Dynamic Columns and Designer Reports - Part Two

DynamicPDF Designer is a powerful graphical editing tool for creating a DLEX XML specification that, when processed, creates a PDF document. You can also programmatically create a DLEX specification to format a report dynamically. Here, we show how to dynamically create a columnar report.
This post is part two of a two-part blog post. In this post, we programmatically add columns to a DLEX from (almost) scratch.
In the last post (Dynamic Columns and Designer Reports - Part One), we modified an existing DLEX file to remove and move columns in an existing DLEX document. But many times, you might wish to create a DLEX programmatically from scratch. Here, we illustrate making a DLEX file dynamically from a bare-bones DLEX document.
Creating and modifying a DLEX from scratch is tedious and error-prone. If possible, you should use DynamicPDF Designer Online.
We start with a bare-bones DLEX file, report-with-cover-page.json, and use the DynamicPDF API C# Client library, available on GitHub or as a NuGet package.
- dotnet-client on GitHub
- DynamicPDF.API on NuGet
- client libraries documentation
We use the client library to create a PDF using the pdf endpoint. We also use Microsoft's System.XML namespace.
Find the files for this post in the samples folder (blog-dynamic-columns-two) if you wish to add the files to your cloud storage space (File Manager - Sample Resources).
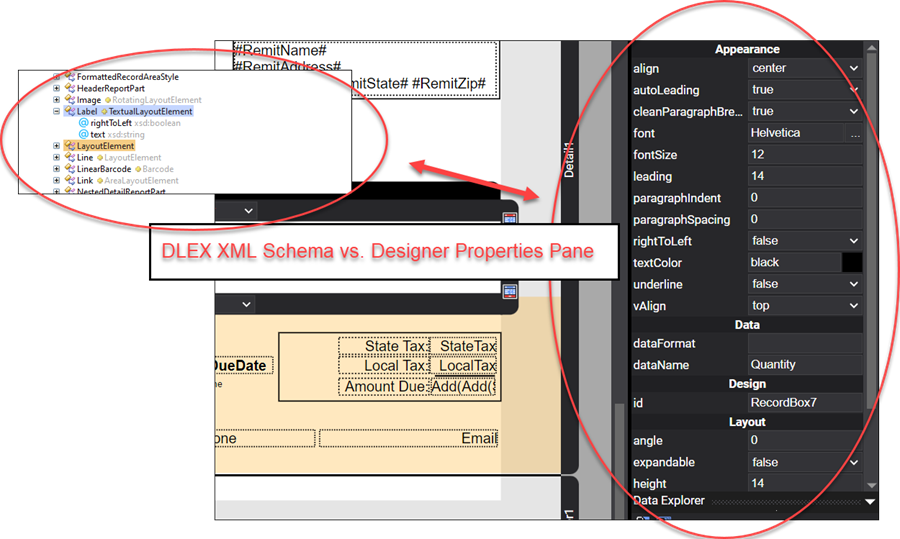
Realize the XSD defining a DLEX is complex. Simply clicking "generate object model" in your language/tool of choice will probably not work. Moreover, the schema has numerous dependencies between schema elements. A much easier solution is to fire up Designer, and in Designer, review the available properties for the element you wish to manipulate programmatically and use that. For example, reviewing a Label element's properties in the XSD requires navigating its dependencies. However, you can quickly identify a Label element's possible attributes when using Designer.
Bare-Bones DLEX File
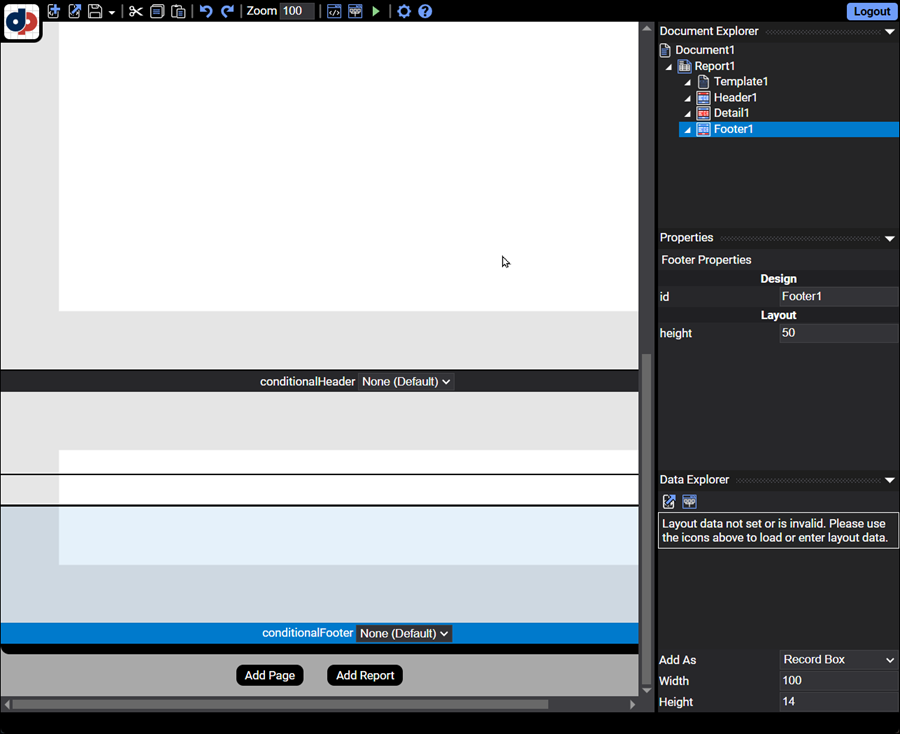
Let's start with a barebones DLEX file in the interest of time. The DLEX file contains a document, page, report, template, header, detail, and footer.
Find the files for this post in the samples folder (blog-dynamic-columns) if you wish adding the files to your cloud storage space (File Manager - Sample Resources). The files used are:
report-with-cover-page.dlex,report-with-cover-page.json.
The DLEX document appears as follows.
<document xmlns="https://www.dynamicpdf.com" xmlns:xsi="http://www.w3.org/2001/XMLSchema-instance" xsi:schemaLocation="https://www.dynamicpdf.com https://www.dynamicpdf.com/schemas/DLEX20.xsd" version="2.0" author="" keywords="" subject="" title="" id="Document1">
  <report id="Report1" dataName="" pageSize="letter" pageOrientation="portrait" leftMargin="50" topMargin="50" rightMargin="50" bottomMargin="50">
    <template id="Template1"/>
    <header id="Header1" height="50"/>
    <detail id="Detail1" autoSplit="false" height="100"/>
    <footer id="Footer1" height="50"/>
  </report>
</document>
Modify the DLEX File
After downloading the DLEX, we can use it locally to modify it programmatically using Visual Studio.
Obtain the source from GitHub in the dotnet-client-examples project. The DynamicPdfColumnsTwo.cs file contains the relevant code.
DynamicColumnsOne Class
The DynamicColumnsTwo class defines the namespace, contentWidth, and padding as constants. It then modifies the DLEX document and processes it by sending it to the pdf endpoint (the details of these tasks are later in this post).
namespace DynamicPdfClientLibraryExamples.Examples
{
    class DynamicColumnsTwo
    {
        private const string nameSpace = "https://www.dynamicpdf.com";

        // content width is document width 612 - left and right margin

        private const int contentWidth = 512;

        // add some padding between columns

        private const int padding = 5;

        public static void Run(string apiKey, string basePath, string outputPath)
        {
            XmlDocument doc = ModifyDlexDocument(basePath + "report-with-cover-page.dlex");

            //Console.WriteLine(Utility.PrettyPrintUtil.PrintXML(doc));

            DynamicColumnsOne.RunDlex(apiKey, basePath, basePath + "report-with-cover-page.json", doc, outputPath + "report-with-cover-page-second-output.pdf");
        }
In the DynamicColumnsTwo class we create a static method named ModifyDlexDocument to modify the DLEX.
Create XmlDocument
In the ModifyDlexDocument method, we create a new instance of XmlDocument and XmlNamespaceManager, load the DLEX file, and then add the labels and columns to the XmlDocument instance.
private static XmlDocument ModifyDlexDocument(string dlexFile)
{

    // create document and add namespace
    XmlDocument doc = new XmlDocument();
    XmlNamespaceManager nsmgr = new XmlNamespaceManager(doc.NameTable);
    nsmgr.AddNamespace("dpdf", nameSpace);

    // load original dlex file into document
    doc.Load(dlexFile);
    // Add column elements then elements in the details
    CreateColumnLabels(doc, nsmgr, 0, 100);
    CreateDetails(doc, nsmgr, 0, 100);
    return doc;
}
The ModifyDlexDocument uses the CreateColumnLabels and CreateDetails methods to actually modify the DLEX.
Create Column Labels
In the CreateColumnLabels method, we use an XPath statement to the header node to place the labels and line as children. We loop through the labels and either call CreateLabel or CreateLine.
private static void CreateColumnLabels(XmlDocument doc, XmlNamespaceManager nsmgr, int x, int width)
{
    string[] columnLabelNames = { "productnamelabel", "qtyperunitlabel", "unitpricelabel", "discontinuedlabel", "line1" };
    string[] columnLabelTexts = { "Product Name", "Qty Per Unit", "Unit Price", "Discontinued" };

    // get the header node to append the labels and line
    string xpathExpression = xpathExpression = "//dpdf:header";
    XmlNode headerNode = doc.DocumentElement.SelectSingleNode(xpathExpression, nsmgr);

    // loop through names and add the label id and name
    for (int i = 0; i < 5; i++)
    {
        XmlElement labelElement = null;
        // first 3 labels are productnamelabel, qtyperunitlabel, unitpricelabel, and dicontinuedlabel
        // the else condition is the line1

        if (i < 4)
        {
            labelElement = CreateLabel(doc, columnLabelTexts[i], width);
            if (i < 3)
            {
                if (i < 2)
                {
                    labelElement.SetAttribute("align", "left");
                }
                else
                {
                    labelElement.SetAttribute("align", "right");
                }
                labelElement.SetAttribute("x", x.ToString());
                x += (width + padding);
            }
            else
            {
                labelElement.SetAttribute("x", (contentWidth - width).ToString());
                labelElement.SetAttribute("align", "center");
            }
        }
        else
        {
            // create a line under the labels
            labelElement = CreateLine(doc);
        }

        // all elements have an id property

        labelElement.SetAttribute("id", columnLabelNames[i]);

        // append the element as a child of header

        headerNode.AppendChild(labelElement);
    }
}
Create Label
The CreateLabel method creates a new XmlElement with the appropriate attributes and returns the XmlElement instance to CreateColumnLabels.
private static XmlElement CreateLabel(XmlDocument doc, string labelText, int width)
{
    XmlElement labelElement = doc.CreateElement("label", nameSpace);
    labelElement.SetAttribute("text", labelText);
    labelElement.SetAttribute("font", "TimesBold");
    labelElement.SetAttribute("fontSize", "11");
    labelElement.SetAttribute("underline", "false");
    labelElement.SetAttribute("height", "14");
    labelElement.SetAttribute("width", width.ToString());
    labelElement.SetAttribute("y", "1");
    return labelElement;
}
Create Line
The CreateLine method creates a new XmlElement and adds attributes applicable to a line.
private static XmlElement CreateLine(XmlDocument doc)
{
    XmlElement lineElement = doc.CreateElement("line", nameSpace);
    lineElement.SetAttribute("x1", "0");
    lineElement.SetAttribute("y1", "15");
    lineElement.SetAttribute("x2", "512");
    lineElement.SetAttribute("y2", "15");
    return lineElement;
}
Create Details
The CreateDetails method first gets the detail node using XPath. It then loops through the columns to create and adds them as children to the detailNode.
private static void CreateDetails(XmlDocument doc, XmlNamespaceManager nsmgr, int x, int width)
{
    string[] columnDetaillNames = { "productnamebox", "qtyperunitbox", "unitpricebox", "discontinuedsymbol" };
    string[] columnDetailFieldNames = { "ProductName", "QuantityPerUnit", "UnitPrice", "Discontinued" };

    // get the detail node to append elements

    string xpathExpression = "//dpdf:detail";
    XmlNode detailNode = doc.DocumentElement.SelectSingleNode(xpathExpression, nsmgr);

    // create the rectangle to add every other row color

    XmlElement fieldElement = CreateRectangle(doc, x);
    detailNode.AppendChild(fieldElement);

    // loop through columnDetailFieldNames

    for (int i = 0; i < 4; i++)
    {
        // if productnamebox, qtyperunitbox, unitpricebox otherwise discontinuedsymbol
        if (i < 3)
        {
            // create new element

            fieldElement = CreateRecordBox(doc, columnDetailFieldNames[i], x);

            // if productnamebox or qtyperunitbox otherwise its the unitpricebox

            if (i < 2)
            {
                fieldElement.SetAttribute("align", "left");
                fieldElement.SetAttribute("expandable", "true");
            }
            else
            {
                fieldElement.SetAttribute("align", "right");
                fieldElement.SetAttribute("expandable", "false");
                fieldElement.SetAttribute("dataFormat", "$0.00##");
            }

            // move x by width and padding

            x += (width + padding);
        }
        else
        {
            // discontinuedsymbol is a symbol not a recordbox so create a symbol node
            fieldElement = CreateSymbol(doc, x, width);
        }

        // all elements have an id, height, width and y

        ModifyFieldElement(fieldElement, width, columnDetailFieldNames[i]);

        //append the created node to the detail node

        detailNode.AppendChild(fieldElement);
    }
}
The CreateDetails method uses the CreateSymbol, CreateRecordBox, CreateRectangle, and ModifyFieldElement methods to create/modify the actual XmlElement instances.
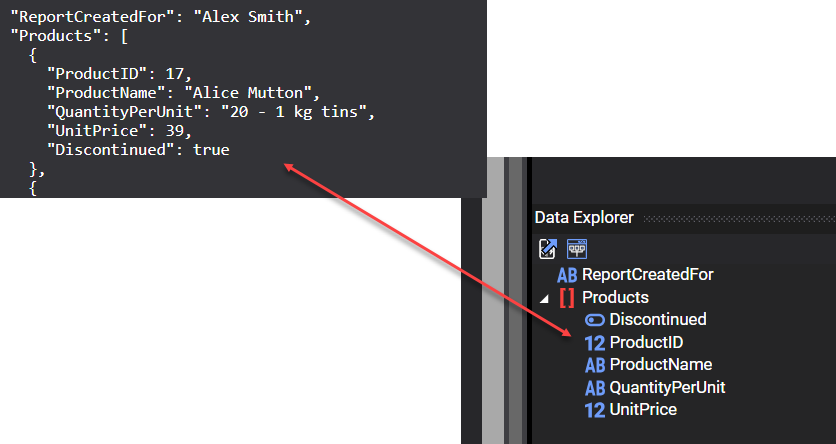
Recall the element names in the JSON data and their corresponding names for data columns in the DLEX.
Create Symbol
The CreateSymbol creates a symbol element. Notice the visibilityCondition expression, which ensures the symbol is displayed if the JSON data indicates a Product is discontinued (Discontinued is the JSON field's name).
private static XmlElement CreateSymbol(XmlDocument doc, int x, int width)
{
    XmlElement fieldElement = doc.CreateElement("symbol", nameSpace);
    fieldElement.SetAttribute("x", (contentWidth - width).ToString());
    fieldElement.SetAttribute("visibilityCondition", "EQ(Discontinued,1)");
    return fieldElement;
}
Create Record Box
The CreateRecordBox method creates nodes for the required record boxes. Note the dataName attribute corresponds to the data element's name in the JSON data.
private static XmlElement CreateRecordBox(XmlDocument doc, string dataName, int x)
{
    XmlElement fieldElement = doc.CreateElement("recordBox", nameSpace);
    fieldElement.SetAttribute("font", "TimesBold");
    fieldElement.SetAttribute("fontSize", "11");
    fieldElement.SetAttribute("underline", "false");
    fieldElement.SetAttribute("x", x.ToString());
    fieldElement.SetAttribute("autoLeading", "true");
    fieldElement.SetAttribute("splittable", "false");
    fieldElement.SetAttribute("dataName", dataName);
    return fieldElement;
}
Create Rectangle
The CreateRectangle method creates a lightly shaded blue line for all even data rows. Note above that the rectangle node must be placed after the other detail nodes to ensure it is displayed below the other elements. Otherwise it will obscure the data values.
 private static XmlElement CreateRectangle(XmlDocument doc, int x)
{
     XmlElement fieldElement = doc.CreateElement("rectangle", nameSpace);
     fieldElement.SetAttribute("id", "rectangle1");
     fieldElement.SetAttribute("x", x.ToString());
     fieldElement.SetAttribute("y", "1");
     fieldElement.SetAttribute("width", contentWidth.ToString());
     fieldElement.SetAttribute("height", "15");
     fieldElement.SetAttribute("borderColor", "lightBlue");
     fieldElement.SetAttribute("fillColor", "lightBlue");
     fieldElement.SetAttribute("showAlternateRow", "even");

     return fieldElement;
 }
Create Modify Field Elements
The ModifyFieldElement is a convenience method that adds common attributes for several of the created field nodes.
private static void ModifyFieldElement(XmlElement fieldElement, int width, string id)
{
    fieldElement.SetAttribute("id", id);
    fieldElement.SetAttribute("height", "14");
    fieldElement.SetAttribute("width", width.ToString());
    fieldElement.SetAttribute("y", "1");
}
Create DLEX Processing Method
After modifying the DLEX document we create the PDF using the RunDlex method. The RunDlex method sends the layout data and DLEX file to the pdf endpoint and returns the created PDF as binary.
public static void RunDlex(string apiKey, string basePath, string layoutDataPath, XmlDocument doc, string outputPath)
{
    Pdf pdf = new Pdf();
    pdf.ApiKey = apiKey;

    LayoutDataResource layoutDataResource = new LayoutDataResource(layoutDataPath);

    DlexResource dlexResource = new DlexResource(Encoding.Default.GetBytes(doc.OuterXml));

    pdf.AddAdditionalResource(basePath + "NorthwindLogo.gif");
    pdf.AddDlex(dlexResource, layoutDataResource);

    PdfResponse pdfResponse = pdf.Process();

    if (pdfResponse.IsSuccessful)
    {
        File.WriteAllBytes(outputPath, pdfResponse.Content);
    }
    else
    {
        Console.WriteLine(pdfResponse.ErrorJson);
    }
}
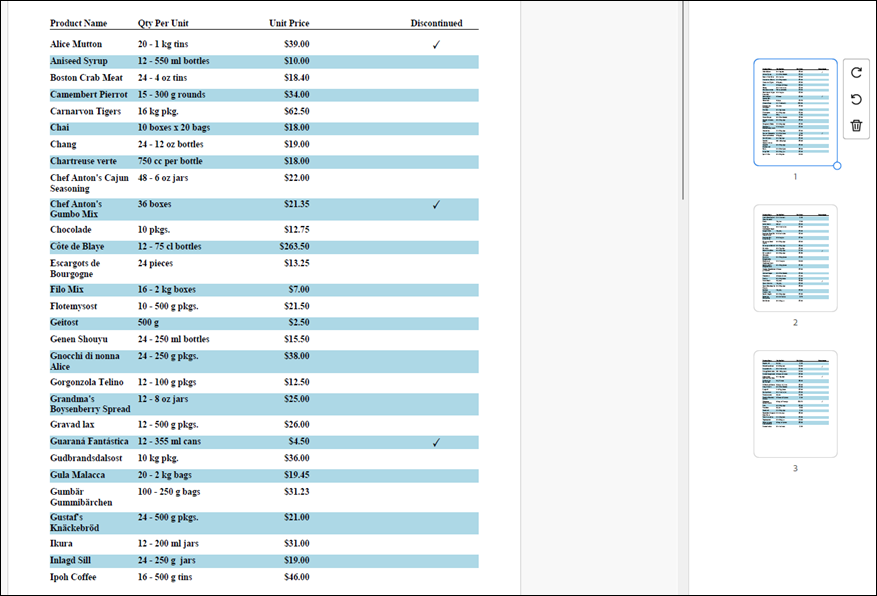
The report is created dynamically from the DLEX byte stream used in the RunDlex method above. The resulting PDF appears as expected.
Tips
The above might make it seem that modifying a DLEX document is a simple process; it's not. It can be challenging to change and debug a DLEX document programmatically. Here are some tips for making editing your DLEX easier.
- Use Designer's Properties panel rather than the XSD to determine an element's attribute names.
- Test the DLEX document incrementally and often. Upload the document to cloud storage using the File Manager and open the DLEX in Designer. Testing the DLEX document's appearance in Designer will help ensure your modifications are valid.
- While modifying the DLEX, use a method to print the produced DLEX to the console so you can quickly see the DLEX document created.
- When finished, upload the DLEX document to cloud storage using the File Manager, upload a sample JSON dataset, and test the produced PDF.
If you follow these tips, debugging your modified DLEX document will go much smoother.
GitHub Example
The complete GitHub example is in the dotnet-client-examples solution.
![]()