Subreports Using Designer
Here at DynamicPDF, we have noticed several clients needing help distinguishing if they should use a Subreport rather than a ConditionalHeader or ConditionalFooter. ConditionalHeader elements and ConditionalFooter elements are convenient ways to add top-level information or column headers to a report. However, when you need to display substantial data in a header or footer, often the better choice is to use a Subreport. Here, we create a report illustrating why you might consider using a Subreport rather than a ConditionalHeader or ConditionalFooter.
The PDF in Figure 1 consists of a hypothetical invoice with billing information, a listing of ordered products, and an invoice total. Notice the final report features of the produced PDF (not the DLEX file).
- The header is large and on the first page only.
- The footer is large on the last page only.
- The footer's details are just below the last product line, while the page footer is at the page's bottom.
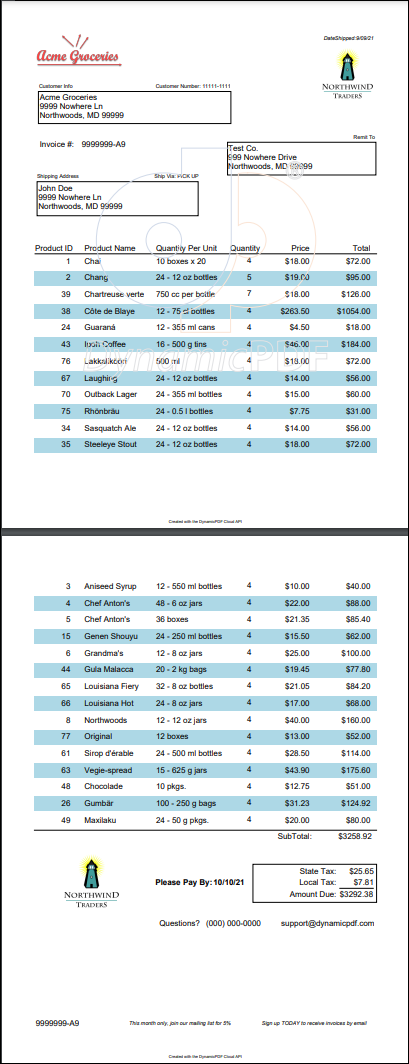
Figure 1. Hypothetical product invoice illustrating a report with a sub-report using DynamicPDF Designer.
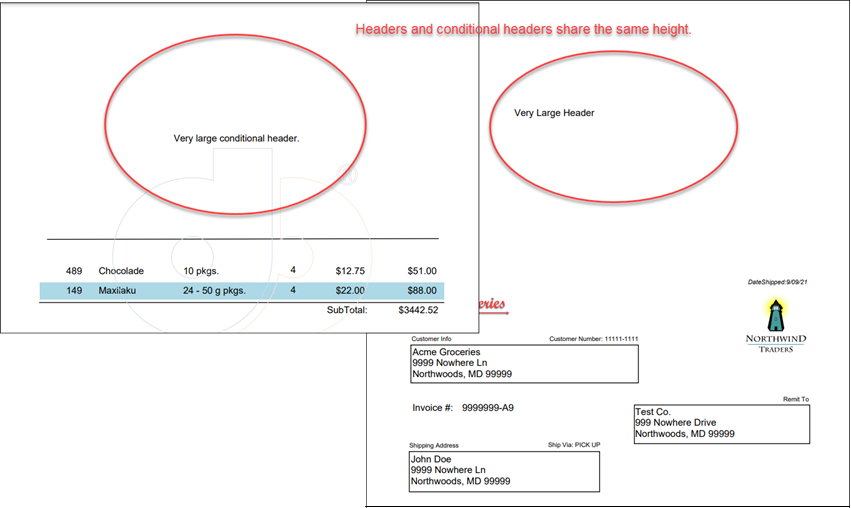
Creating the report in Figure 1 is practically impossible to reproduce using a ConditionalHeader or ConditionalFooter. This impossibility is because a ConditionalFooter element's height is the same as the footer's height (more on this later). By using Subreport we can avoid this header and footer limitation and create a report more aligned with how we wish the PDF to appear.
Before we review the DLEX report, let's first review the report's JSON data.
JSON Data
The following JSON illustrates a typical invoice containing top-level data related to the invoice, followed by a list of products bought by a customer. Refer to the sample project for the complete JSON listing.
{
    "RemitName": "Test Co.",
---SNIP---
    "ShipToZip": "99999",
---SNIP---
	 "Products":
	 [
	   {
          "ProductID": 1,
          "ProductName": "Chai",
          "QuantityPerUnit": "10 boxes x 20 bags",
          "UnitPrice": 18,
          "Quantity":4,
          "Discontinued": false
        },
        {
          "ProductID": 2,
          "ProductName": "Chang",
          "QuantityPerUnit": "24 - 12 oz bottles",
          "UnitPrice": 19,
          "Quantity":5,
          "Discontinued": false
        },
 ---SNIP--
	]
}
Based on the above JSON, your first instinct might be to put invoice details in a report's header and footer, as Figure 2 illustrates. However, this leads to several formatting issues not discussed here due to space constraints.
Resizing a header or footer also resizes any conditional headers or conditional footers to the same size as the header or footer. Designer does not support different sizes. This means all headers and footers, not just the first or second page, have the same size.
Instead, embed a Subreport in the report's Detail section where the unnamed top-level elements are used in the Detail section. In contrast, the Products records are used in the Subreport element's Detail section.
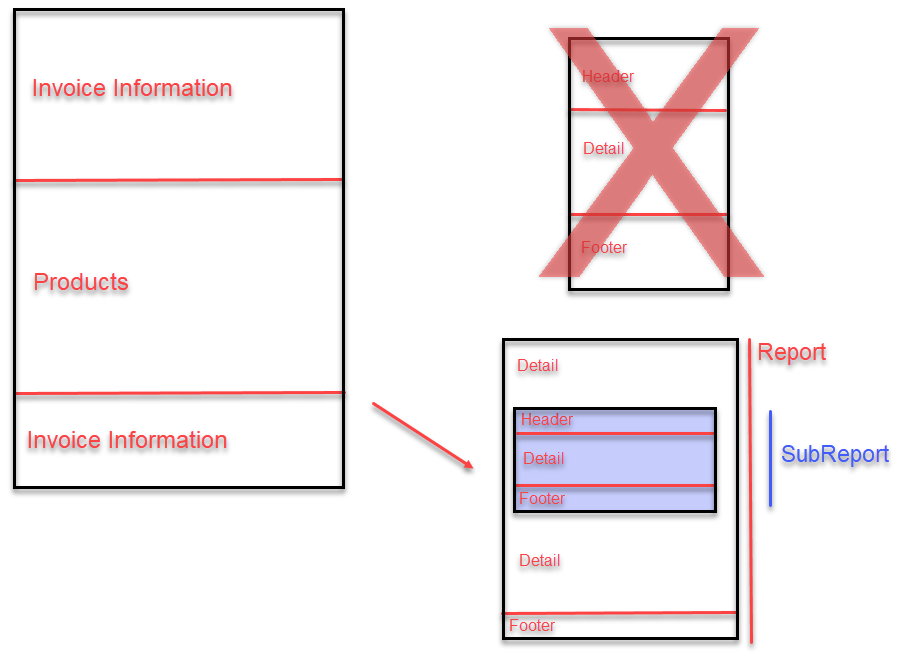
Figure 2. Layout of Report and Subreport in a DLEX file.
Headers and footers are designed for simple metadata associated with records, for example, column headers. Header and footers are not intended for much information, such as an invoice's shipping and billing data.
Let's create a DLEX report that mitigates the problems of using conditional headers and conditional footers to create reports.
DLEX Report
The solution to the header/footer problem outlined above is fixed by using a Subreport. The report used in this post consists of the following:
- a Detail section with an embedded Subreport,
- invoice information in the top and bottom portions of the Report Detail,
Productlisting in the Subreport Detail, product listing column headings in the Subreport Header as a ConditionalHeader,- product listing
Subtotalin the Subreport Footer as a ConditionalFooter, - and more invoice information in the Report Footer as a ConditionalFooter.
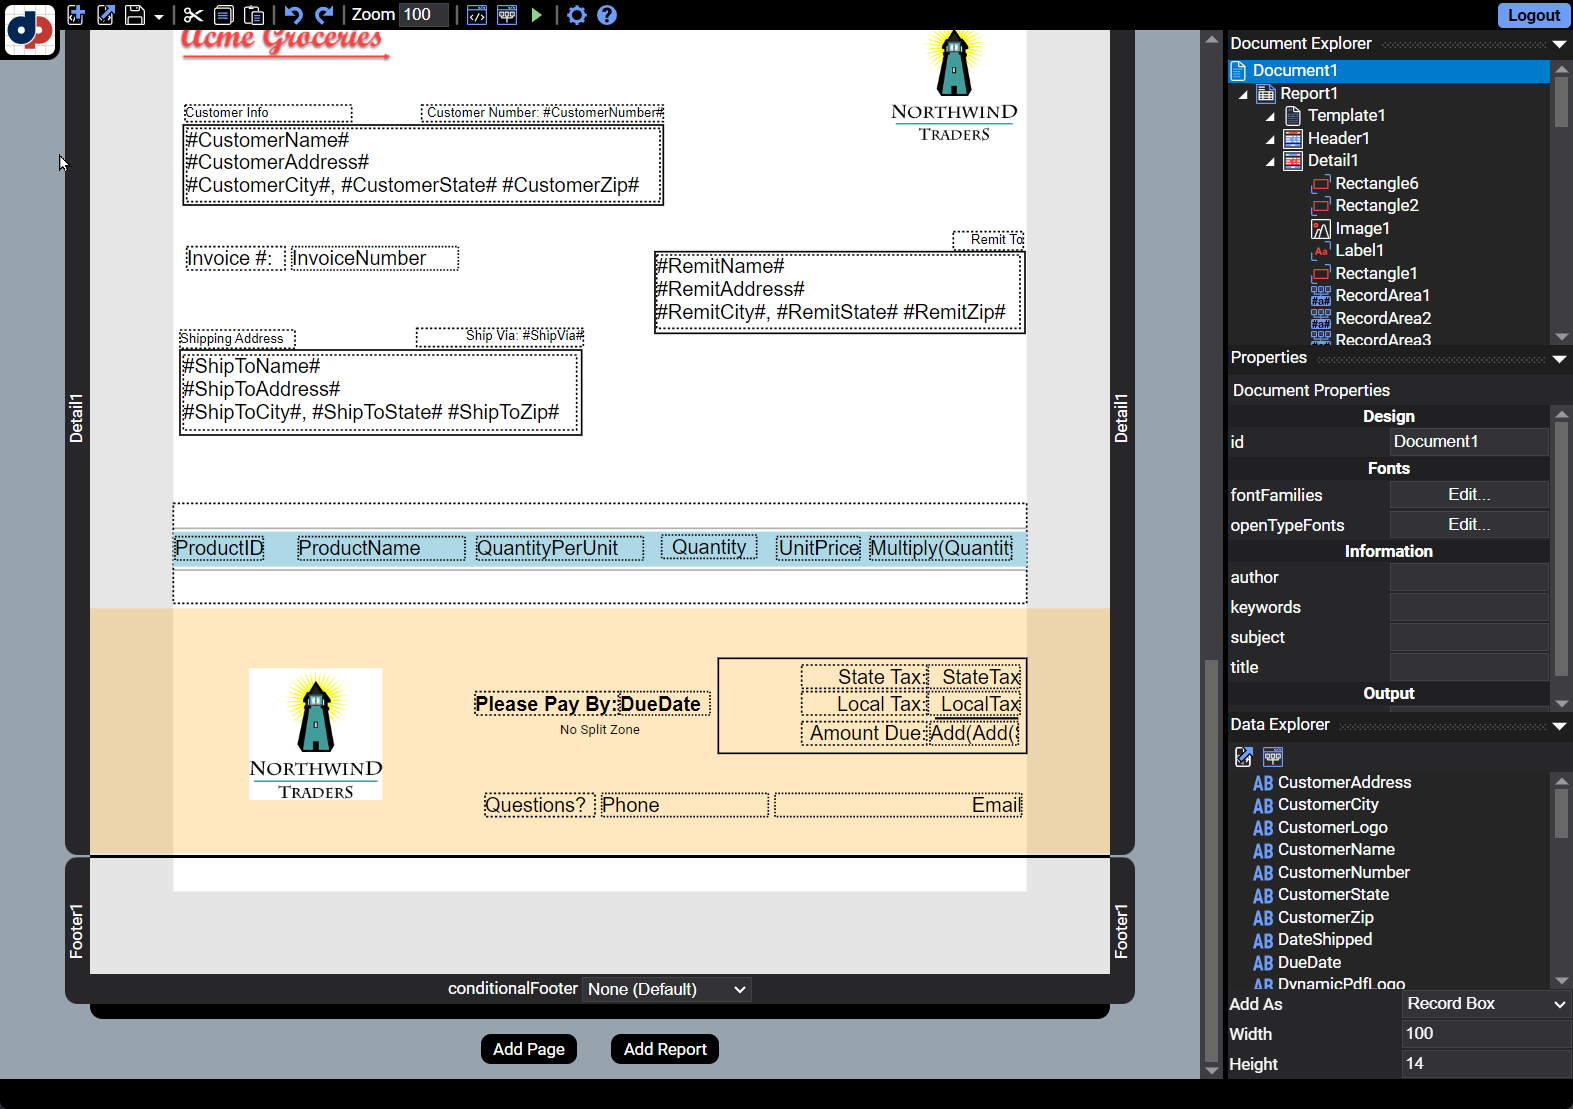
Figure 3. Report design for hypothetical invoice.
Example Files
You can access the sample files used in this posting by getting the blog-subreport folder in the Samples folder in Manage Resources.
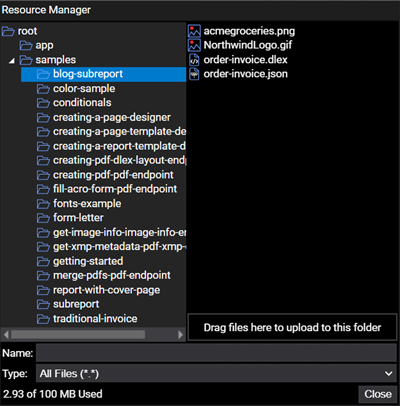
Figure 4. The blog-subreport folder in the File Manager.
Report Resize
Open the DLEX file in Designer, select the Report, and notice the Layout properties. The first thing we did was resize the report to the appropriate width and height and allow the margins to remain at their default values (Figure 5).
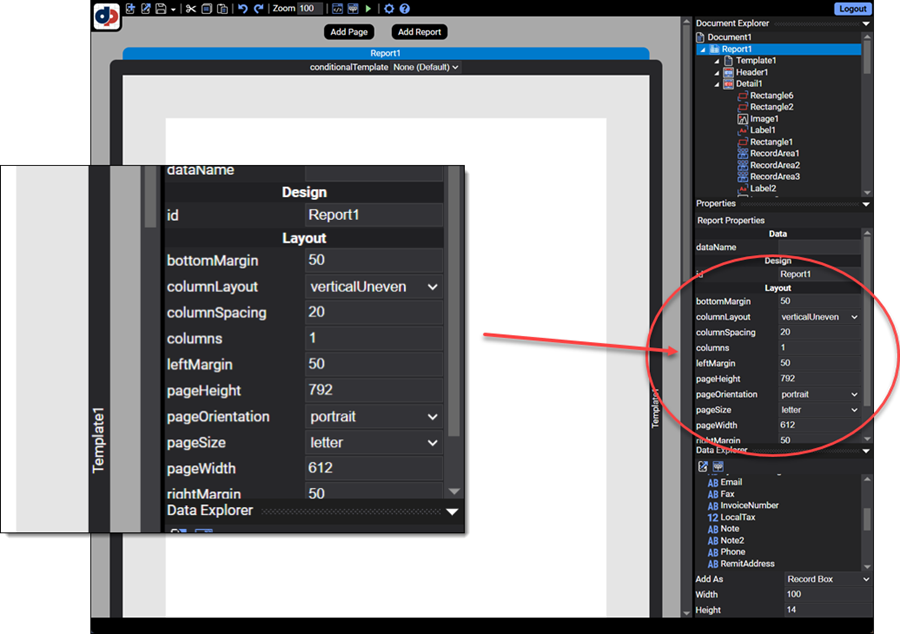
Figure 5. Resizing a Report to the desired dimensions.
Pay attention to a document's margins, as incorrectly sized margins can result in reports that print incorrectly.
After adding the report we formated its header, footer, and details.
Header (Report)
The Report doesn't display any header information, so the header's height was set to zero, making the header invisible in the printed report.
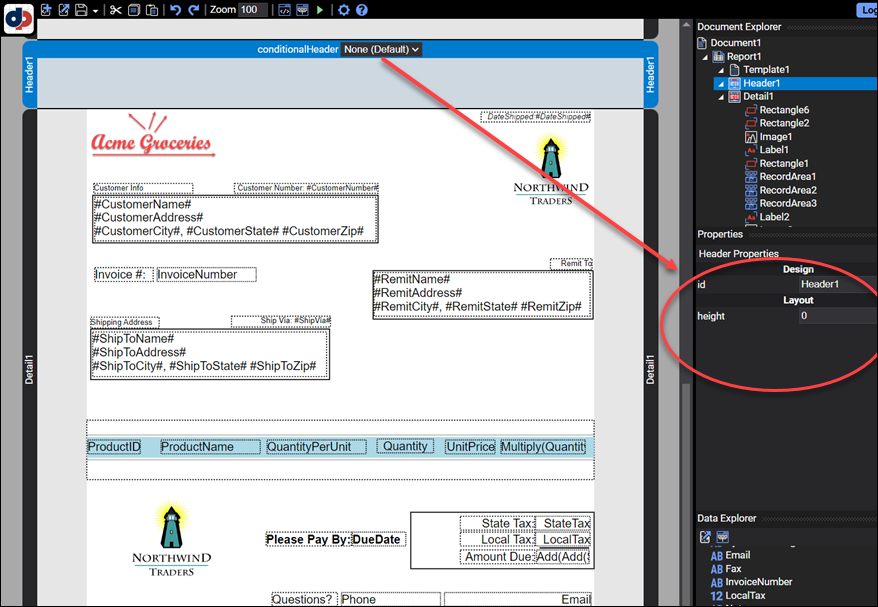
Figure 6. Setting the Header to zero.
Detail (Report)
The Detail section was resized sufficiently large to display all the information needed as the report's header. The top-level JSON data was placed in the Detail section.
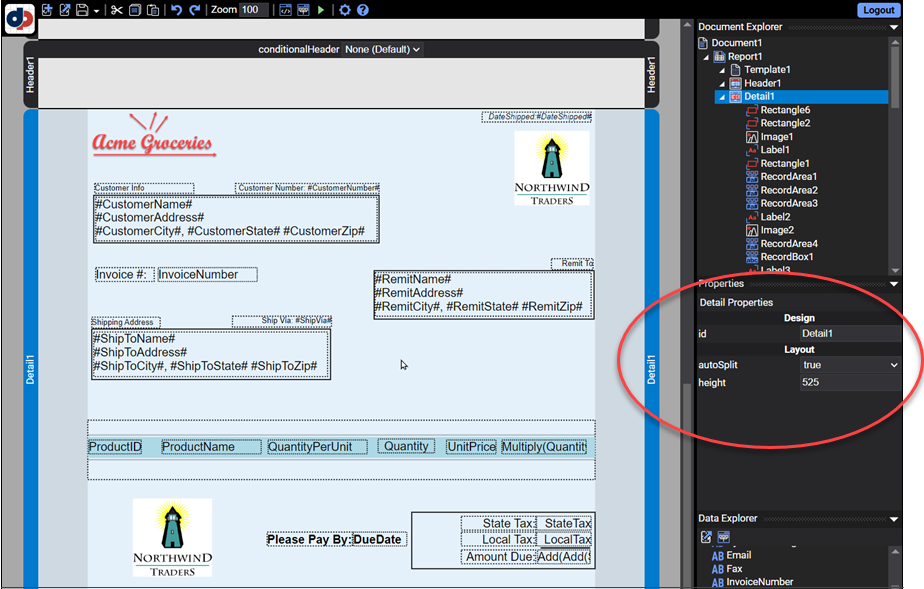
Figure 7. Resizing the Detail section of Report.
The "header" information is contained in the report's Detail section not a ConditionalHeader.
The Detail section also contains footer information; however, between the top of the Detail and its bottom we first placed a Subreport that contains the Products.
Subreport
We added a Subreport to the Detail section and then added the Products array items to the Detail section of the Subreport. We assigned Products to the Subreport element's dataName property.
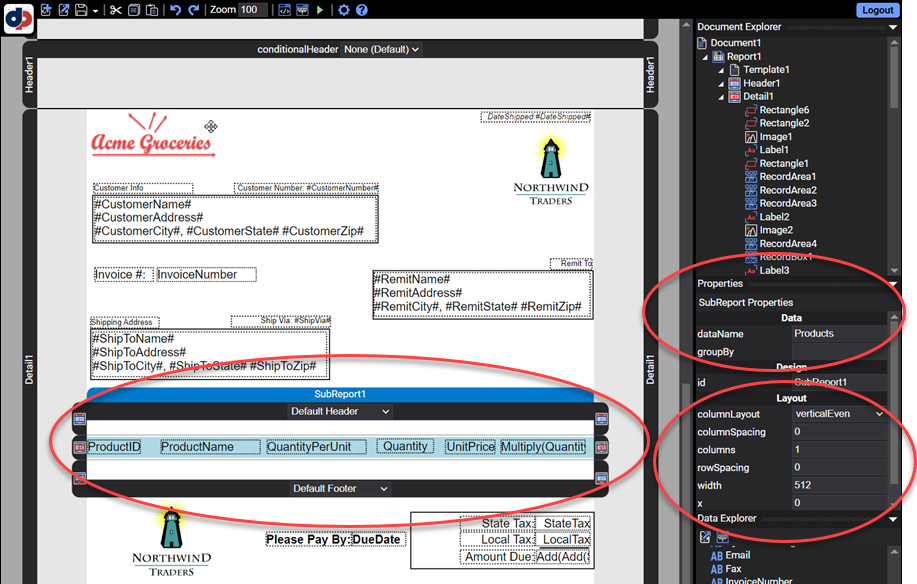
Figure 8. The line items are contained in a Subreport.
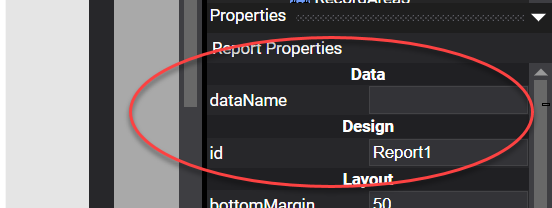
The main Report element's dataName property was left blank, as the JSON's top-level data is unnamed.
Conditional Header (Subreport)
We added column headings to a ConditionalHeader in the Subreport and specified the condition as FirstPage.
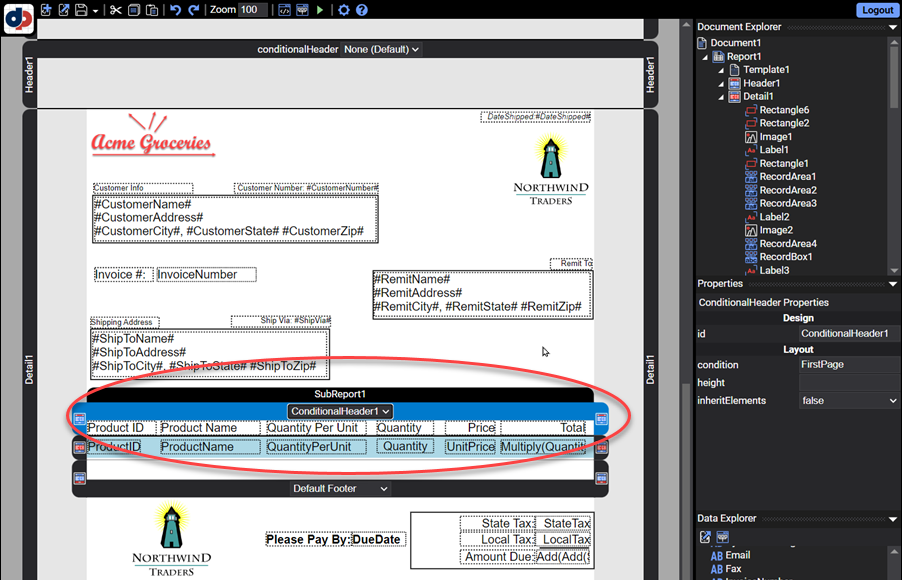
Figure 9. The Subreport has a ConditionalHeader.
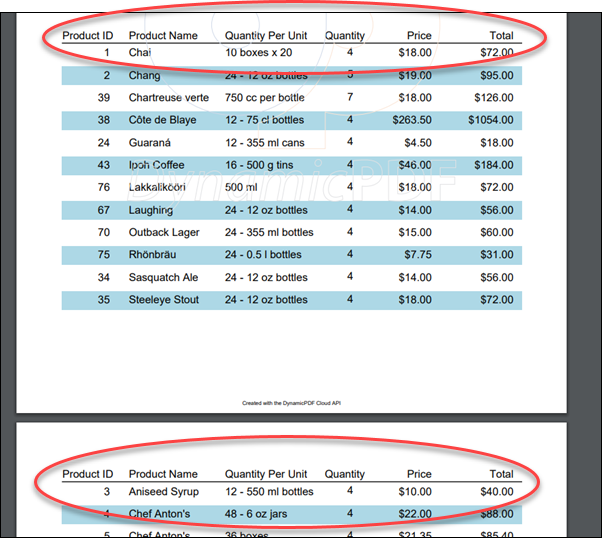
If we wanted the column headings to repeat on every page of data we would have added the columns to the Header and not created a ConditionalHeader.
Details (Subreport)
The Detail section of the Subreport contains the items in the JSON's Products array.
"Products":
[
	{
        "ProductID": 1,
        "ProductName": "Chai",
        "QuantityPerUnit": "10 boxes x 20 bags",
        "UnitPrice": 18,
        "Quantity":4,
        "Discontinued": false
    },
    {
        "ProductID": 2,
        "ProductName": "Chang",
        "QuantityPerUnit": "24 - 12 oz bottles",
        "UnitPrice": 19,
        "Quantity":5,
        "Discontinued": false
     },
--- snip ---
 ]
}
The ProductID, ProductName, QualityPerUnit, Quantity, UnitPrice from the Products array were added to the Subreport element's Detail section.
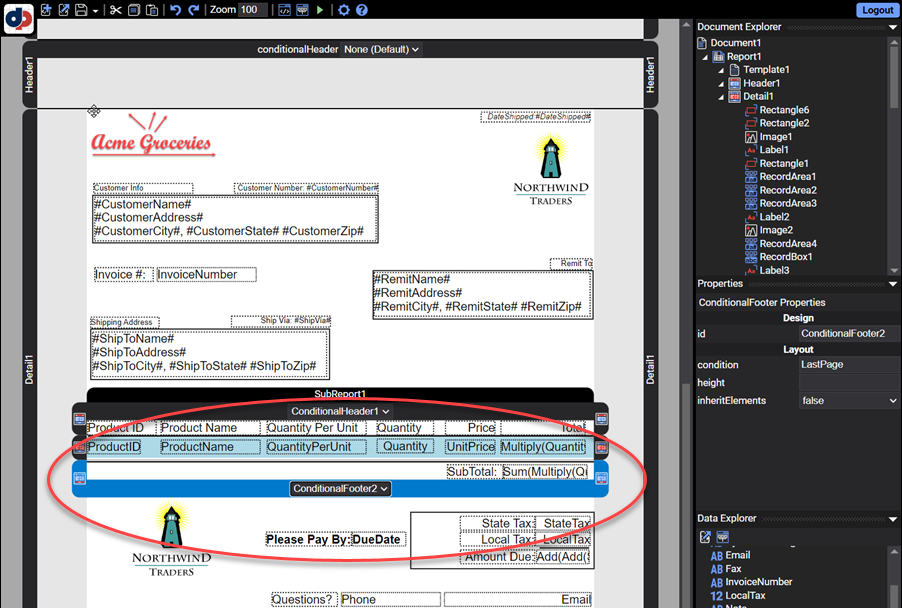
Figure 10. The Detail section's data elements.
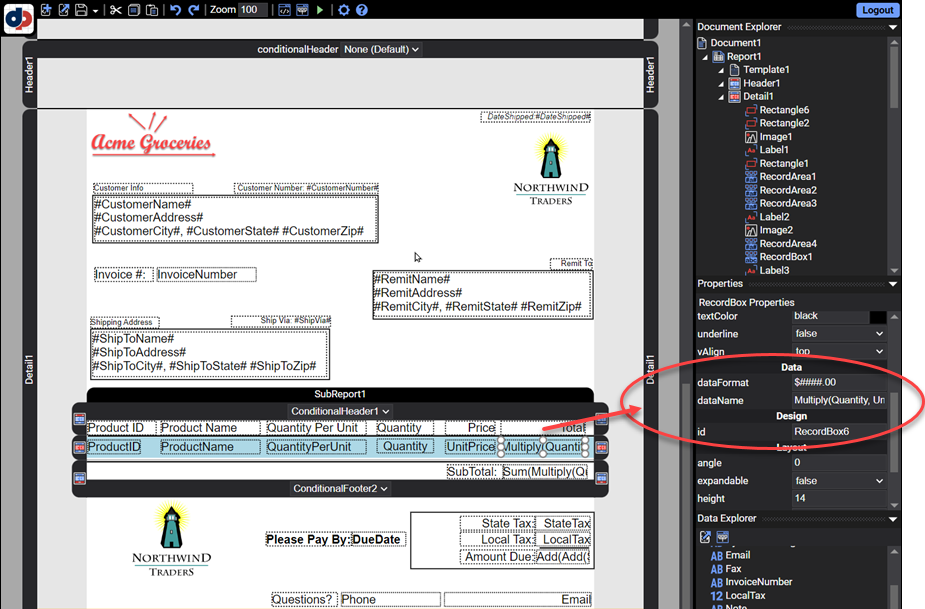
Note that the total is a calculated value: Multiply(Quantity, UnitPrice) formatted as a number $####.00.
Subtotal (Subreport)
We also created a ConditionalFooter in the Subreport that contains the product's subtotal Sum(Multiply(Quantity,UnitPrice)).
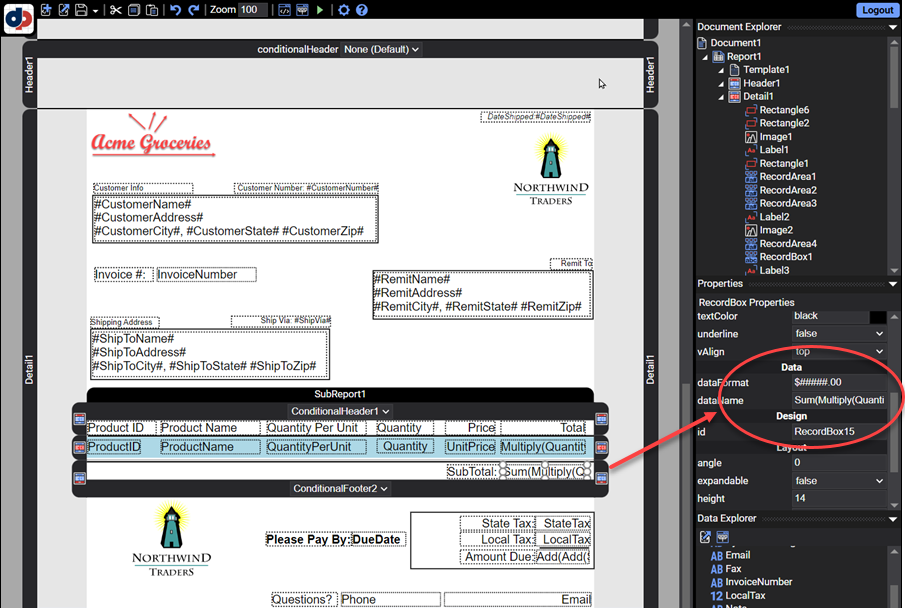
Figure 11. The Subreport contains a ConditionalFooter.
Total (Report)
The Detail section also contains the state tax, local tax, and a total: Add(Add(Sum(Multiply(Quantity,UnitPrice), SubReport1), StateTax),LocalTax). Because Quantity, and UnitPrice come from the Products array, while the total is in the report's Detail section, we specified the Subreport element's id Add(Sum(Multiply(Quantity,UnitPrice), SubReport1).
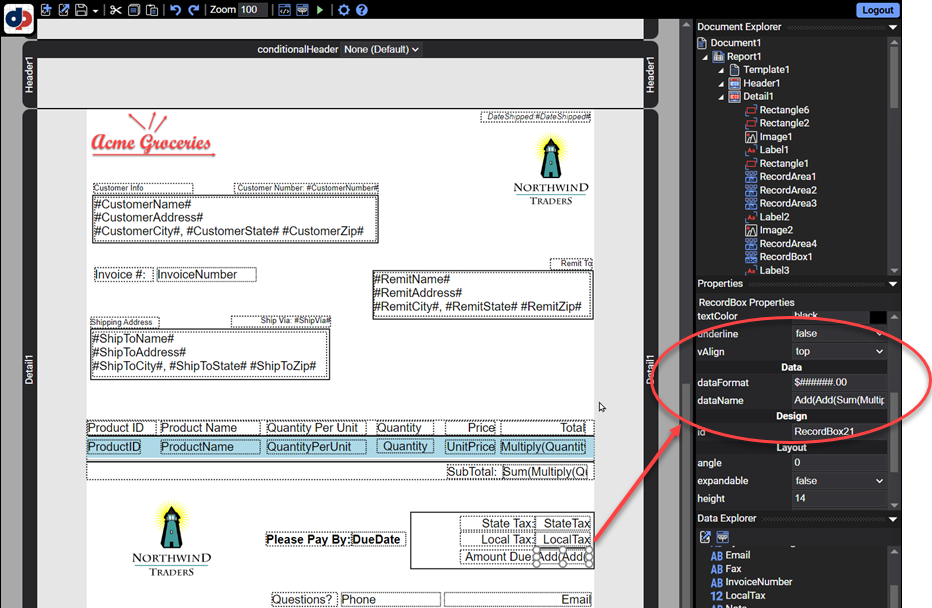
Figure 12. The total in the report's Detail.
No Split Zone (Report)
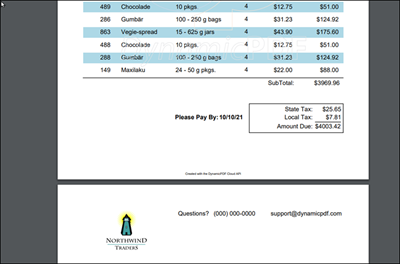
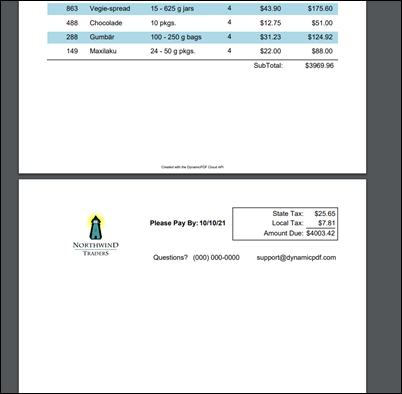
We then added a NoSplitZone to ensure that the footer details are kept together regardless of the height of the details in the Subreport.

Figure 13. The NoSplitZone prevents page splits between elements.
If we had not used a NoSplitZone, then the footer details might split inappropriately rather than keeping the footer details together.
Conditional Footer (Report)
Finally, we added a ConditionalFooter to the main report, as we wished the footer to only appear on the last page and only on the page's very bottom.
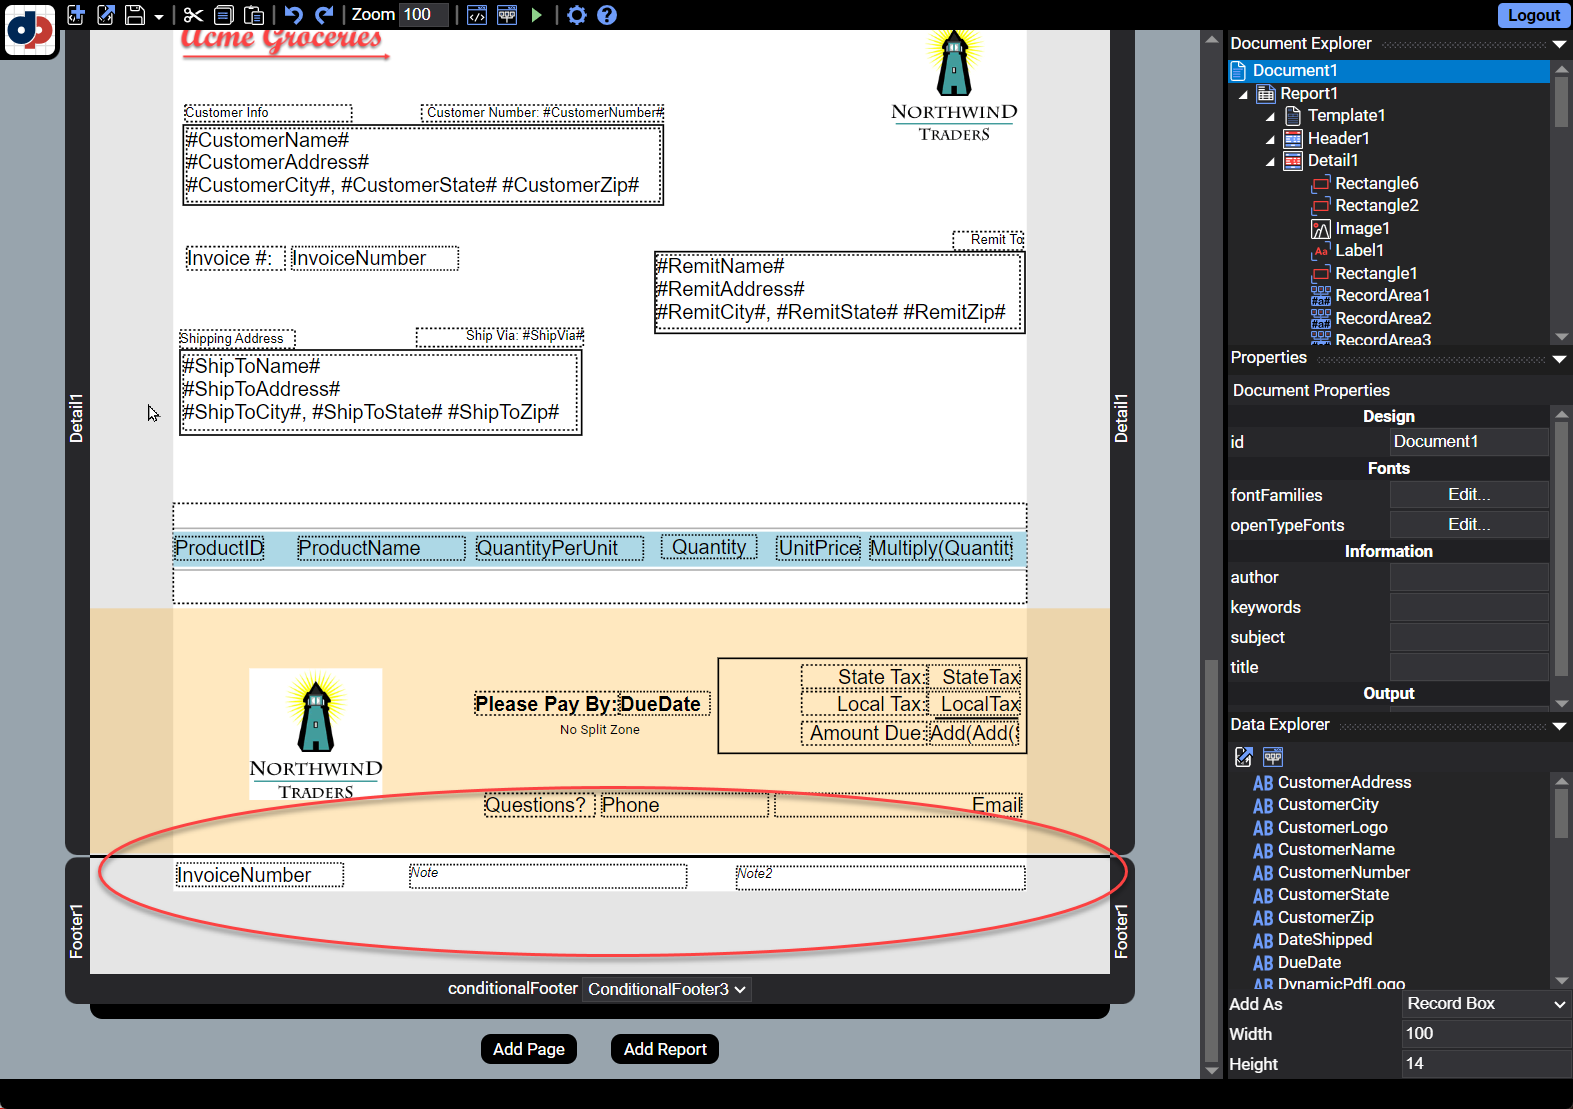
Figure 14. A ConditionalFooter on the last page of a report.
When running the report we obtain the expected results. The first page has a large header containing the invoice top-level information, followed by the data, followed by the billing total information. To ensure the billing information remained together, we placed it in a NoSplitZone. Finally, we added the footer information in a ConditionalFooter.

Figure 15. The final formatted PDF report.
Discussion
The next time you create a report with data in the report's header and footer, consider using a Subreport rather than a ConditionalHeader or a ConditionalFooter. Refer to the blog-subreport project in the Samples in the File Manager for the complete source for this blog post.
Refer to the following tutorials for more information that illustrating using Designer to create rich PDF reports.
- Getting Started
- Create a Page
- Create a Report
- Create a Subreport
- Create a Page Using a Template
- Create a Report With a Template
