Completing an AcroForm
The DynamicPDF API provides an easy way you can complete pre-existing PDF forms. In this tutorial, you complete a PDF Acroform using the pdf endpoint.
Before beginning, we assume you already have a rudimentary understanding of Adobe forms. To create a form, you would use a product such as Adobe Acrobat Pro to create a PDF and add form fields that end users can then add values to and save as a completed form. But you can also complete a form programmatically.
Adobe provides a good introduction to Acroforms (PDF forms basics).
In today's world, it seems nobody completes paper forms anymore. Instead, they download a PDF form and complete it in Adobe Acrobat and then save the completed form. However, organizations often automate completing a form programmatically rather than requiring a person to fill out the form manually. This tutorial uses the DynamicPDF API's pdf endpoint to fill out a PDF form. We first use the pdf endpoint directly as a POST request using cURL. We then use one of the DynamicPDF API's client libraries.
Adobe PDF Acroforms
Let's demonstrate how to automate filling out an Acroform using the pdf endpoint. We show using the pdf endpoint to complete the first ten fields of the IRS W-9 (Request for Taxpayer Identification Number and Certification) form - fw9AcroForm_18.pdf.
Required Resources
To complete this tutorial, you must add the Fill an Acroform sample to your samples folder in your cloud storage space using the File Manager. After adding the sample resources, you should see a samples/fill-acro-form-pdf-endpoint folder containing the resources for this tutorial.
| Sample | Sample Folder | Resources |
|---|---|---|
| Fill an Acroform | samples/fill-acro-form-pdf-endpoint | fw9AcroForm_18.pdf, instructions.json |
- From the File Manager, download
fw9AcroForm_18.pdfandinstructions-acroform.jsonto your local system; here we assume/temp/dynamicpdf-api-samples/fill-acro-form. - After downloading, delete
instructions.jsonfrom your cloud storage space using the File Manager.
| Resource | Cloud/Local |
|---|---|
fw9AcroForm_18.pdf | cloud |
instructions.json | local |
See Sample Resources for instructions on adding sample resources.
Obtaining API Key
This tutorial assumes a valid API key obtained from the DynamicPDF API's Portal. Refer to the following for instructions on getting an API key.
If you are not familiar with the File Manager or Apps and API Keys, refer to the following tutorial and relevant Users Guide pages.
W9 Form Example
Let's review the form we wish to fill-out with values. The following is the W-9 tax form. It contains several fields that you can complete after opening the PDF which you can then save as a new, completed PDF.

Figure 1. IRS W9 form PDF.
In this tutorial we will use the following subset of fields to illustrate using the pdf endpoint to complete a W9 form. The fields we use are as follows.
topmostSubform[0].Page1[0].f1_1[0]
topmostSubform[0].Page1[0].f1_2[0]
topmostSubform[0].Page1[0].Address[0].f1_7[0]
topmostSubform[0].Page1[0].Address[0].f1_7[0]
topmostSubform[0].Page1[0].Address[0].f1_8[0]
topmostSubform[0].Page1[0].f1_9[0]
topmostSubform[0].Page1[0].f1_10[0]
topmostSubform[0].Page1[0].EmployerID[0].f1_14[0]
topmostSubform[0].Page1[0].EmployerID[0].f1_15[0]
If you do not have access to a PDF's fields using Adobe Acrobat, note that you could get these fields using the pdf-info endpoint. See Extract PDF Metadata Using the pdf-info Endpoint.
Calling API Directly Using POST
Completing a form and saving it as a new PDF requires using the pdf endpoint. The pdf endpoint uses an instructions JSON document you send to the endpoint. The endpoint then processes the instructions to create the resultant PDF. When you call the pdf endpoint directly, you must create an instructions document. When you use one of the DynamicPDF client libraries, then the client library hides the complexities of creating the instructions document from you.
Let's call the endpoint directly using an instructions document. But first, we examine the schema for creating an instructions document and then create the document.
Create JSON Instructions
A JSON Instructions document tells the pdf endpoint how to create a PDF. To generate the JSON instructions, you need to know the task you wish to perform. Here, we want to fill out a PDF form, so we must know the field names.
- Obtain the list of field names for the PDF form you wish to create.
After obtaining the field names, we create the JSON instructions. However, before we do, let's briefly examine the relevant portions of the schema used to construct the instructions document for this tutorial.
Review the JSON Schema
- Open the JSON schema at https://www.dynamicpdf.com/schemas/pdf.instructions.schema.json. Refer Instructions Schema Diagram if you prefer to view a visual representation of the schema.
Refer to JSON Instructions Schema in the Users Guide for more details on the Instructions schema.
- Notice a the schema's
typeproperty that takes adlex,pdf, orimageas an enumeration. Because we want to complete a PDF that is a form, we assign the type aspdf.
"type": "array",
"items": {
	"type": "object",
    "properties": {
    "type": {
    	"type": "string",
        "enum": [ "dlex", "pdf", "image", "multipageTiff" ]
   	},
- Also notice the
formFieldsarray field used to specify each form field.
  "formFields": {
    "type": "array",
    "items": {
      "type": "object",
      "properties": {
        "name": {
          "type": "string"
        },
        "value": {
          "type": "string"
        },
        "flatten": {
          "type": "boolean"
        },
        "remove": {
          "type": "boolean"
        }
      }
    }
  },
Filling out a form requires creating instructions containing the resource type (PDF) and its filename and the field names.
Note that using one of the DynamicPDF API's client libraries allows you to avoid creating an instructions document.
Create Instructions Document
- Create the following JSON instructions for filling out the form.
- Add the reference to the schema, the
author, andtitleas top-level fields. - Add an array named
inputsthat contains the input'stype,resourceName,startPage, andpageCount. - Add another array named
formFieldsand for each form field on the PDF, add an element with the field name and field value. - First specify the reference to the schema and then determine the metadata to capture.
  "$ref": "https://www.dynamicpdf.com/schemas/pdf-creator.instructions.scheme.json",
  "author": "Andrew Cochran",
  "title": "My PDF From REST API",
- Next determine the inputs to the instructions. As we are filling out a single form, the inputs array consists of a single input specifying the
typeandresourceName.
  "inputs": [
    {
      "type": "pdf",
      "resourceName": "samples/fill-acro-form-pdf-endpoint/fw9AcroForm_18.pdf",
    }
  ],
- Add the form elements to the
formFieldsarray. The complete instructions document follows.
{
  "$ref": "https://www.dynamicpdf.com/schemas/pdf-creator.instructions.scheme.json",
  "author": "Andrew Cochran",
  "title": "My PDF From REST API",
  "inputs": [
    {
      "type": "pdf",
      "resourceName": "samples/fill-acro-form-pdf-endpoint/fw9AcroForm_18.pdf",
    }
  ],
  "formFields": [
    {
      "name": "topmostSubform[0].Page1[0].f1_1[0]",
      "value": "Any Company, Inc."
    },
    {
      "name": "topmostSubform[0].Page1[0].f1_2[0]",
      "value": "Any Company"
    },
    {
      "name": "topmostSubform[0].Page1[0].FederalClassification[0].c1_1[0]",
      "value": "1"
    },
    {
      "name": "topmostSubform[0].Page1[0].Address[0].f1_7[0]",
      "value": "123 Main Street"
    },
    {
      "name": "topmostSubform[0].Page1[0].Address[0].f1_8[0]",
      "value": "Washington, DC  22222"
    },
    {
      "name": "topmostSubform[0].Page1[0].f1_9[0]",
      "value": "Any Requester"
    },
    {
      "name": "topmostSubform[0].Page1[0].f1_10[0]",
      "value": "17288825617"
    },
    {
      "name": "topmostSubform[0].Page1[0].EmployerID[0].f1_14[0]",
      "value": "52"
    },
    {
      "name": "topmostSubform[0].Page1[0].EmployerID[0].f1_15[0]",
      "value": "1234567"
    }
  ]
}
- If following along, and you wrote the instructions in a text editor, save the file as
instructions.json.
cURL Command
Now we use the instructions.json in our cURL command to call the pdf endpoint.
- If you haven't already, then create the
/temp/dynamicpdf-api-samples/fill-acro-formlocation on your local system that contains the JSON instructions document. - Ensure the
instructions.jsonfile is in/temp/dynamicpdf-api-samples/fill-acro-form. - Construct a cURL command that uses HTTP POST and specifies the
pdfendpoint, the authorization header (the API key), and the JSON instructions document.
curl -X POST https://api.dpdf.io/v1.0/pdf
-H "Authorization: Bearer DP.xxx-api-key-xxx"
-F Instructions=@C:/temp/dynamicpdf-api-samples/fill-acro-form/instructions.json
-o fill-acro-form-output.pdf
Note that we do not specify the path to the fw9AcroForm_18.pdf document, as it resides on the cloud in your cloud storage space. Instead instructions.json contains all the information needed to process the PDF. However, you can also specify local resources. For an example demonstrating using a local resource, refer to how DocumentC.pdf is handled in the Merging PDFs tutorial.
- Execute the command and the completed PDF is downloaded and saved.
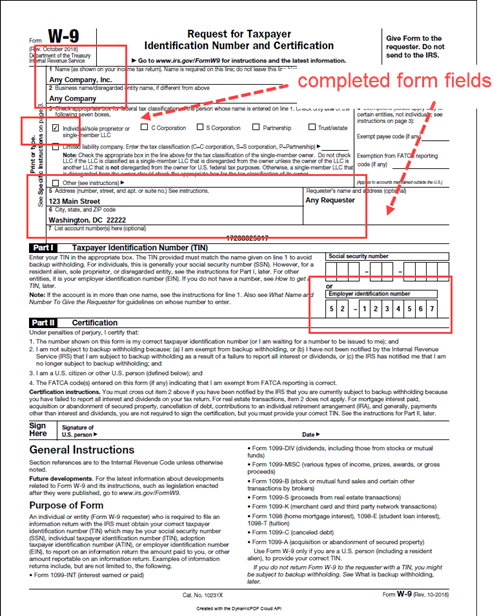
Figure 2. The W9 form with the form fields completed.
Calling Endpoint Using Client Library
To simplify your development, you can also use one of the DynamicPDF API client libraries. Use the client library of your choice to complete this tutorial section. Each client library tab contains tutorial steps particular to the selected language.
Complete Source
Access the complete source for this project at one of the following GitHub projects.
| Language | GitHub Users Guide Project | Example Class File | Location/Package/Namespace |
|---|---|---|---|
| C# | https://github.com/dynamicpdf-api/dotnet-client-examples | Program.cs | namespace CompletingAcroForm |
| Java | https://github.com/dynamicpdf-api/java-client-examples | CompletingAcroForm.java | com.dynamicpdf.api.examples |
| Node.js | https://github.com/dynamicpdf-api/nodejs-client-examples | CompletingAcroForm.js | nodejs-client-examples |
| PHP | https://github.com/dynamicpdf-api/php-client-examples | CompletingAcroForm.php | php-client-examples |
| GO | https://github.com/dynamicpdf-api/go-client-examples/tree/main | fill-acroform.go | go-client-examples |
| Python | https://github.com/dynamicpdf-api/python-client-examples | CompletingAcroform.py | python-client-examples |
Click on the language tab of choice to view the tutorial steps for the particular language.
- C# (.NET)
- Java
- Node.js
- PHP
- GO
- Python
Available on NuGet:
Install-Package DynamicPDF.API
- Create a new Console App (.NET Core) project named
CompletingAcroform. - Add the DynamicPDF.API NuGet package.
- Create a new static method named
Run. - Add the following code to the
Runmethod. - Create a new
Pdfclass andPdfResourceclass with the path to the PDF in its constructor. - Add nine
FormFieldinstances and in each constructor add the fieldname and value. - Add the
FormFieldinstances to thePdfinstance'sFormFieldscollection. - Call the
Pdfinstance'sProcessmethod to return aPdfResponse. - Check to ensure the endpoint successfully returned the response.
- Write the returned
PdfResponseinstance's content (the completed PDF) to a file.
using DynamicPDF.Api;
using System;
using System.IO;

namespace CompletingAcroForm
{
    class Program
    {
        static void Main(string[] args)
        {
            Run("DP.xxx-api-key-xxx", "C:/temp/dynamicpdf-api-samples/fill-acro-form");
        }

        public static void Run(String apiKey, String basePath)
        {
            // create new pdf instance and set api key
            Pdf pdf = new Pdf();
            pdf.ApiKey = apiKey;

            //add the uncompleted form as a resource from File Manager
            pdf.AddPdf("samples/fill-acro-form-pdf-endpoint/fw9AcroForm_18.pdf");

            //fill out the form fields
            FormField formField = new FormField("topmostSubform[0].Page1[0].f1_1[0]", "Any Company, Inc.");
            FormField formField2 = new FormField("topmostSubform[0].Page1[0].f1_2[0]", "Any Company");
            FormField formField3 = new FormField("topmostSubform[0].Page1[0].FederalClassification[0].c1_1[0]", "1");
            FormField formField4 = new FormField("topmostSubform[0].Page1[0].Address[0].f1_7[0]", "123 Main Street");
            FormField formField5 = new FormField("topmostSubform[0].Page1[0].Address[0].f1_8[0]", "Washington, DC  22222");
            FormField formField6 = new FormField("topmostSubform[0].Page1[0].f1_9[0]", "Any Requester");
            FormField formField7 = new FormField("topmostSubform[0].Page1[0].f1_10[0]", "17288825617");
            FormField formField8 = new FormField("topmostSubform[0].Page1[0].EmployerID[0].f1_14[0]", "52");
            FormField formField9 = new FormField("topmostSubform[0].Page1[0].EmployerID[0].f1_15[0]", "1234567");

            //add the form fields to the pdf's FormFields array
            pdf.FormFields.Add(formField);
            pdf.FormFields.Add(formField2);
            pdf.FormFields.Add(formField3);
            pdf.FormFields.Add(formField4);
            pdf.FormFields.Add(formField5);
            pdf.FormFields.Add(formField6);
            pdf.FormFields.Add(formField7);
            pdf.FormFields.Add(formField8);
            pdf.FormFields.Add(formField9);

            //call the pdf endpoint and get response
            PdfResponse response = pdf.Process();

            //if response is successful then save PDF as file
            if (!response.IsSuccessful)
            {
                Console.WriteLine(response.ErrorJson);
            }
            else
            {
                File.WriteAllBytes(basePath + "fill-acro-form-output.pdf", response.Content);
            }

        }
    }
}
- Run the program and the completed form is saved as a PDF to your local system.
Available on NPM:
npm i @dynamicpdf/api
- Use npm to install the DynamicPDF API module.
- Create a new class named
CompletingAcroForm. - Create a static
Runmethod. - Add the following code to the
Runmethod. - Create a new
Pdfclass andPdfResourceclass with the path to the PDF in its constructor. - Add nine
FormFieldinstances and in each constructor add the fieldname and value. - Add the
FormFieldinstances to thePdfinstance'sFormFieldscollection. - Call the
Pdfinstance'sprocessmethod to return aPdfResponse. - Check to ensure the endpoint successfully returned the response.
- Write the returned
PdfResponseinstance's content (the completed PDF) to a file. - Add the
Runmethod call below theCompletingAcroformclass definition.
import fs from 'fs';
import {
    Pdf,
    FormField,
    PdfResource
} from "@dynamicpdf/api"

export class CompletingAcroForm {
    static async Run() {

        var pdf = new Pdf();
        pdf.apiKey =  "DP.xxx-api-key-xxx";
        pdf.addPdf("samples/fill-acro-form-pdf-endpoint/fw9AcroForm_18.pdf");

        var formField = new FormField("topmostSubform[0].Page1[0].f1_1[0]", "Any Company, Inc.");
        var formField2 = new FormField("topmostSubform[0].Page1[0].f1_2[0]", "Any Company");
        var formField3 = new FormField("topmostSubform[0].Page1[0].FederalClassification[0].c1_1[0]", "1");
        var formField4 = new FormField("topmostSubform[0].Page1[0].Address[0].f1_7[0]", "123 Main Street");
        var formField5 = new FormField("topmostSubform[0].Page1[0].Address[0].f1_8[0]", "Washington, DC  22222");
        var formField6 = new FormField("topmostSubform[0].Page1[0].f1_9[0]", "Any Requester");
        var formField7 = new FormField("topmostSubform[0].Page1[0].f1_10[0]", "17288825617");
        var formField8 = new FormField("topmostSubform[0].Page1[0].EmployerID[0].f1_14[0]", "52");
        var formField9 = new FormField("topmostSubform[0].Page1[0].EmployerID[0].f1_15[0]", "1234567");
        pdf.formFields.push(formField);
        pdf.formFields.push(formField2);
        pdf.formFields.push(formField3);
        pdf.formFields.push(formField4);
        pdf.formFields.push(formField5);
        pdf.formFields.push(formField6);
        pdf.formFields.push(formField7);
        pdf.formFields.push(formField8);
        pdf.formFields.push(formField9);

        var res = await pdf.process();

        if (res.isSuccessful) {
            var outFile = "C:/temp/dynamicpdf-api-samples/fill-acro-form/fill-acro-form-output.pdf";
            var outStream = fs.createWriteStream(outFile);
            outStream.write(res.content);
            outStream.close();
        }
        else {
            console.log(res.errorJson);
        }
    }
}
await CompletingAcroForm.Run();
- Run the application
node CompletingAcroform.jsand the completed PDF is written to your filesystem.
Available on Maven:
https://search.maven.org/search?q=g:com.dynamicpdf.api
<dependency>
  <groupId>com.dynamicpdf.api</groupId>
  <artifactId>dynamicpdf-api</artifactId>
  <version>1.0.0</version>
</dependency>
- Create a new Maven project and add the DynamicPDF API as a dependency, also add the Apache Commons IO library.
<dependency>
	<groupId>commons-io</groupId>
	<artifactId>commons-io</artifactId>
	<version>2.8.0</version>
</dependency>
- Create a new class named
CompletingAcroformwith amainmethod. - Create a new method named
Run. - Add the
Runmethod call tomain. - Create a new
Pdfclass andPdfResourceclass with the path to the PDF in its constructor. - Add nine
FormFieldinstances and in each constructor add the fieldname and value. - Add the
FormFieldinstances to thePdfinstance'sFormFieldscollection. - Call the
Pdfinstance'sprocessmethod to return aPdfResponse. - Check to ensure the endpoint successfully returned the response.
- Write the returned
PdfResponseinstance's content (the completed PDF) to a file. - Run the application and the completed PDF is written to your filesystem.
package com.dynamicpdf.api.examples;

import java.io.File;
import java.io.IOException;
import org.apache.commons.io.FileUtils;
import com.dynamicpdf.api.FormField;
import com.dynamicpdf.api.Pdf;
import com.dynamicpdf.api.PdfResponse;

public class CompletingAcroForm {

	public static void main(String[] args) {
		CompletingAcroForm.Run("DP.xxx-api-key-xxx",
				"C:/temp/dynamicpdf-api-samples/fill-acro-form/");
	}

    public static void Run(String apiKey, String basePath)
    {
        // create new pdf instance and set api key
        Pdf pdf = new Pdf();
        pdf.setApiKey(apiKey);

        //add the uncompleted form as a resource from File Manager
        pdf.addPdf("samples/fill-acro-form-pdf-endpoint/fw9AcroForm_18.pdf");

        //fill out the form fields
        FormField formField = new FormField("topmostSubform[0].Page1[0].f1_1[0]", "Any Company, Inc.");
        FormField formField2 = new FormField("topmostSubform[0].Page1[0].f1_2[0]", "Any Company");
        FormField formField3 = new FormField("topmostSubform[0].Page1[0].FederalClassification[0].c1_1[0]", "1");
        FormField formField4 = new FormField("topmostSubform[0].Page1[0].Address[0].f1_7[0]", "123 Main Street");
        FormField formField5 = new FormField("topmostSubform[0].Page1[0].Address[0].f1_8[0]", "Washington, DC  22222");
        FormField formField6 = new FormField("topmostSubform[0].Page1[0].f1_9[0]", "Any Requester");
        FormField formField7 = new FormField("topmostSubform[0].Page1[0].f1_10[0]", "17288825617");
        FormField formField8 = new FormField("topmostSubform[0].Page1[0].EmployerID[0].f1_14[0]", "52");
        FormField formField9 = new FormField("topmostSubform[0].Page1[0].EmployerID[0].f1_15[0]", "1234567");

        //add the form fields to the pdf's FormFields array
        pdf.getFormFields().add(formField);
        pdf.getFormFields().add(formField2);
        pdf.getFormFields().add(formField3);
        pdf.getFormFields().add(formField4);
        pdf.getFormFields().add(formField5);
        pdf.getFormFields().add(formField6);
        pdf.getFormFields().add(formField7);
        pdf.getFormFields().add(formField8);
        pdf.getFormFields().add(formField9);

        //call the pdf endpoint and get response
        PdfResponse response = pdf.process();

		// if the response is successful, save merged pdf to file. if error, then
		// printout JSON error
		if (response.getIsSuccessful()) {
			try {
				FileUtils.writeByteArrayToFile(new File(basePath + "fill-acro-form-output.pdf"),
						response.getContent());
			} catch (IOException e) {
				e.printStackTrace();
			}
		} else {
			System.out.println(response.getErrorJson());
		}
    }
}
Available as a Composer package:
composer require dynamicpdf/api
- Use composer to ensure you have the required PHP libraries.
- Create a new class named
CompletingAcroForm. - Add a
Runmethod. - Create a new
Pdfclass andPdfResourceclass with the path to the PDF in its constructor. - Add nine
FormFieldinstances and in each constructor add the fieldname and value. - Add the
FormFieldinstances to thePdfinstance'sFormFieldscollection. - Call the
Pdfinstance'sprocessmethod to return aPdfResponse. - Check to ensure the endpoint successfully returned the response.
- Add the call to the
CompletingAcroForm::Run()method.
require __DIR__ . '/vendor/autoload.php';
use DynamicPDF\Api\Pdf;
use DynamicPDF\Api\FormField;
include_once("constants.php");
class CompletingAcroForm
{
    public static function Run(string $apikey, string $path, string $output_path)
    {
        $pdf = new Pdf();
        $pdf->ApiKey = $apikey;

        //load the PDF from the cloud
        $pdf->AddPdf("samples/fill-acro-form-pdf-endpoint/fw9AcroForm_18.pdf");

        //complete the values from the pdf
        $formField = new FormField("topmostSubform[0].Page1[0].f1_1[0]", "Any Company, Inc.");
        $formField2 = new FormField("topmostSubform[0].Page1[0].f1_2[0]", "Any Company");
        $formField3 = new FormField("topmostSubform[0].Page1[0].FederalClassification[0].c1_1[0]", "1");
        $formField4 = new FormField("topmostSubform[0].Page1[0].Address[0].f1_7[0]", "123 Main Street");
        $formField5 = new FormField("topmostSubform[0].Page1[0].Address[0].f1_8[0]", "Washington, DC  22222");
        $formField6 = new FormField("topmostSubform[0].Page1[0].f1_9[0]", "Any Requester");
        $formField7 = new FormField("topmostSubform[0].Page1[0].f1_10[0]", "17288825617");
        $formField8 = new FormField("topmostSubform[0].Page1[0].EmployerID[0].f1_14[0]", "1234567");
        $formField9 = new FormField("topmostSubform[0].Page1[0].EmployerID[0].f1_15[0]", "1234567");
        array_push($pdf->FormFields, $formField);
        array_push($pdf->FormFields, $formField2);
        array_push($pdf->FormFields, $formField3);
        array_push($pdf->FormFields, $formField4);
        array_push($pdf->FormFields, $formField5);
        array_push($pdf->FormFields, $formField6);
        array_push($pdf->FormFields, $formField7);
        array_push($pdf->FormFields, $formField8);
        array_push($pdf->FormFields, $formField9);

        //call the pdf endpoint and return response
        $response = $pdf->Process();

        //if response is successful the save the PDF returned from endpoint
        if($response->IsSuccessful)
        {
            file_put_contents($output_path . "fill-acro-form-php-output.pdf", $response->Content);
        } else {
            echo("Error: ");
            echo($response->StatusCode);
            echo($response->ErrorId);
            echo($response->ErrorMessage);
        }

    }
}
CompletingAcroForm::Run(CLIENT_EXAMPLES_API_KEY, CLIENT_EXAMPLES_BASE_PATH . "/fill-acro-form-pdf-endpoint/", CLIENT_EXAMPLES_OUTPUT_PATH);
- Run the application
php CompletingAcroform.phpand the completed PDF is saved to your local system.
Available as a GO package: https://pkg.go.dev/github.com/dynamicpdf-api/go-client
- Ensure you have the required GO libraries.
- Create a new file named
fill-acroform.go. - Add a
mainmethod. - Create a new
Pdfclass andPdfResourceclass with the path to the PDF in its constructor. - Add nine
FormFieldinstances and in each constructor add the fieldname and value. - Add the
FormFieldinstances to thePdfinstance'sFormFieldscollection. - Call the
Pdfinstance'sProcessmethod to return aPdfResponse. - Check to ensure the endpoint successfully returned the response.
package main

import (
	"fmt"
	"os"
	"github.com/dynamicpdf-api/go-client/endpoint"
	"github.com/dynamicpdf-api/go-client/input"
	"github.com/dynamicpdf-api/go-client/resource"
)

func main() {

	pdfAcro := endpoint.NewPdf()
	pdfAcro.Endpoint.BaseUrl = "https://api.dpdf.io/"
	pdfAcro.Endpoint.ApiKey = "DP.xxx-api-key-xxx"
	basePath := "c:/temp/dynamicpdf-api-samples/"

	pdfResource := resource.NewPdfResourceWithResourcePath(basePath+"fw9AcroForm_18.pdf", "fw9AcroForm_18.pdf")
	pdfInput := input.NewPdfWithResource(pdfResource)
	pdfAcro.Inputs = append(pdfAcro.Inputs, pdfInput)

	field1 := endpoint.NewFormFieldWithValue("topmostSubform[0].Page1[0].f1_1[0]", "Any Company, Inc.")
	pdfAcro.FormFields = append(pdfAcro.FormFields, *field1)
	field2 := endpoint.NewFormFieldWithValue("topmostSubform[0].Page1[0].f1_2[0]", "Any Company")
	pdfAcro.FormFields = append(pdfAcro.FormFields, *field2)
	field3 := endpoint.NewFormFieldWithValue("topmostSubform[0].Page1[0].FederalClassification[0].c1_1[0]", "1")
	pdfAcro.FormFields = append(pdfAcro.FormFields, *field3)
	field4 := endpoint.NewFormFieldWithValue("topmostSubform[0].Page1[0].Address[0].f1_7[0]", "123 Main Street")
	pdfAcro.FormFields = append(pdfAcro.FormFields, *field4)
	field5 := endpoint.NewFormFieldWithValue("topmostSubform[0].Page1[0].Address[0].f1_8[0]", "Washington, DC  22222")
	pdfAcro.FormFields = append(pdfAcro.FormFields, *field5)
	field6 := endpoint.NewFormFieldWithValue("topmostSubform[0].Page1[0].f1_9[0]", "Any Requester")
	pdfAcro.FormFields = append(pdfAcro.FormFields, *field6)
	field7 := endpoint.NewFormFieldWithValue("topmostSubform[0].Page1[0].f1_10[0]", "17288825617")
	pdfAcro.FormFields = append(pdfAcro.FormFields, *field7)
	field8 := endpoint.NewFormFieldWithValue("topmostSubform[0].Page1[0].EmployerID[0].f1_14[0]", "52")
	pdfAcro.FormFields = append(pdfAcro.FormFields, *field8)
	field9 := endpoint.NewFormFieldWithValue("topmostSubform[0].Page1[0].EmployerID[0].f1_15[0]", "1234567")
	pdfAcro.FormFields = append(pdfAcro.FormFields, *field9)

	resp := pdfAcro.Process()
	res := <-resp

	if res.IsSuccessful() == false {
		if res.ClientError() != nil {
			fmt.Print("Failed with error: " + res.ClientError().Error())
		} else {
			fmt.Print("Failed with error: " + res.ErrorJson())
		}
	} else {
		os.WriteFile(basePath+"acroform-pdfs-output.pdf",
			res.Content().Bytes(), os.ModeType)
	}
}
- Run the application
go fill-acroform.goand the completed PDF is saved to your local system.
Available at: pip install dynamicpdf-api
- Ensure you have the required Python libraries.
- Create a new file named
CompletingAcroForm.py. - Add a
completing_acroformmethod. - Create a new
Pdfclass andPdfResourceclass with the path to the PDF in its constructor. - Add nine
FormFieldinstances and in each constructor add the fieldname and value. - Add the
FormFieldinstances to thePdfinstance'sFormFieldscollection. - Call the
Pdfinstance'sprocessmethod to return aPdfResponse. - Check to ensure the endpoint successfully returned the response.
from dynamicpdf_api.pdf import Pdf
from dynamicpdf_api.pdf_resource import PdfResource
from dynamicpdf_api.form_field import FormField

def completing_acroform(apiKey, basePath):

    pdf=Pdf()
    pdf.api_key=apiKey
    pdf.add_pdf(PdfResource(basePath + "fw9AcroForm_18.pdf"))

    pdf.form_fields.append(FormField("topmostSubform[0].Page1[0].f1_1[0]", "Any Company, Inc."))
    pdf.form_fields.append(FormField("topmostSubform[0].Page1[0].f1_2[0]", "Any Company"))
    pdf.form_fields.append(FormField("topmostSubform[0].Page1[0].FederalClassification[0].c1_1[0]", "1"))
    pdf.form_fields.append(FormField("topmostSubform[0].Page1[0].Address[0].f1_7[0]", "123 Main Street"))
    pdf.form_fields.append(FormField("topmostSubform[0].Page1[0].Address[0].f1_8[0]", "Washington, DC  22222"))
    pdf.form_fields.append(FormField("topmostSubform[0].Page1[0].f1_9[0]", "Any Requester"))
    pdf.form_fields.append(FormField("topmostSubform[0].Page1[0].f1_10[0]", "17288825617"))
    pdf.form_fields.append(FormField("topmostSubform[0].Page1[0].EmployerID[0].f1_14[0]", "52"))
    pdf.form_fields.append(FormField("topmostSubform[0].Page1[0].EmployerID[0].f1_15[0]", "1234567"))

    response = pdf.process()
    if response.is_successful:
         with open(basePath + "form-fill-output-python.pdf", "wb") as file:
            file.write(response.content)
    else:
        print(response.error_id)

# Call the function
api_key = 'DP.---API-KEY---'
completing_acroform(api_key, "C:/temp/dynamicpdf-api-samples/")
- Run the application
python CompletingAcroform.pyand the completed PDF is saved to your local system.
In all six languages, the steps were similar. First, we created a new instance of the Pdf class, which abstracts the pdf endpoint. This Pdf instance holds the merged PDF after processing. We then loaded the PDF into the Pdf instance using the AddPdf method. We then created eight FormField instances and, in the constructor, set the field name from the PDF form and the field's value. Next, we added the FormField instances to the Pdf instance's FormFields collection. And then called the Pdf instance endpoint and saved the results as a PDF on the local system.
![]()