Create a Report With a Template
This tutorial creates a PDF report using a pre-existing PDF template. In the last tutorial, Create a Page Using a Template, we used a PDF template to complete a form using a Page.
As this tutorial will illustrate, using a PDF template combined with a Report to create a PDF is another powerful technique for creating professional appearing PDF reports using DynamicPDF API's Designer.
Begin by getting the resources we use for this tutorial.
Required Resources
- Navigate to the File Manager and add the
creating-a-report-template-designerfolder to add the sample resources.
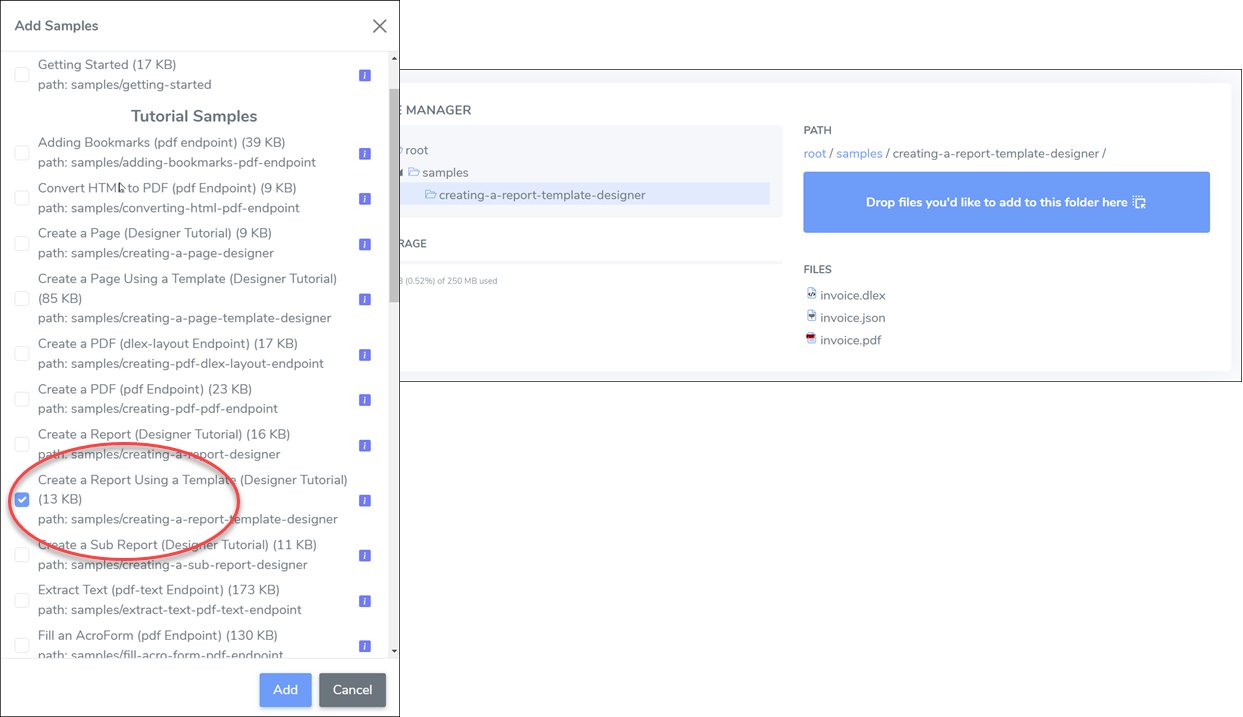
Figure 1. Adding the sample project to samples folder.
- If completing the steps in this tutorial, then delete the
invoice.dlexfile.
- Right-click and create a new empty DLEX file named
invoice.dlex.
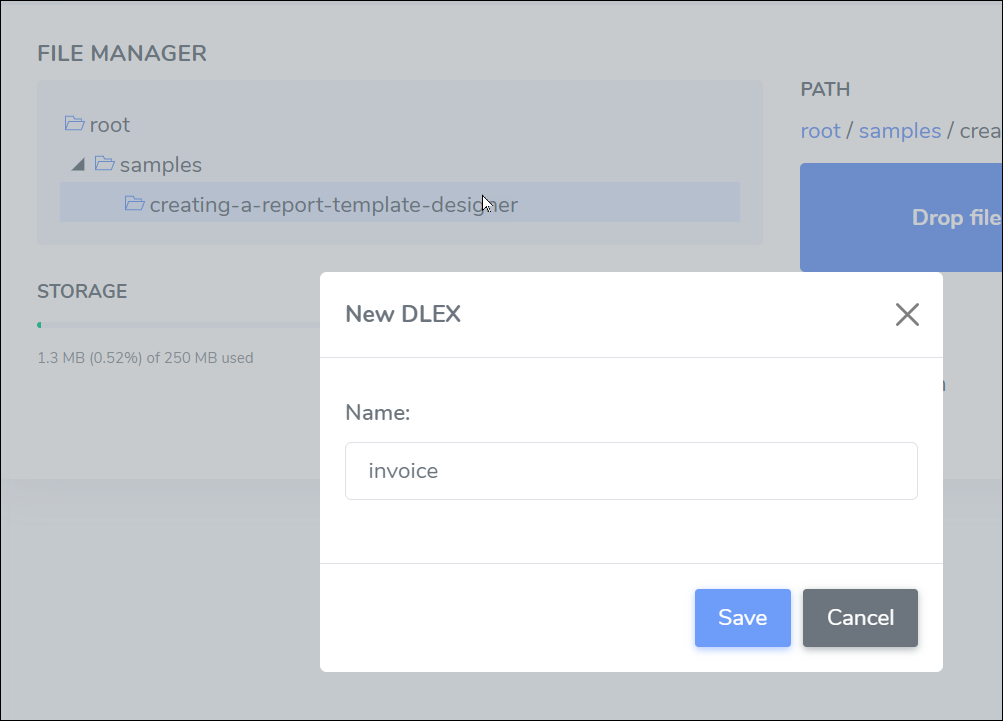
Figure 2. Creating a new DLEX file.
JSON Data
- Open
invoice.dlexin Designer. - Open the Layout Data Editor and ensure the following JSON document is present.
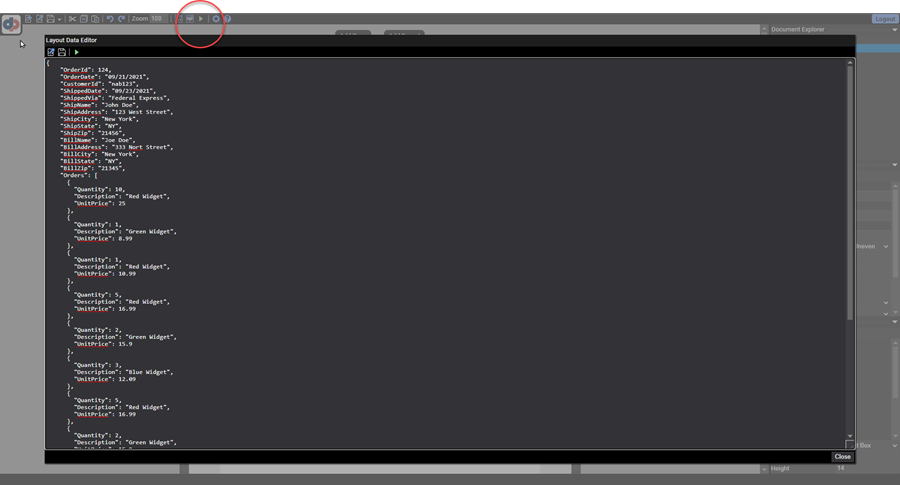
Figure 3. The Layout Data Editor with JSON data.
- If the Layout Data Editor does not contain the data, then add the following data and save the results as
invoice.json.
{
  "OrderId": 124,
  "OrderDate": "09/21/2021",
  "CustomerId": "nab123",
  "ShippedDate": "09/23/2021",
  "ShippedVia": "Federal Express",
  "ShipName": "John Doe",
  "ShipAddress": "123 West Street",
  "ShipCity": "New York",
  "ShipState": "NY",
  "ShipZip": "21456",
  "BillName": "Joe Doe",
  "BillAddress": "333 Nort Street",
  "BillCity": "New York",
  "BillState": "NY",
  "BillZip": "21345",
  "Orders": [
    {
      "Quantity": 10,
      "Description": "Red Widget",
      "UnitPrice": 25
    },
    {
      "Quantity": 1,
      "Description": "Green Widget",
      "UnitPrice": 8.99
    },
    {
      "Quantity": 1,
      "Description": "Red Widget",
      "UnitPrice": 10.99
    },
    {
      "Quantity": 5,
      "Description": "Red Widget",
      "UnitPrice": 16.99
    },
    {
      "Quantity": 2,
      "Description": "Green Widget",
      "UnitPrice": 15.9
    },
    {
      "Quantity": 3,
      "Description": "Blue Widget",
      "UnitPrice": 12.09
    },
    {
      "Quantity": 5,
      "Description": "Red Widget",
      "UnitPrice": 16.99
    },
    {
      "Quantity": 2,
      "Description": "Green Widget",
      "UnitPrice": 15.9
    },
    {
      "Quantity": 3,
      "Description": "Blue Widget",
      "UnitPrice": 12.09
    },
    {
      "Quantity": 5,
      "Description": "Red Widget",
      "UnitPrice": 16.99
    },
    {
      "Quantity": 2,
      "Description": "Green Widget",
      "UnitPrice": 15.9
    },
    {
      "Quantity": 3,
      "Description": "Blue Widget",
      "UnitPrice": 12.09
    }
  ],
  "Freight": 400.32
}
- Close the Layout Data Editor to return to the main application window.
Now that we have the JSON data, let's add a report and template to the DLEX.
Add Report and Template
- Add a Report element by clicking the Add Report button.
- In the Document Explorer, select the template and from the PDF Template Explorer, add the PDF named
invoice.pdffrom the samples folder to the report's template.
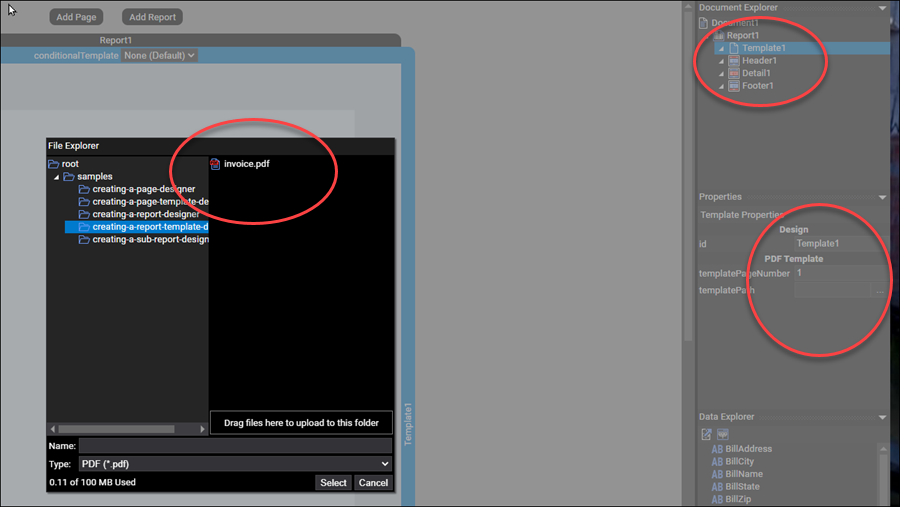
Figure 4. Adding the template to the report.
- Set the report's left and right margin to 36 in the Layout Explorer.
- Scroll to the bottom of the report and note the template appears in the report.

Figure 5. The template added to the details section of the report.
Format Report
Now that we have the template added to the report, we need to format it correctly. Let's format the template so that the header, details, and footer sections align properly with the template's layout.
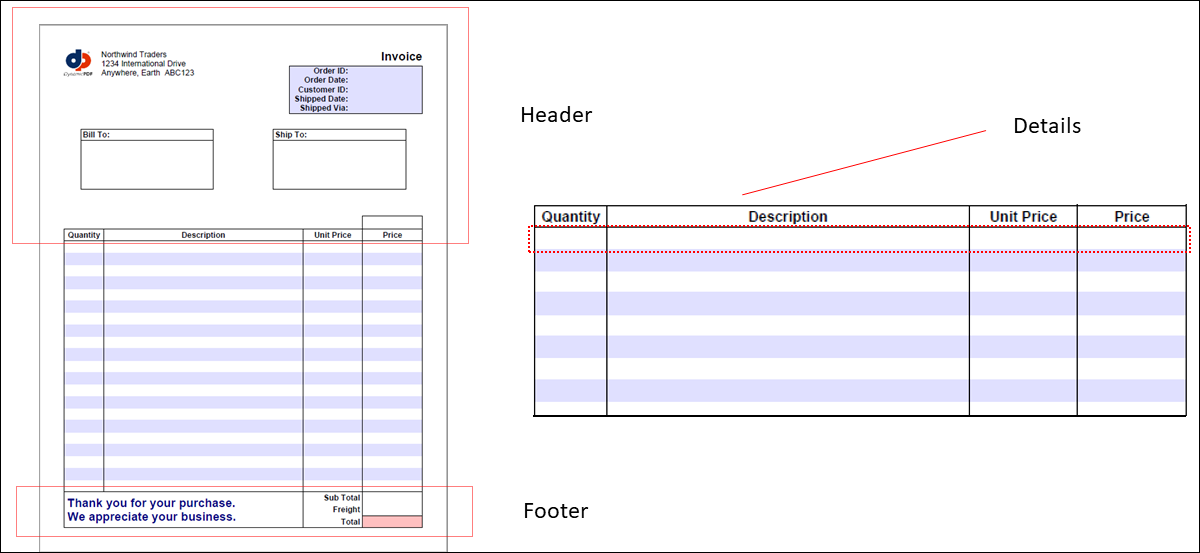
Figure 6. The report with template resized to match PDF's dimensions.
- Resize the header so its height is 275.
- Resize the footer so its height is 38.
- Resize the details so its height is 18.
Format Header
- Add
OrderIdas a RecordBox and position it next to the Order ID in the template.

Figure 7. Adding a RecordBox by dragging an element from the Data Explorer.
- Add
OrderData,CustomerId,ShippedDate, andShippedViadata elements to the invoice as RecordBox elements. - For each element, assign the x value as 437 for all five elements. Assign 10, 25, 40, 55, and 68 as the y values for each element.
- Create a RecordArea and add the billing elements to the invoice and then do the same for the shipping elements.
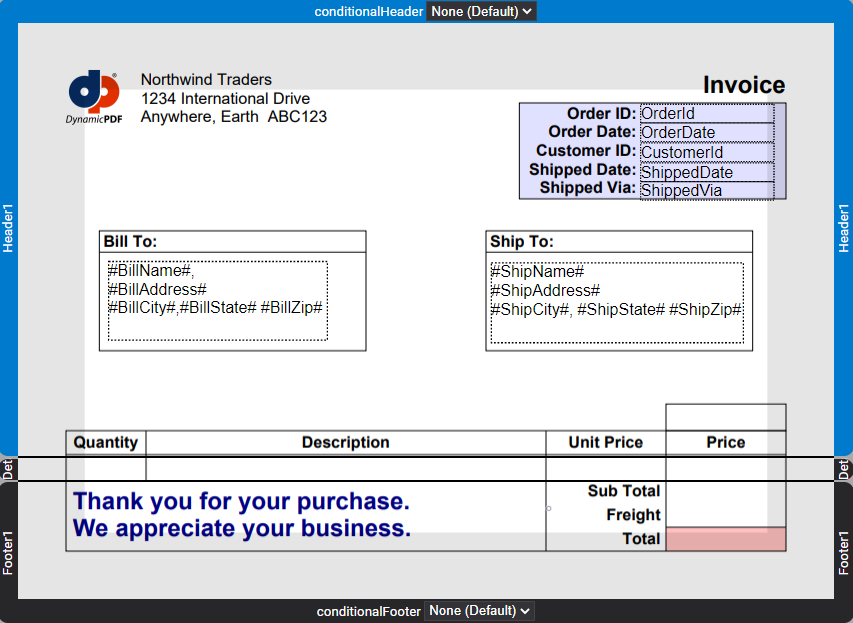
Figure 8. Adding header data elements to the invoice.
- Generate the PDF to test progress thus far.
Format Details
-
Add
Quantityto the details section. -
Align the
QuantityRecordBox as right by changing the align property in the Appearance Explorer. -
Add
UnitPriceto the invoice and set its alignment to right. -
Add a new RecordBox in the space on the template below Price and set its alignment to right, and then enter the expression
Multiply(Quantity,UnitPrice)to the dataName field. -
We also need to set the dataFormat of both
UnitPriceand the calculated price to reflect that they are currency by setting their values to:$####.00.

Figure 9. Adding fields to the details section of the report.
- Set the x values of the elements as 4, 64, 364, and 454 and the y values as 2. Set the widths as 52, 292, 82, and 82. Set the heights as 12.
Format Footer
- Add
Freightto the footer and format the element as currency. - Add a RecordBox in the template space for the sub Total, assign it the expression
Sum(Multiply(Quantity,UnitPrice)), and format the element as currency.

Figure 10. Adding the sum to the report's footer.
- Add another RecordBox for Total, assign it the expression
Add(Freight,Sum(Multiply(Quantity,UnitPrice))), and format the element as currency. - Generate the report, and the PDF reflects the report's data.
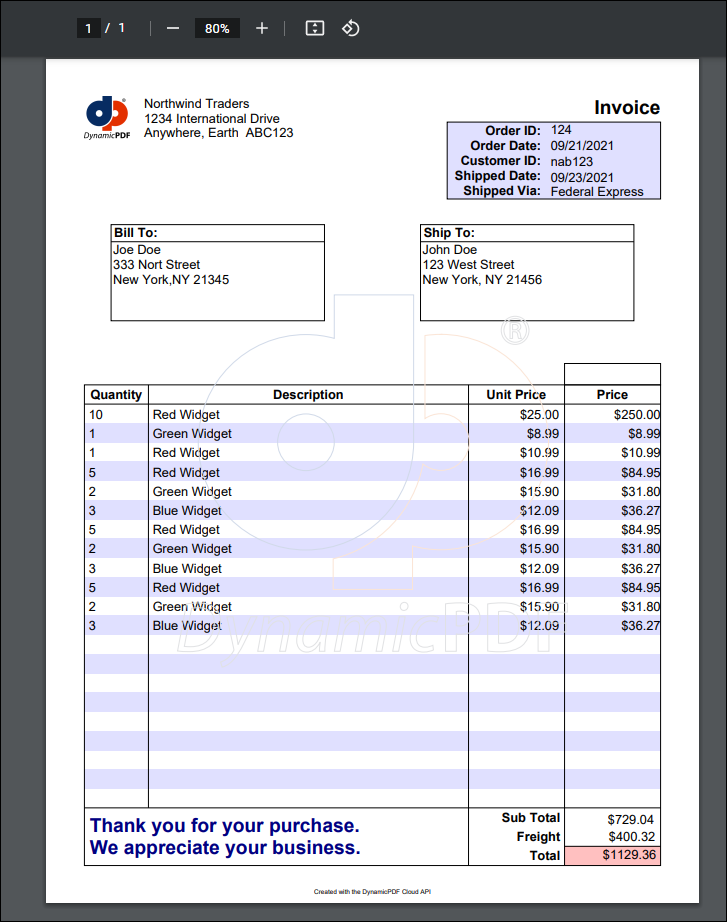
Figure 11. The generated PDF invoice.
- Return to the report and add about twenty additional records to the JSON data. For simplicity, simply cut and paste existing records.
- Generate the PDF and the data is repeated across multiple pages.

Figure 12. The generated PDF with repeated footer.
Notice that the sub total, freight, and total are repeated on each page rather than one total at the report's end. Let's modify the report to only display the values only on the last page of the generated PDF.
Add Conditional Template
- Select the footer and from the context menu create a new conditional footer.
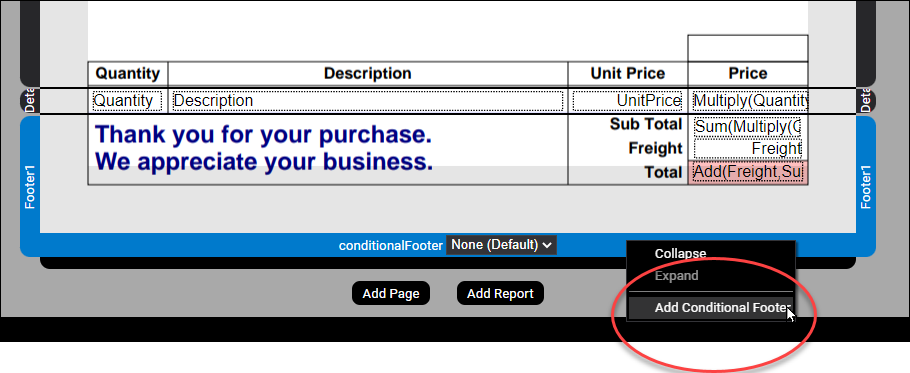
Figure 13. Adding a conditional template to a footer.
-
Note that the footer is now blank, you need to add the footer data elements to the conditional template.
-
Move the RecordBox elements from the original footer to the newly created conditional footer. Note that you can highlight the id of each element in the Document Explorer, cut the element using the Ctrl-x key combination, and then paste the element in the conditional footer.
-
Select the conditional footer and in the condition field in the Layout pane, add the condition
LastPage.

Figure 14. The conditional template with the added values and the condition set to LastPage.
Generate PDF
- Generate the PDF and the footer's values only appear on the last page.

Figure 15. A PDF with correct footer totals.
Discussion
This tutorial used several advanced features available when creating a report using DynamicPDF Designer. First, when adding a template to a report, the template overlays the report section and is divided into three sections. The top 1/3 of the template is the header, the middle third the details, and the bottom third the footer. When generating the report, the report repeats the template's section, depending upon if it was the header, details, or footer. We resized the actual section dimensions to the template's true dimensions. We then added the appropriate data fields to the relevant report sections. Expressions allow you to create reports that include functions that enable performing math, string manipulation, and data summarization. In this example, we added two values to calculate a line-item amount, summed the amounts to calculate a total, and then added freight to create a final total amount. We also illustrated using several features such as assigning an id to an element, adding formatting to data values, and using expressions in data fields. Refer to online documentation for a complete list of available expressions.