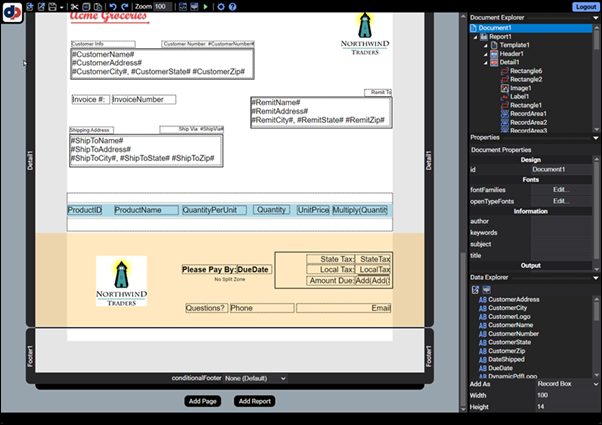
Create a Report
In this tutorial, you use the DynamicPDF API's Designer to create a report. If you have not completed the first tutorial, Create A Page, then you should complete that tutorial before this tutorial.
Here we expand upon the first tutorial to also include creating a simple dynamic report.
If you wish to understand how to create this tutorial's cover-page, but have not already completed the Create a Page tutorial, then complete that tutorial first.
Reports
While a page is helpful for non-repeating, single-page pages in a DLEX document, a report is where DynamicPDF Designer truly shines. You use a report to generate a PDF that contains dynamic data that describes a dataset's data. A report consists of header, details, and footer sections. The header and footer, like a page, contain top-level non-repeating JSON fields, while the details section contains repeating data fields that comprise the report's content.
- Place static, top-level JSON elements in a report's header or footer.
- Place dynamic repeating data in a report's details section. That repeating data is a top-level JSON element (the details section's name).
- Each JSON field in the array consists of one or more fields. These fields are the data repeated in a report's details section.
Every JSON field must have a field name; DynamicPDF Designer does not support unnamed JSON data elements.
Report Data
Recall in the first tutorial, we had a JSON document that contained the data for a hypothetical coffee shop.
{
    "ReportName": "Monthly Beverage Order List",
    "Date": "09/21/2021",
    "Author": "John Doe",
    "Coffees": [
        {
            "ProductID": 568,
            "Type": "Arabica",
            "Variety": "Arusha",
            "Price": 7.99
        },
        {
            "ProductID": 120,
            "Type": "Arabica",
            "Variety": "Blue Mountain",
            "Price": 12.21
        },
        {
            "ProductID": 235,
            "Type": "Robusta",
            "Variety": "Italian Espresso",
            "Price": 15.22
        }
    ]
}
The instructions document corresponds to the following sections we will create in our DLEX template. The header and footer are top-level (non-repeating) fields from an instructions document while the details section contains the actual repeating data elements.

Figure 1. Example report data and corresponding sections.
We already used the top-level fields to create a cover page in the previous tutorial. Here we reuse those top-level fields (ReportName, Date, and Author ) to generate a header and footer for our DLEX report.
We use the Coffees array as the report's dataset name.
The JSON array for a report's data array must be a named array, in this dataset that is the Coffees element. Anonymous arrays are not supported in DLEX templates.
Each row in the details section corresponds to a field in the Coffees array (ProductID, Type, Variety, and Price). We use the details section for the repeating data, where each record in the Coffees array repeats each row for each field in the array.
If creating a header with static top-level JSON fields, consider using a Subreport rather than a header or conditional header. See (Subreports Using Designer).
Required Resources
Before beginning this tutorial, you must add the creating-a-report-designer samples folder to your cloud storage space in the File Manager.
- Login to the Portal and open the File Manager.
- Select the
samplesfolder and then click the Add Samples button. - Check the
creating-a-report-designerproject to add the folder containing the resources needed for this tutorial.
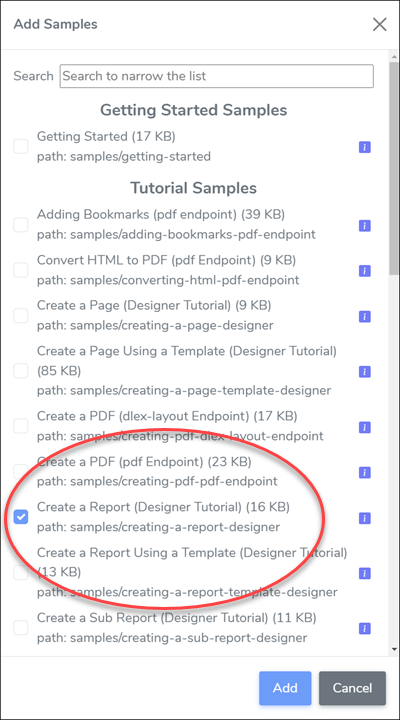
Figure 2. Required resources for project.
- If you do not already have the
creating-a-page-designersample project already added, then also add that project to yoursamplesfolder.
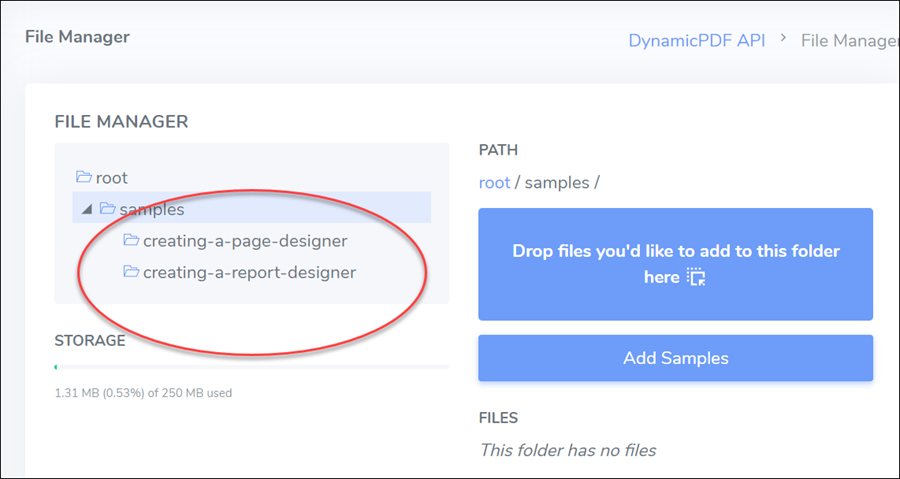
Figure 3. Resources from previous project.
The steps in this tutorial assume you are creating the resources. If you wish to follow along, and not duplicate this tutorial's steps, then simply review the sample project's files. Otherwise, follow these steps from the previous tutorial (Create a Page).
Now that we have the resources, let's add a report to our DLEX document from the previous tutorial.
Start Report
- Delete the
creating-report.dlexfile from thecreating-a-reportsamples project. - Move the
creating-page.dlexfile in thecreating-a-pagesamples project to the current project.
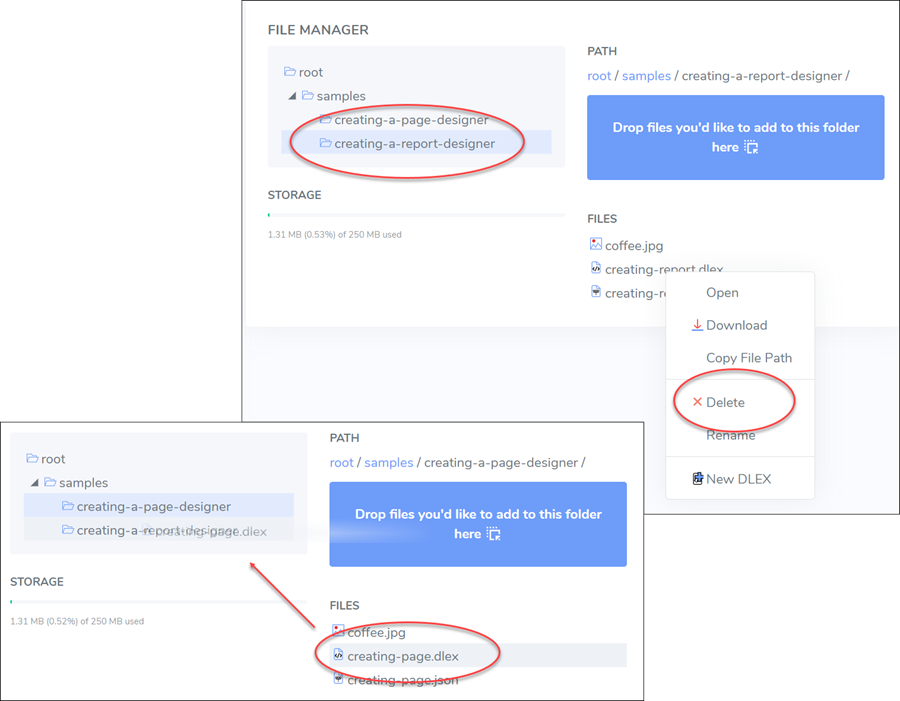
Figure 4. Copying resource between projects.
- Change the name to
creating-report.dlex
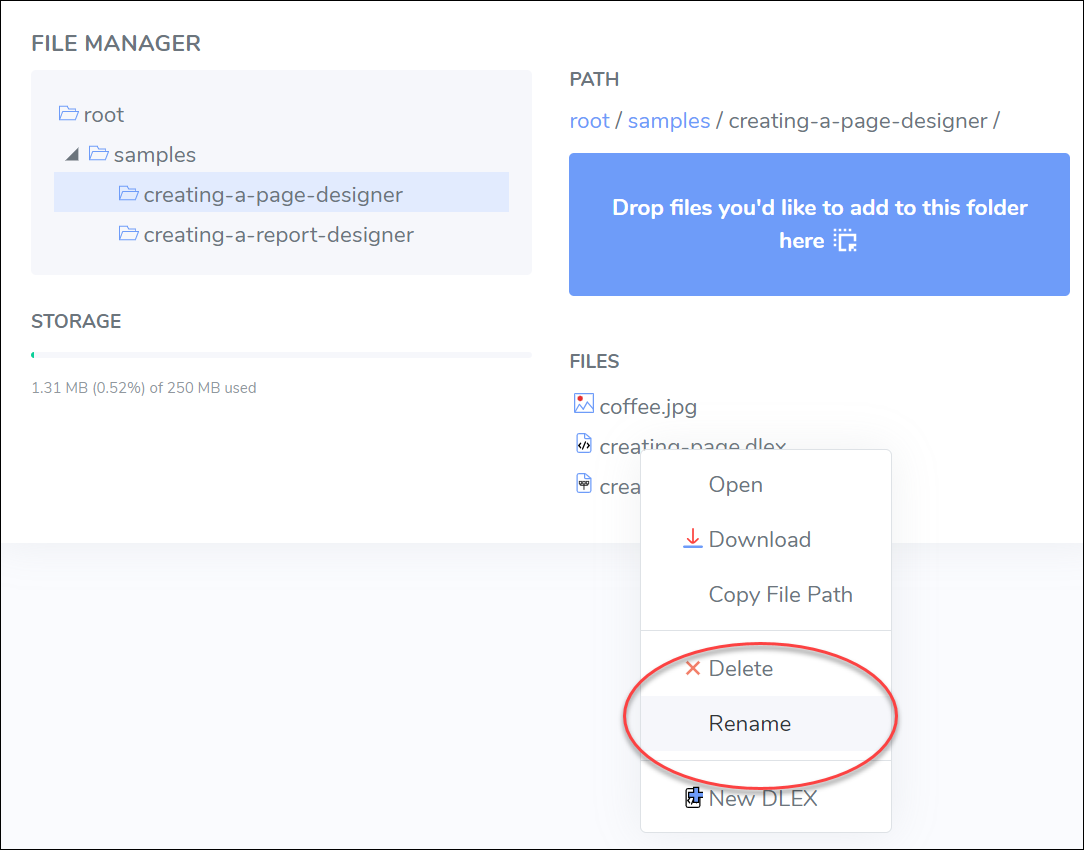
Figure 5. Renaming a resource.
- Double-click to open the file in Designer.
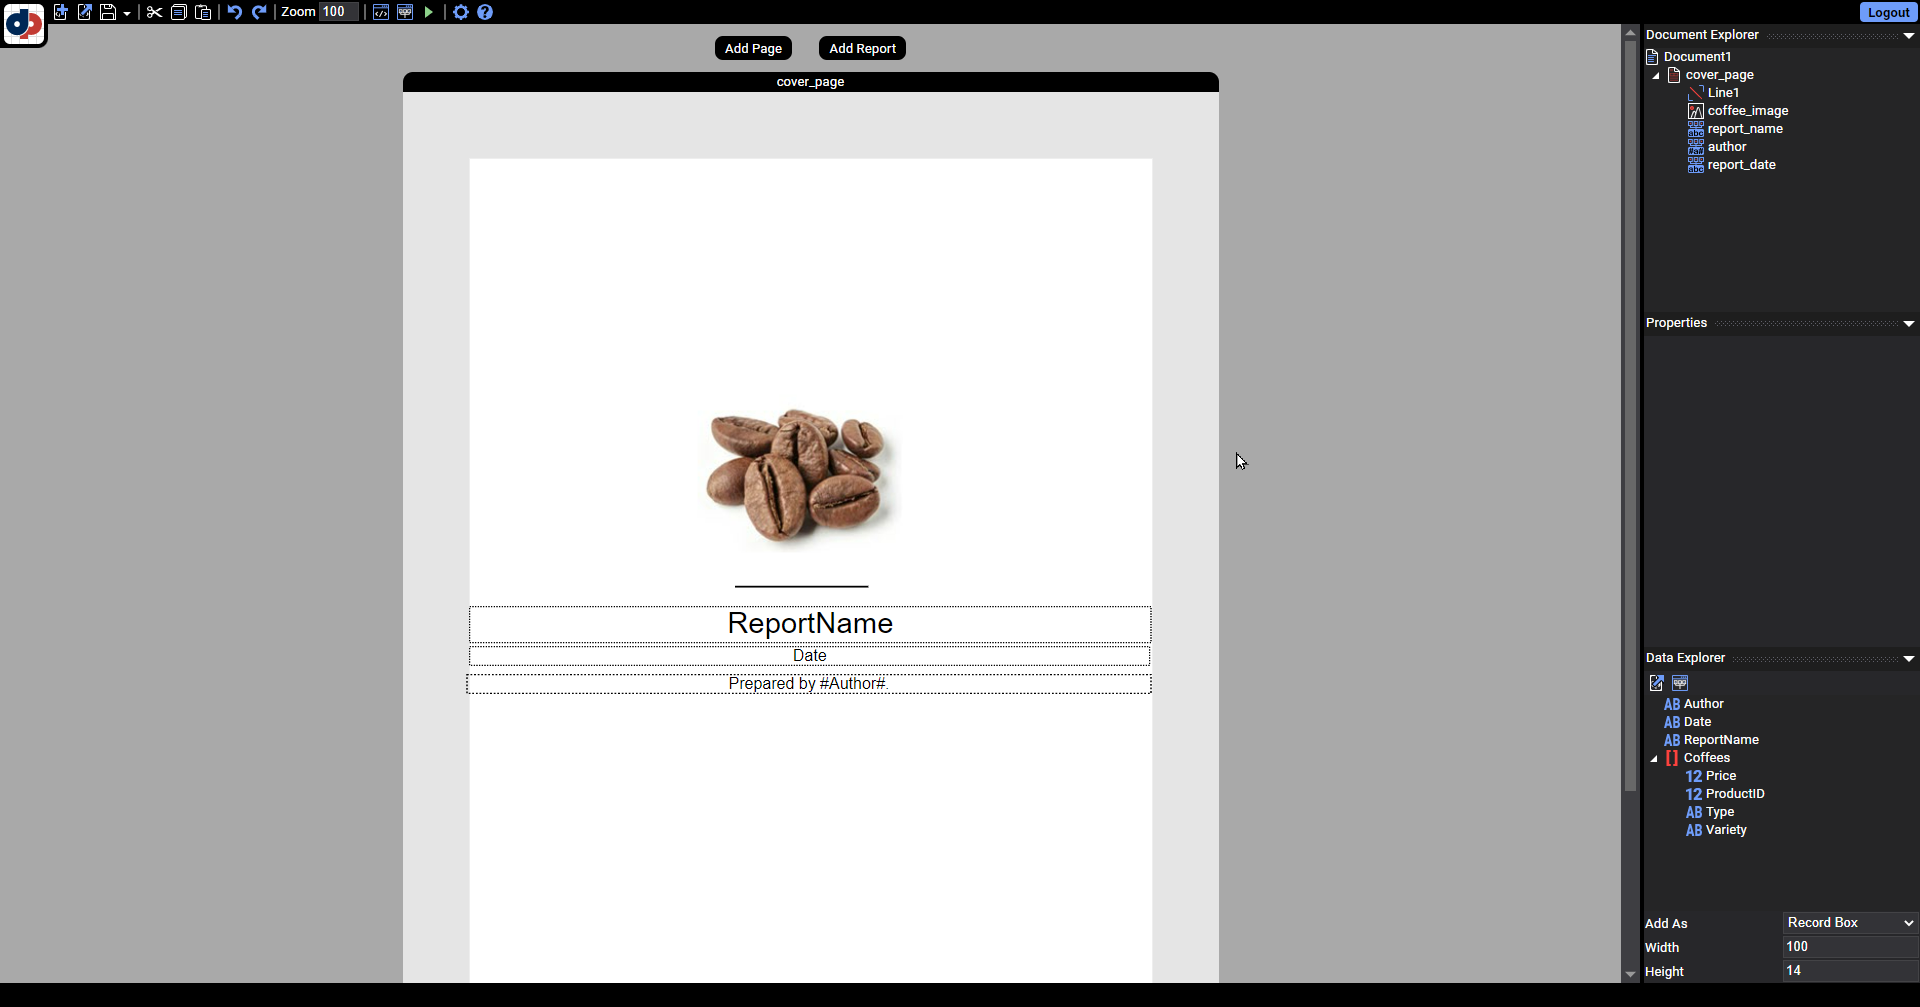
Figure 7. The creating-page.dlex opened in Designer.
Now that we have our new DLEX file, let's add the data to the report.
If you moved the create-report.json data file to the project, then this data is already loaded by Designer.
Add JSON Data
- Open the Layout Data Editor.
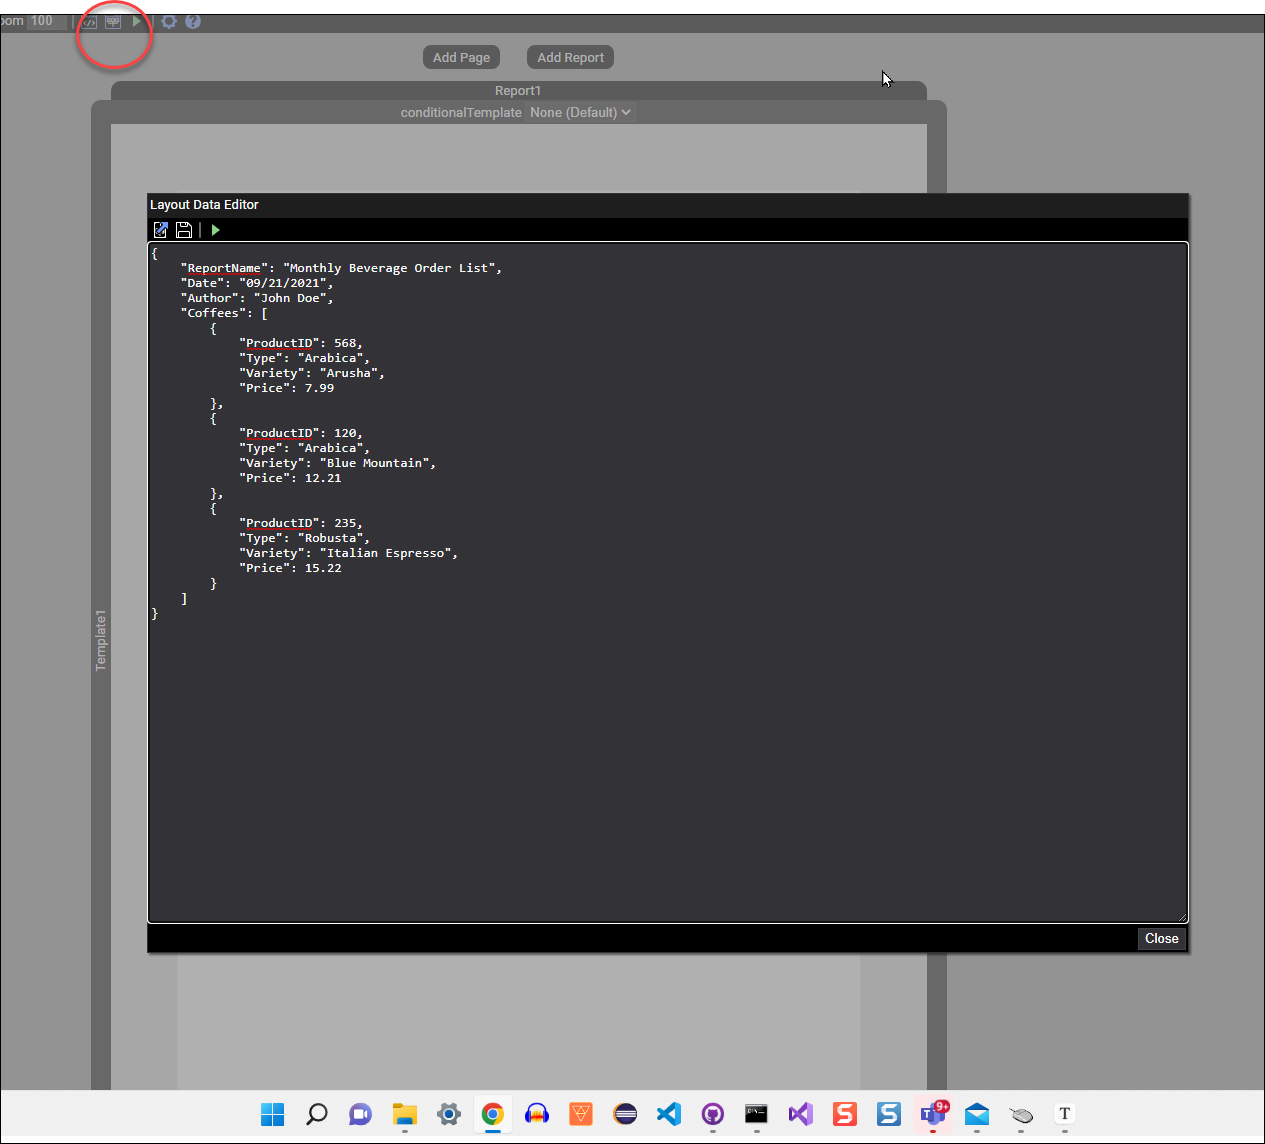
Figure 8. The Layout Data Editor containing the JSON for tutorial.
- If the data does not appears as follows, then replace the layout data with the following JSON.
{
    "ReportName": "Monthly Beverage Order List",
    "Date": "09/21/2021",
    "Author": "John Doe",
    "Coffees": [
        {
            "ProductID": 568,
            "Type": "Arabica",
            "Variety": "Arusha",
            "Price": 7.99
        },
        {
            "ProductID": 120,
            "Type": "Arabica",
            "Variety": "Blue Mountain",
            "Price": 12.21
        },
        {
            "ProductID": 235,
            "Type": "Robusta",
            "Variety": "Italian Espresso",
            "Price": 15.22
        }
    ]
}
- Save the JSON data as
creating-report.json. - Run the report and only the cover-page appears.
After ensuring the cover-page and JSON data renders correctly, we can now add the report to our DLEX template.
Add Report
In the previous tutorial, we stopped after creating a cover page. Let's modify the previous tutorial's output to expand the cover page and include a dynamically generated report.
- Ensure you have
creating-report.dlexopen in Designer and that you have already added thecreating-report.jsonlayout data to the report. - Click Add Report to add a report to the document.

Figure 9. The Add Report button adds a report to a document.
- Scroll down and you see the report's three sections: header, details, and footer.
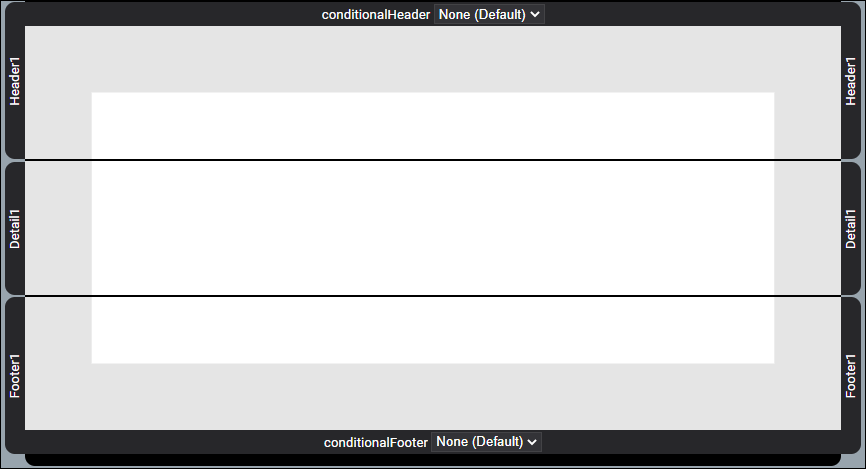
Figure 10. A report's three sections.
Add Report Data Source
- Scroll to the top of the document and select
Report1to ensure the Document Explorer pane lists the properties forReport1.
The Document Explorer pane is context sensitive to the element you have selected in the layout window and displays the properties relevant to the selected element.
- With
Report1still selected, addCoffeeas the report's dataName from the JSON dataset.
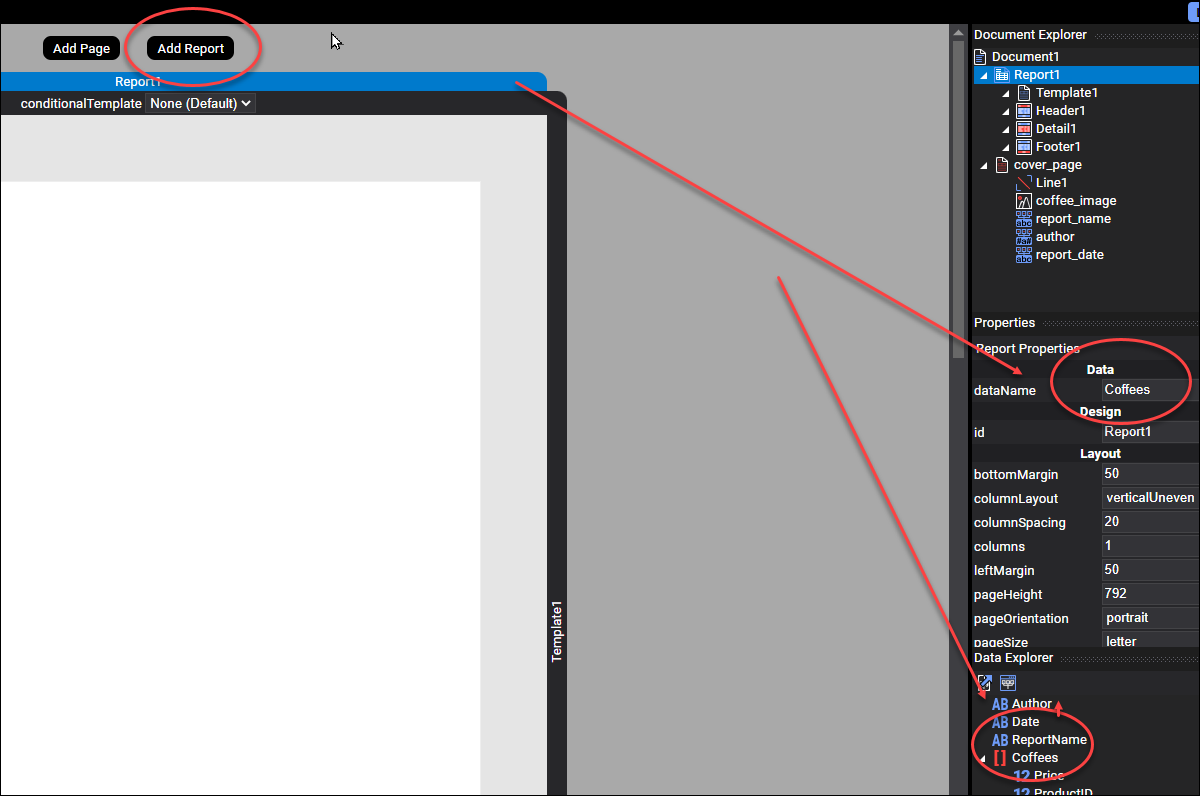
Figure 11. Assigning a report's data field.
Complete Report Header
Now let's add the header to the report. A header is, well, a header. A report's header section, like a page, contains non-repeating data. The header is displayed at the top of a report's page. If the dataset is more than can fit on a single page, then the header is repeated for each page of data.
- Add a label to the header section and assign the text
Product IDto the label.
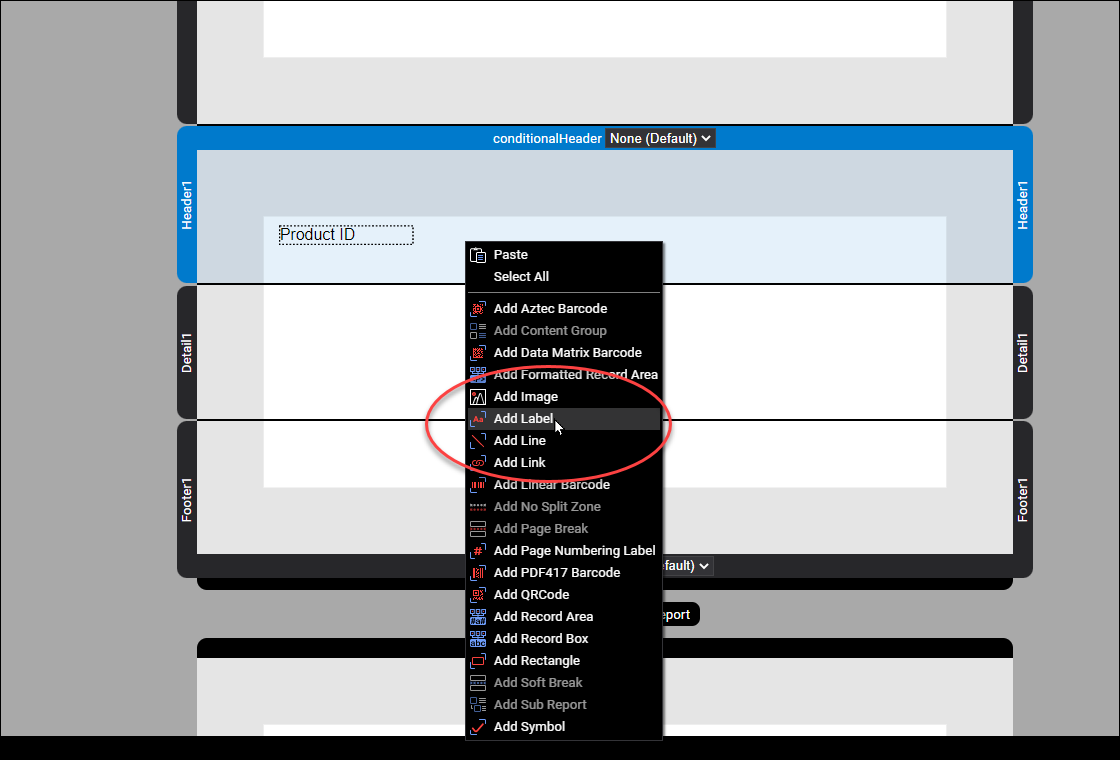
Figure 12. Adding a label to a report header section.
- And three more Label elements to the header.
- In the labels, add the text:
Variety,Coffee Type, andPrice per Poundto each label. - Change the four labels to have the following x values: 10, 130, 285, and 400.
- Change the y value for all four labels to 2.
- Add a line below the labels in the header.
- Set the line's x1 value to 10 and y values to 2.
- Resize the header's height to 25.

The template should appear as follows.

Figure 13. Setting a report's header values and format.
- Run the report and it generates the PDF with the newly added header, albeit the report is blank.
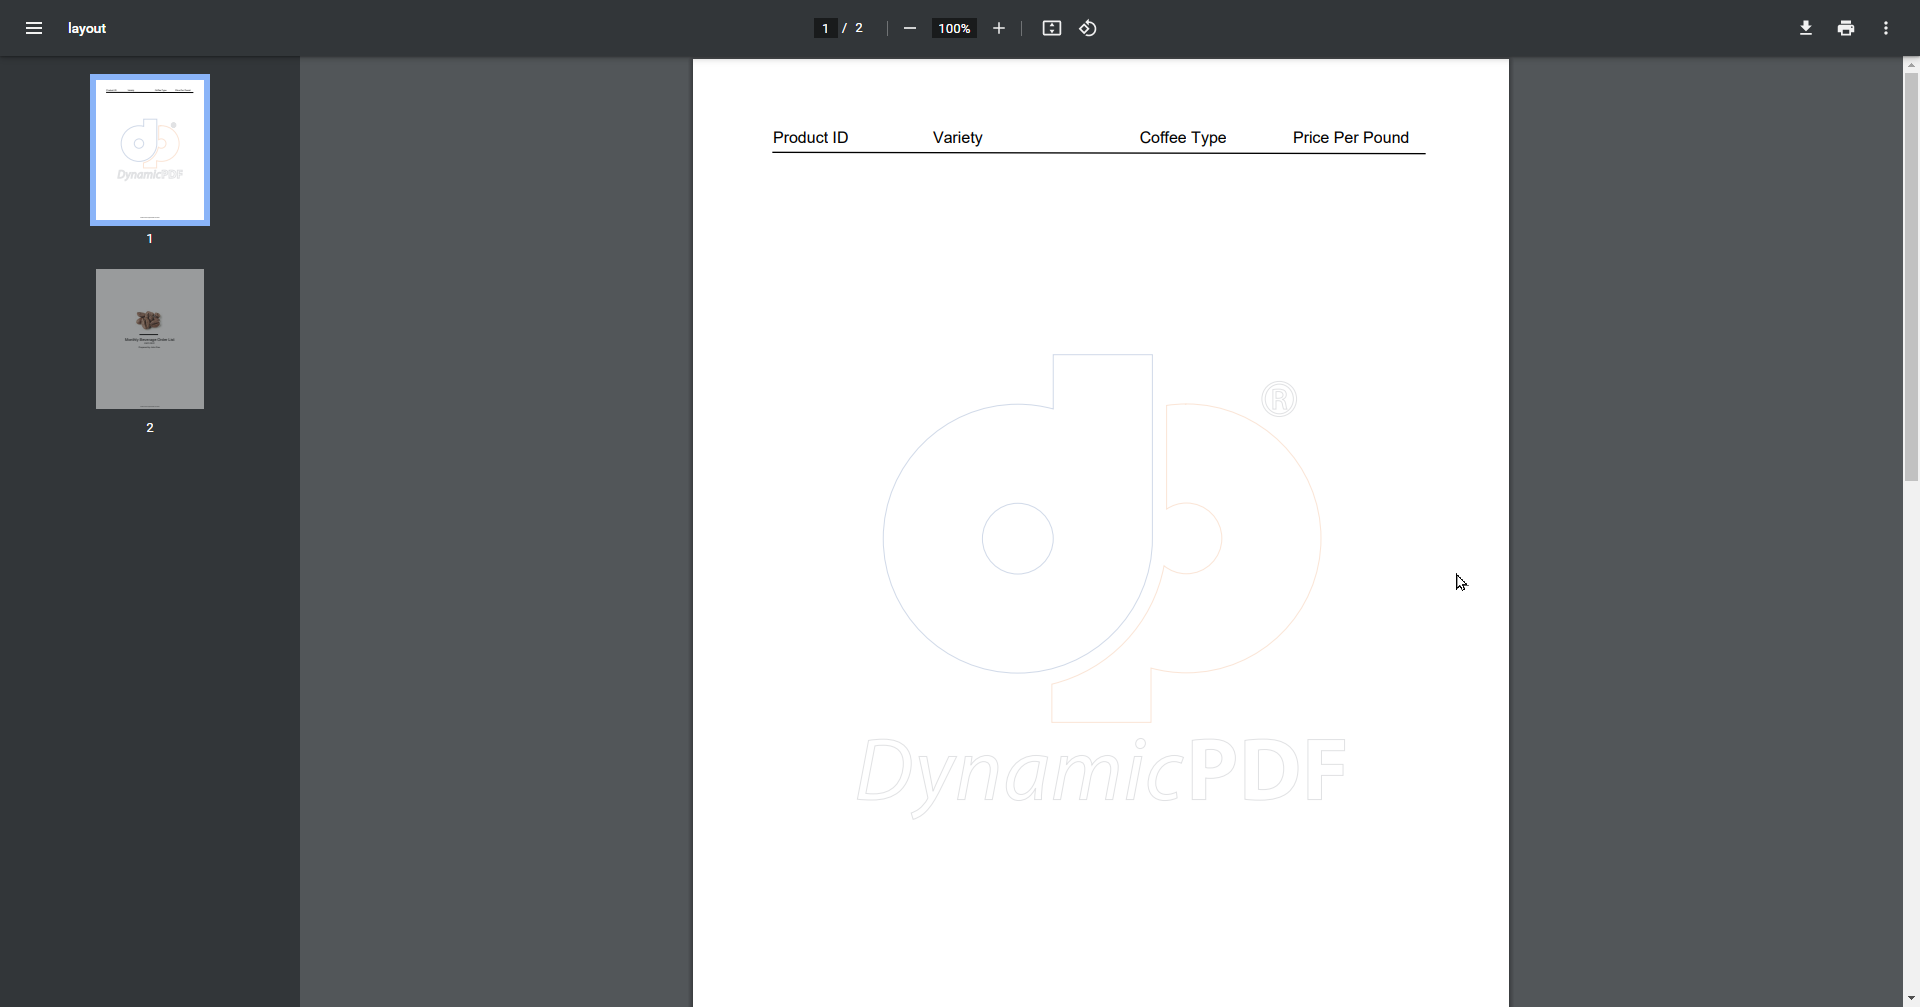
Figure 14. Running the report with only the header values.
Complete Report Details
Now let's add the repeating data for the report's details section.
-
Add three RecordBox elements and one RecordArea element to the details section.
-
Add the
ProductIDto the first RecordBox and set the element's x position as 10 and y position as 2. -
Add
Varietyto the second RecordBox andTypeto the third RecordBox. Assign the x values as 130 and 285. Assign the y values as 2. -
To the RecordArea element, add the following text
$#Price#and assign its x value as 400 and y value as 2. Also, set the alignment to right alignment. -
Resize the details section so its height is 20.

Figure 15. Adding and formatting fields in report's data section.
- Run the report and note the created PDF.

Figure 16. The generated report.
Complete Report Footer
Let's create the report's footer. A report's footer, like its header, contains non-repeating data, only it is displayed at the bottom of a report section's details. A footer is repeated for each page of data.
- Add a ReportArea to the footer section and add the following text:
Report created by #Author#. - Change the area's font size to 8 and font to
HelveticaOblique.
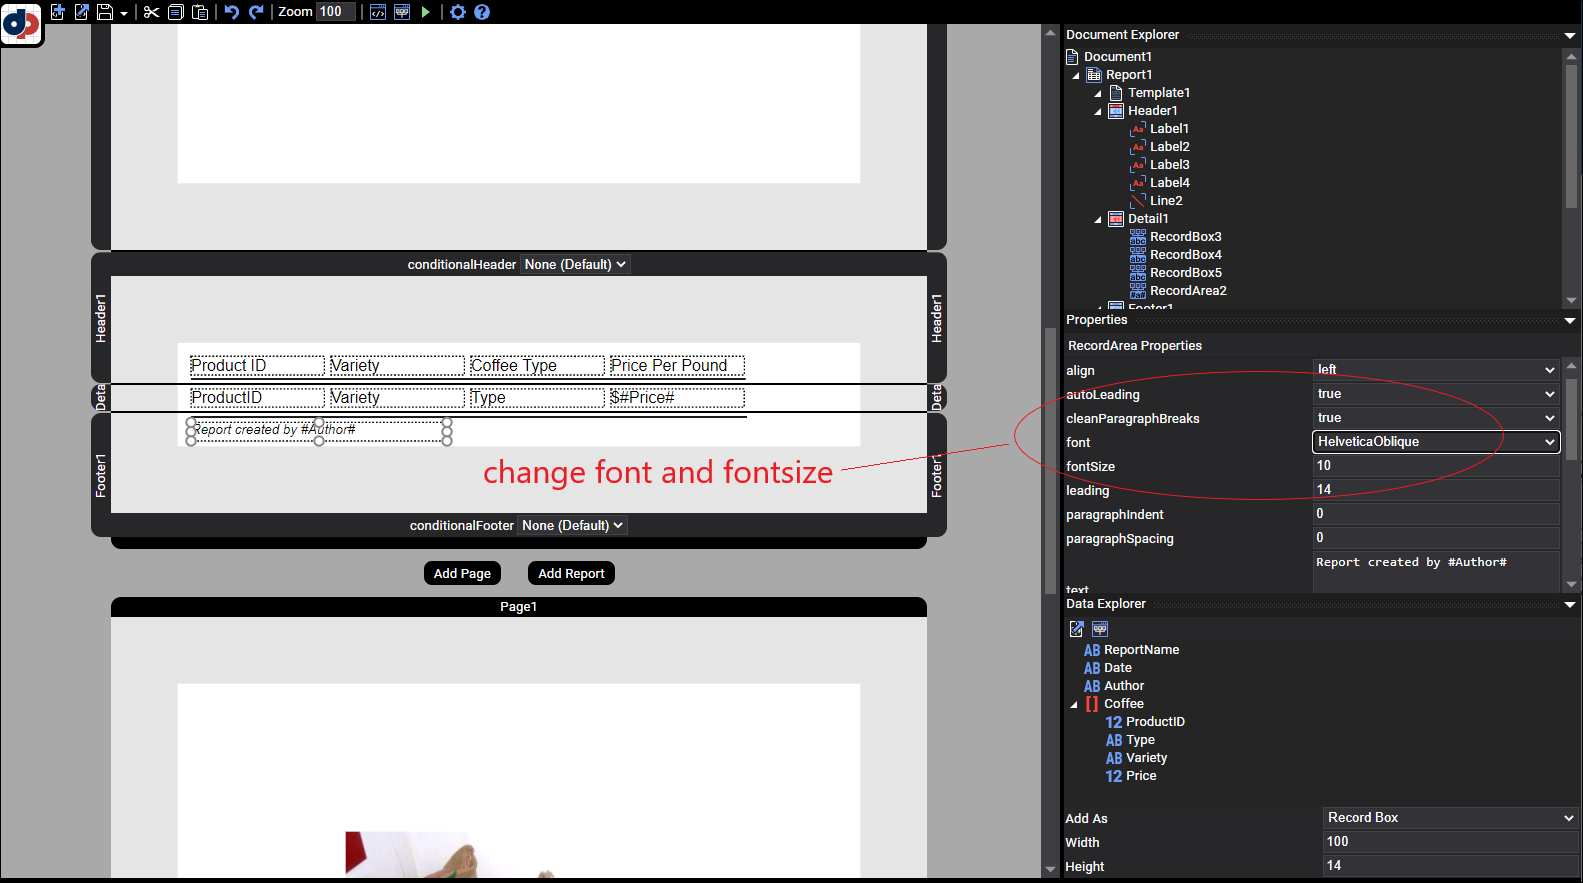
Figure 17. Adding and formatting field in the report's footer section.
After completing all three sections, the report contains all the needed JSON fields.

Figure 18. All three report sections completed.
Generate PDF
- Generate the PDF and review the created report.
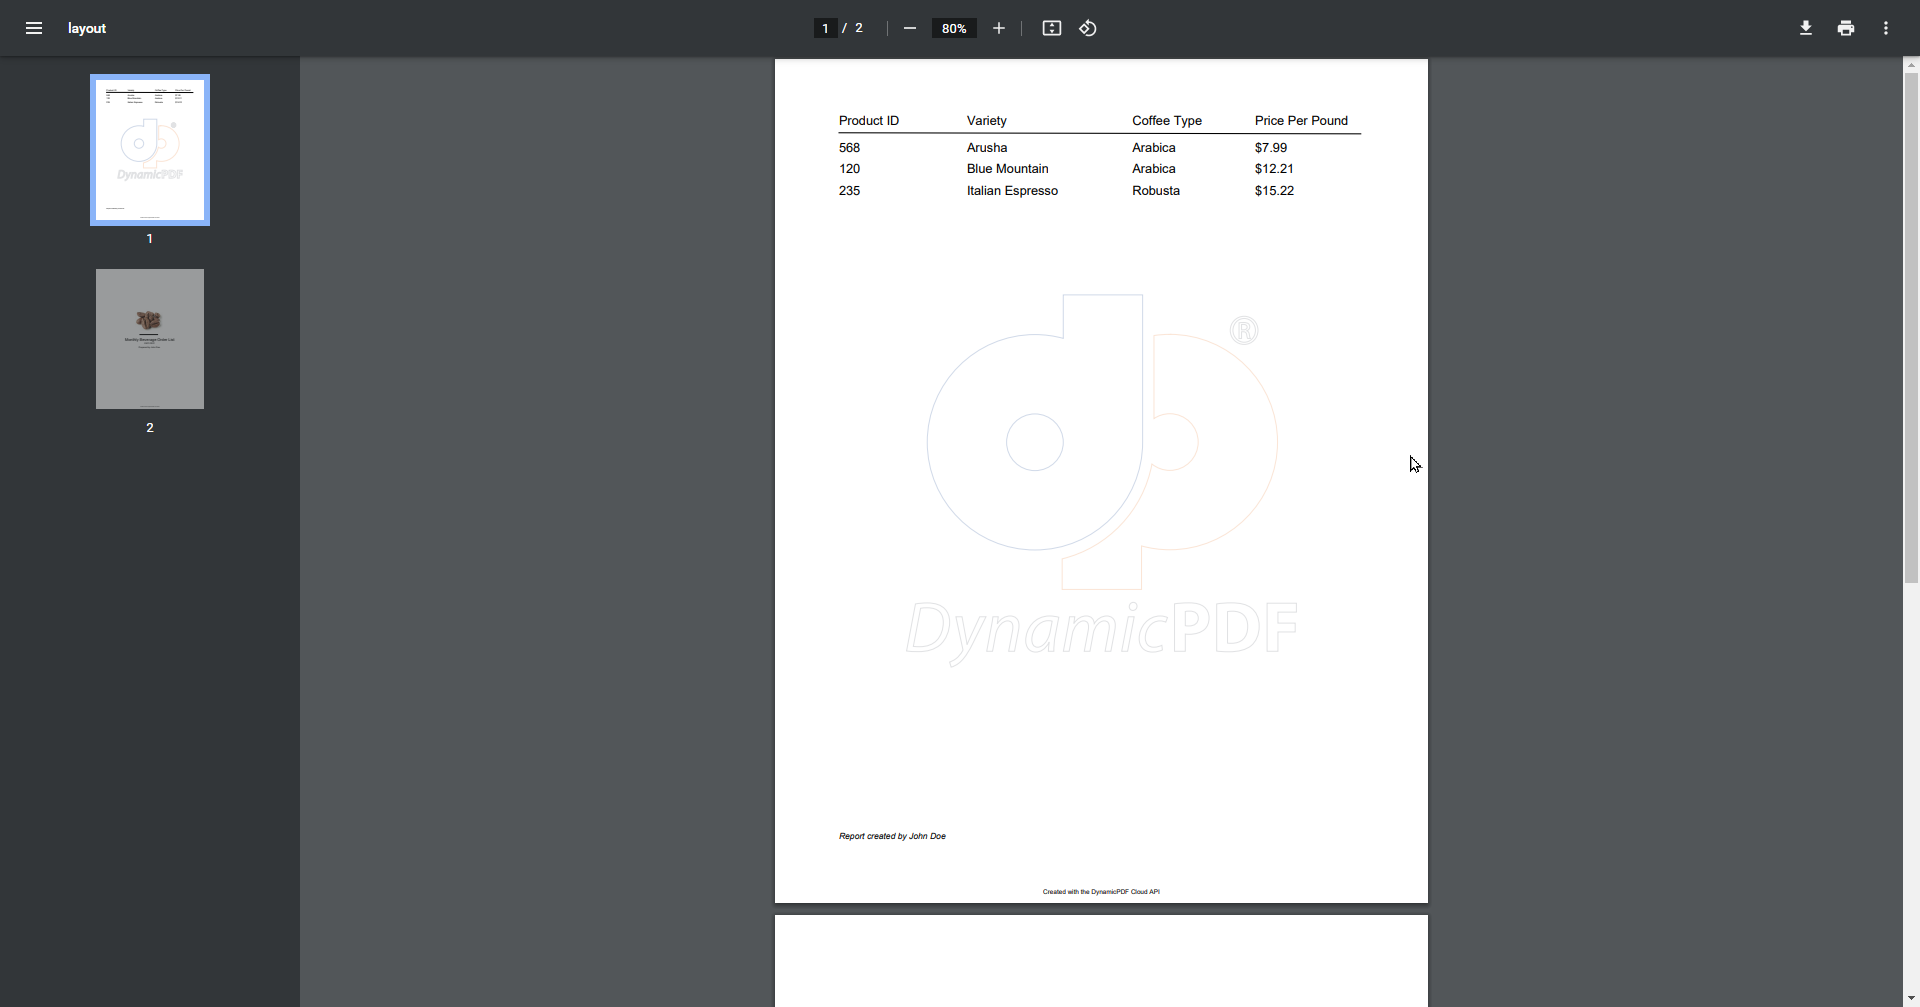
Figure 19. The completed report with cover page.
Add More Records
Of course, most data-driven reports contain more data than can be displayed on a single page. DynamicPDF Designer facilitates multi-page reports by continuing data across multiple pages and by repeating the header and footer. Let's illustrate by adding more data to the JSON dataset.
- Replace the JSON data with the following data.
{
    "ReportName": "Monthly Beverage Order List",
    "Date": "09/21/2021",
    "Author": "John Doe",
    "Coffees": [
        {
            "ProductID": 568,
            "Type": "Arabica",
            "Variety": "Arusha",
            "Price": 7.99
        },
        {
            "ProductID": 120,
            "Type": "Arabica",
            "Variety": "Blue Mountain",
            "Price": 12.21
        },
        {
            "ProductID": 235,
            "Type": "Robusta",
            "Variety": "Italian Espresso",
            "Price": 15.22
        },
        {
            "ProductID": 568,
            "Type": "Arabica",
            "Variety": "Arusha",
            "Price": 7.99
        },
        {
            "ProductID": 124,
            "Type": "Arabica",
            "Variety": "Blue Mountain",
            "Price": 12.21
        },
        {
            "ProductID": 239,
            "Type": "Robusta",
            "Variety": "Italian Espresso",
            "Price": 15.22
        },
        {
            "ProductID": 522,
            "Type": "Arabica",
            "Variety": "Arusha",
            "Price": 7.99
        },
        {
            "ProductID": 122,
            "Type": "Arabica",
            "Variety": "Blue Mountain",
            "Price": 12.21
        },
        {
            "ProductID": 321,
            "Type": "Robusta",
            "Variety": "Italian Espresso",
            "Price": 15.22
        },
        {
            "ProductID": 222,
            "Type": "Arabica",
            "Variety": "Arusha",
            "Price": 7.99
        },
        {
            "ProductID": 244,
            "Type": "Arabica",
            "Variety": "Blue Mountain",
            "Price": 12.21
        },
        {
            "ProductID": 111,
            "Type": "Robusta",
            "Variety": "Italian Espresso",
            "Price": 15.22
        },
        {
            "ProductID": 134,
            "Type": "Arabica",
            "Variety": "Arusha",
            "Price": 7.99
        },
        {
            "ProductID": 441,
            "Type": "Arabica",
            "Variety": "Blue Mountain",
            "Price": 12.21
        },
        {
            "ProductID": 451,
            "Type": "Robusta",
            "Variety": "Italian Espresso",
            "Price": 15.22
        },
       {
            "ProductID": 235,
            "Type": "Robusta",
            "Variety": "Italian Espresso",
            "Price": 15.22
        },
        {
            "ProductID": 568,
            "Type": "Arabica",
            "Variety": "Arusha",
            "Price": 7.99
        },
        {
            "ProductID": 124,
            "Type": "Arabica",
            "Variety": "Blue Mountain",
            "Price": 12.21
        },
        {
            "ProductID": 239,
            "Type": "Robusta",
            "Variety": "Italian Espresso",
            "Price": 15.22
        },
        {
            "ProductID": 522,
            "Type": "Arabica",
            "Variety": "Arusha",
            "Price": 7.99
        },
        {
            "ProductID": 226,
            "Type": "Arabica",
            "Variety": "Blue Mountain",
            "Price": 12.21
        },
        {
            "ProductID": 344,
            "Type": "Robusta",
            "Variety": "Italian Espresso",
            "Price": 15.22
        },
        {
            "ProductID": 12,
            "Type": "Arabica",
            "Variety": "Arusha",
            "Price": 7.99
        },
        {
            "ProductID": 18,
            "Type": "Arabica",
            "Variety": "Blue Mountain",
            "Price": 12.21
        },
        {
            "ProductID": 17,
            "Type": "Robusta",
            "Variety": "Italian Espresso",
            "Price": 15.22
        },
        {
            "ProductID": 97,
            "Type": "Arabica",
            "Variety": "Arusha",
            "Price": 7.99
        },
        {
            "ProductID": 53,
            "Type": "Arabica",
            "Variety": "Blue Mountain",
            "Price": 12.21
        },
        {
            "ProductID": 87,
            "Type": "Robusta",
            "Variety": "Italian Espresso",
            "Price": 15.22
        },
        {
            "ProductID": 178,
            "Type": "Arabica",
            "Variety": "Arusha",
            "Price": 7.99
        },
        {
            "ProductID": 183,
            "Type": "Arabica",
            "Variety": "Blue Mountain",
            "Price": 12.21
        },
        {
            "ProductID": 173,
            "Type": "Robusta",
            "Variety": "Italian Espresso",
            "Price": 15.22
        },
        {
            "ProductID": 927,
            "Type": "Arabica",
            "Variety": "Arusha",
            "Price": 7.99
        },
        {
            "ProductID": 593,
            "Type": "Arabica",
            "Variety": "Blue Mountain",
            "Price": 12.21
        },
        {
            "ProductID": 887,
            "Type": "Robusta",
            "Variety": "Italian Espresso",
            "Price": 15.22
        }
    ]
}
- Generate the PDF and note the header and footer repeats for each page of data.
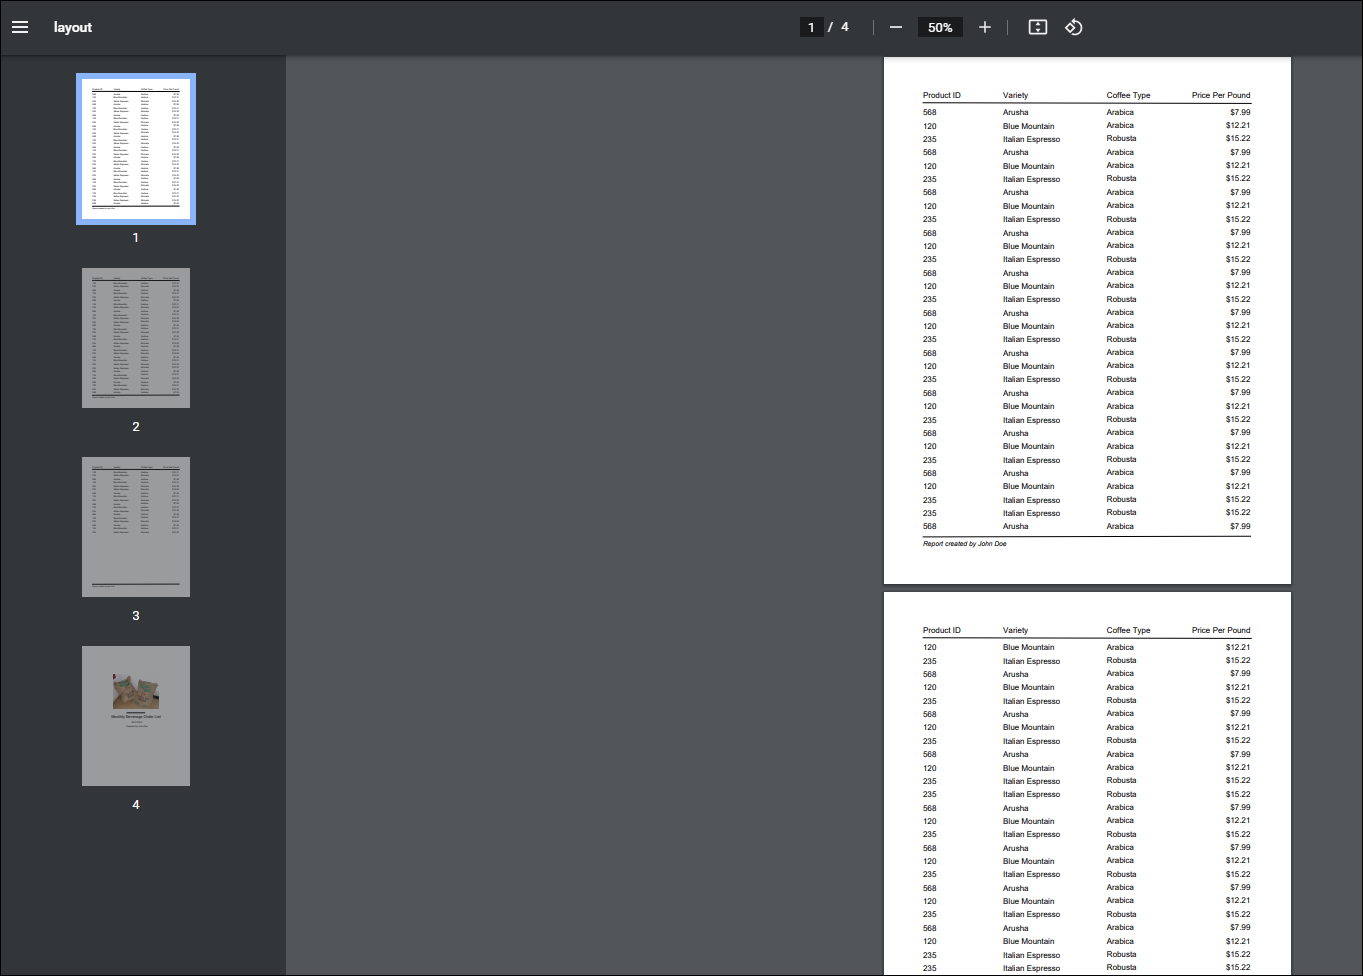
Figure 20. The completed report with three pages of data.
Do not be misled by this tutorial's simple example, headers and footers can also display dynamically generated data, specific to each page of data. Future tutorials demonstrate these capabilities.
Discussion
In this tutorial, we expanded on the simple cover-page in the first tutorial and created an actual report. A report contains a header, a footer, and a details section. We added static top-level data to the report's header and footer and then added the repeating data to the report's details section. Again, be certain to remember the limitations of a JSON dataset when creating a report in Designer; only top-level data fields can appear in a report's header or footer. Moreover, only child fields in a top-level array field can appear in a report's details section. And the JSON data array must be assigned an element name; anonymous arrays are not supported in a DLEX template.
Remember, only top-level data fields can appear in a report's header or footer. Moreover, only child fields in a top-level array field can appear in a report's details section.
Of course, many real-world reports require more than one level of repeating data. DynamicPDF Designer facilitates reports with multiple levels of data through its Subreport functionality. We illustrate Subreports in the next tutorial: Create A Subreport.