Using the DynamicPDF API in Make Scenarios

Integrating the DynamicPDF API into a Make scenario is straightforward when using Make’s built-in HTTP module. Here you learn how to configure Make's HTTP module to call all eight of the DynamicPDF API's REST endpoints without writing any code.
The DynamicPDF API provides a dedicated custom Make app that exposes all endpoint parameters directly in the UI, eliminating the need to use the built-in HTTP module. The custom app is more intuitive, easier to configure, and reduces the likelihood of errors compared to working with the HTTP module. The DynamicPDF API custom Make app
The HTTP module allows you to define authentication, request headers, query parameters, HTTP methods, and request body formats. It is a versatile module, and by using it, you can easily call every DynamicPDF API endpoint without writing any code.
This blog post illustrates using Make's built-in HTTP module. It assumes basic familiarity with using modules to build scenarios using Make.
Using the HTTP module, you can call the following DynamicPDF API endpoints in your Make scenarios.
There are two distinct ways to call the DynamicPDF API endpoints, depending on how the request body is structured. Some endpoints accept raw binary data sent directly in the body of an HTTP POST request, while others require a multipart/form-data submission. The pdf-text, pdf-xmp, pdf-info, pdf-security-info, and image-info endpoints accept raw binary payloads, where the file itself is posted as the request body. In contrast, the pdf-image, dlex-layout, and pdf endpoints require multipart form submissions to support multiple inputs and named fields. Make’s built-in HTTP module supports both request patterns, which is illustrated throughout this blog’s examples.
Make
Make is a visual automation platform that developers can use to visually define how data moves between systems and APIs. Instead of writing custom integration code, developers assemble scenarios composed of modules that execute in sequence, handle branching logic, transform data, and manage errors. When using the HTTP module with the DynamicPDF API endpoints, the scenario builder provides a clear, repeatable way to define request construction, authentication, payload handling, and response processing, all within a single workflow. This approach lets developers focus on API behavior and document processing logic rather than infrastructure, making it easier to prototype, test, and maintain integrations that combine DynamicPDF operations with other services.
Because Make.com continuously updates its user interface and modules, occasionally introducing breaking changes, some interface details may differ in future versions. The information in this blog is current as of version 4 of the HTTP module.
HTTP Module
The HTTP module in Make is an integration tool for sending custom HTTP requests (GET, POST, PUT, PATCH, DELETE, etc.) to an API, including services that don’t have native Make connectors, by configuring the URL, method, headers, body, and other settings directly in a scenario. It supports multiple authentication schemes (Basic, API Key, OAuth 2.0, client certificates), flexible body types (JSON, raw text, form data, multipart), and enables parsing API responses for use in subsequent modules. With it, you can build workflows that integrate in-house APIs, fetch or manipulate remote data, and orchestrate complex automation without writing code outside of Make’s visual editor.
Refer to Make's documentation for more details on the HTTP module.
HTTP Request Credentials
You must use an API key to call the DynamicPDF API endpoints (Apps and API Keys). You use API key authentication when using DynamicPDF API with the HTTP module (API key authentication type).
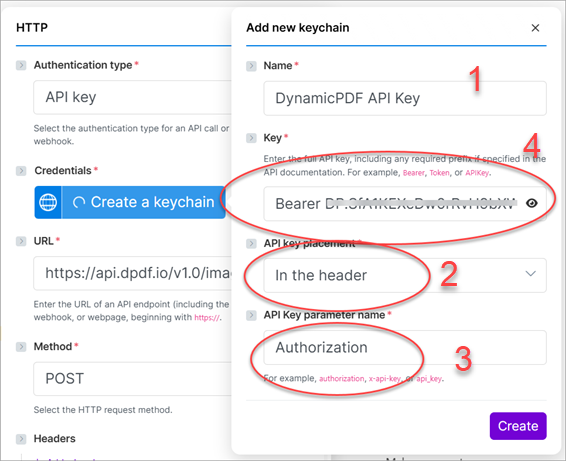
When creating a keychain entry for API key authentication, you first provide a descriptive name to identify the connection in your Make scenario. You then enter the complete API key exactly as required by the service, including any necessary prefix such as Bearer. Next, you choose where the API key is included in the request, typically in the HTTP header. Finally, you specify the parameter name the API uses to read the key, such as Authorization, which tells the remote service how to locate and validate the credential in each request.
The DynamicPDF API puts the key in the HTTP header. Authorization: Bearer <your-api-key>
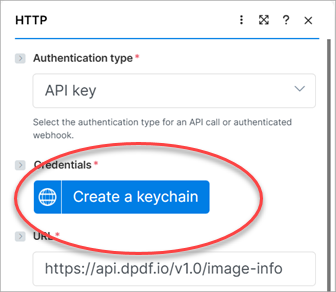
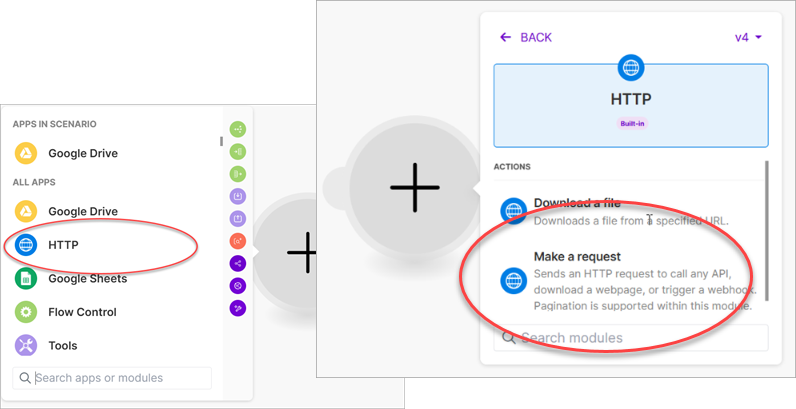
The first time you use the HTTP module, you must create a keychain to place your DynamicPDF API key in the request's header. To create the keychain, create a new scenario (1) and add a new HTTP module (2). Select Make a request as the Action (3). In the HTTP module assign API key as the Authentication type (4).

In Credentials select Create a keychain to take you to a popup allowing you to create the DynamicPDF API key. Note that if you already have a keychain for a different application, then you are presented with the option to Add
In the Add new keychain dialog provide it a Name (1), select In the header as the API key placement (2) and Authorization as the API Key parameter name (3). Add the DynamicPDF API key to Key (4) and be certain to prepend Bearer to its value.
After adding the keychain, you can now use the key in subsequent calls to the API using the HTTP module.
The pdf-text, pdf-xmp, pdf-info, and pdf-security-info Endpoints
The pdf-text, pdf-xmp, pdf-info, and pdf-security-info endpoints all accept raw binary data as the body of an HTTP POST request. When calling these endpoints from Make, you configure the HTTP module to send the file contents directly as binary payload rather than as form data. The following four examples demonstrate how to upload a file as raw binary and process the resulting response from each endpoint.
pdf-text
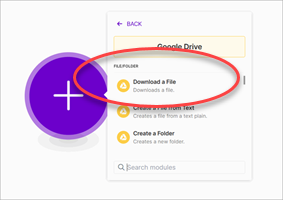
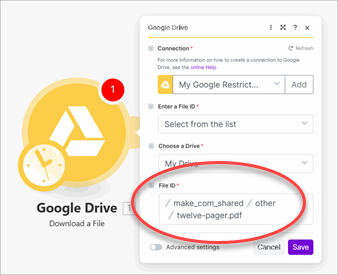
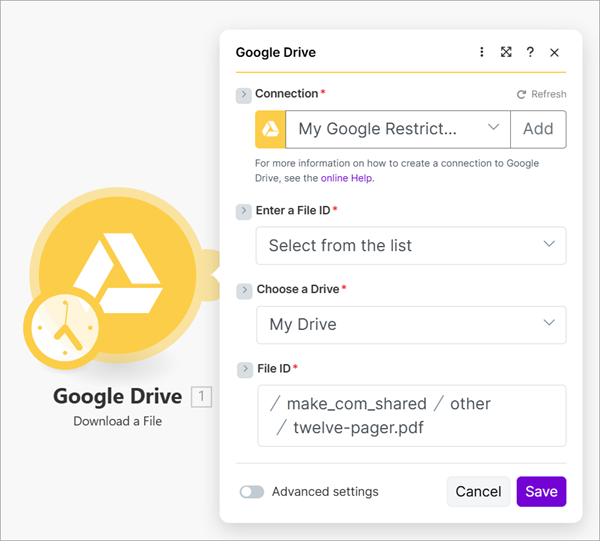
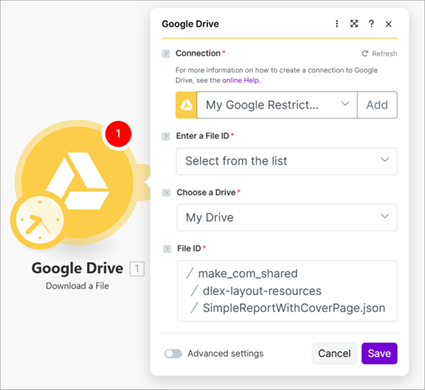
Start by creating a new scenario that calls the pdf-text endpoint. If you already created a scenario in the previous step when setting up your API key, you can reuse it; otherwise, create a new one. In this example, assume the PDF you want to process is stored in Google Drive and contains twelve pages. Add a Google Drive module to the scenario and choose Download a File, then select Select from the list to browse your drive and locate the document, such as twelve-pager.pdf. Once selected, this module will download the PDF and provide the binary file data that you will pass directly to the pdf-text endpoint in the next step.
Refer to Make.com's documentation on the Google Drive module for more information (google-drive).
How you obtain the PDF is not important for understanding the examples that follow. The file could come from Google Drive, Dropbox, a public URL, an Amazon S3 bucket, or any other source supported by Make. What matters is that the module producing the file provides the required metadata, including the file name, MIME type, and binary content, so it can be sent correctly to the DynamicPDF API endpoints.

After adding the Google Drive module, add an HTTP module and choose Make a request from Actions.
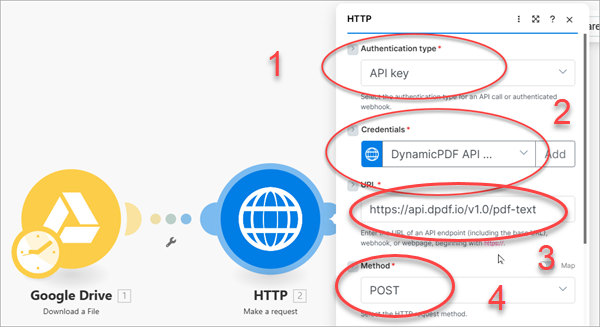
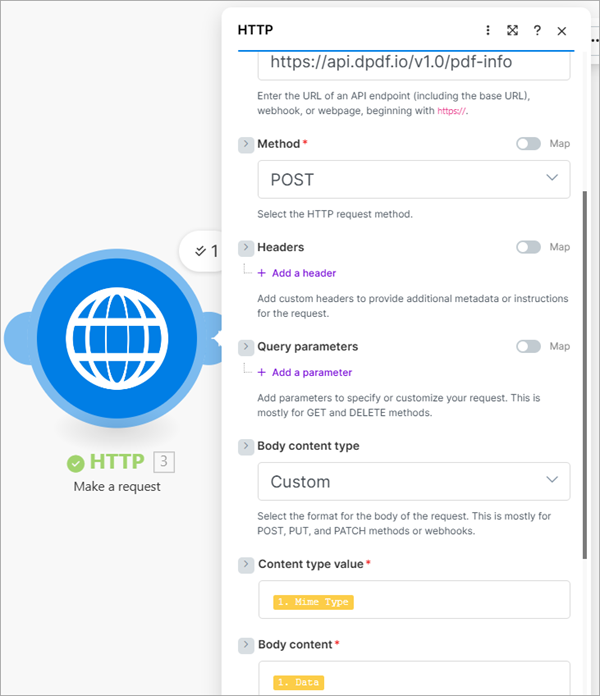
Select API key as the Authentication type (1) and select the credentials previously created for the DynamicPDF API key (2). Add the URL to the pdf-text endpoint (3) and select POST as the Method (4).
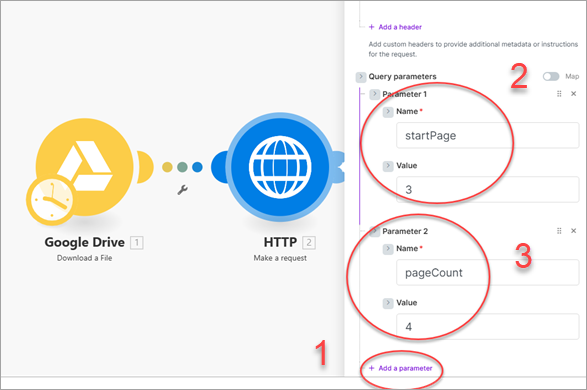
Add two query parameters using Add a parameter (1) named startPage (2) and pageCount (3). This ensures the endpoint only gets the text from page three through page six when processing the PDF.
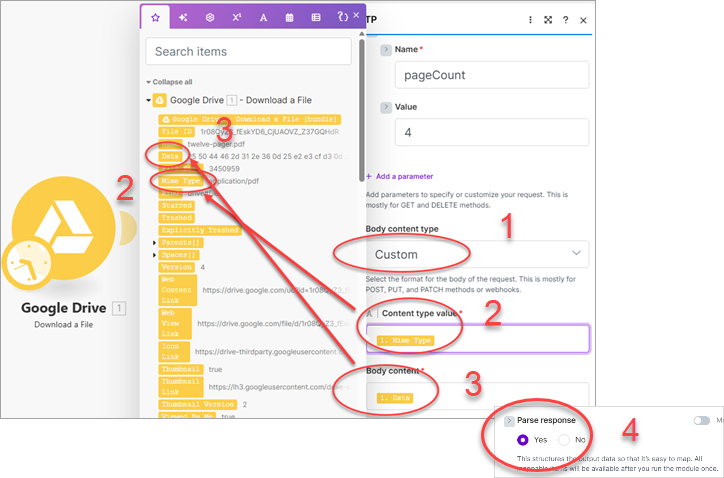
Scroll down to review more of the HTTP module's configuration. Select Custom as the Body Content type (1), then from the Google Drive module select the Mime Type as the Content type value (2) and Data as the Body content (3). Leave the Parse response set to Yes (4) so that the response returns only the returned JSON.
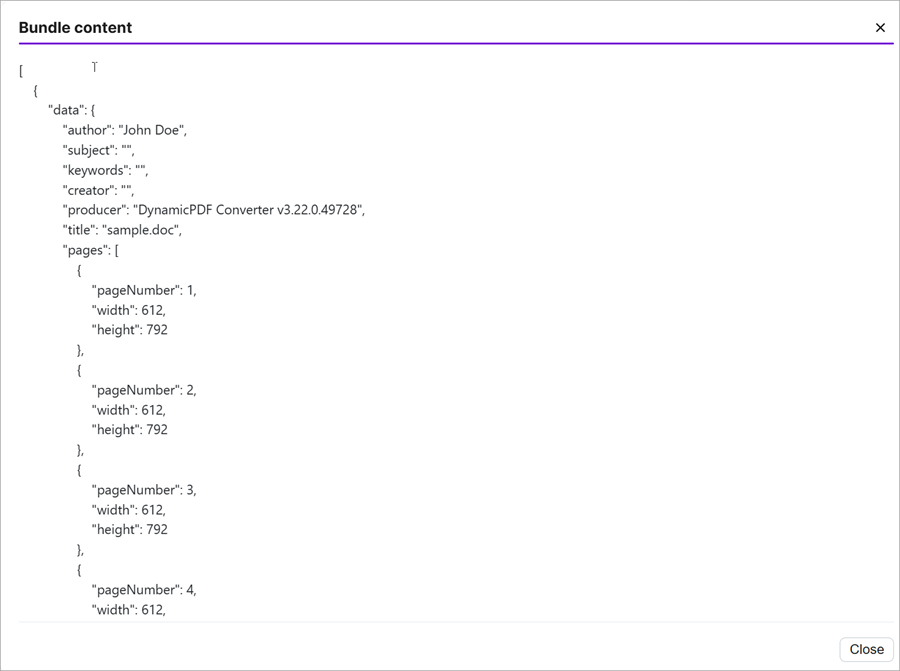
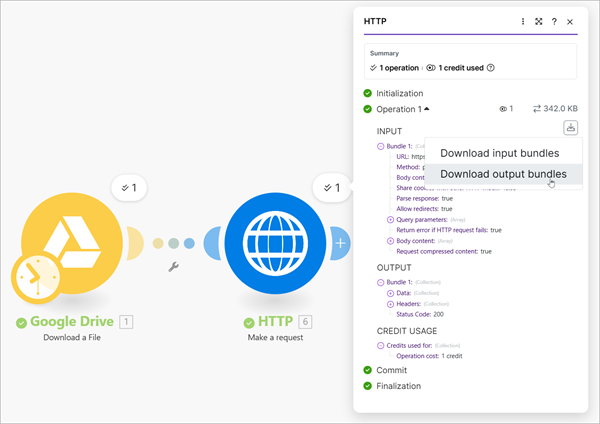
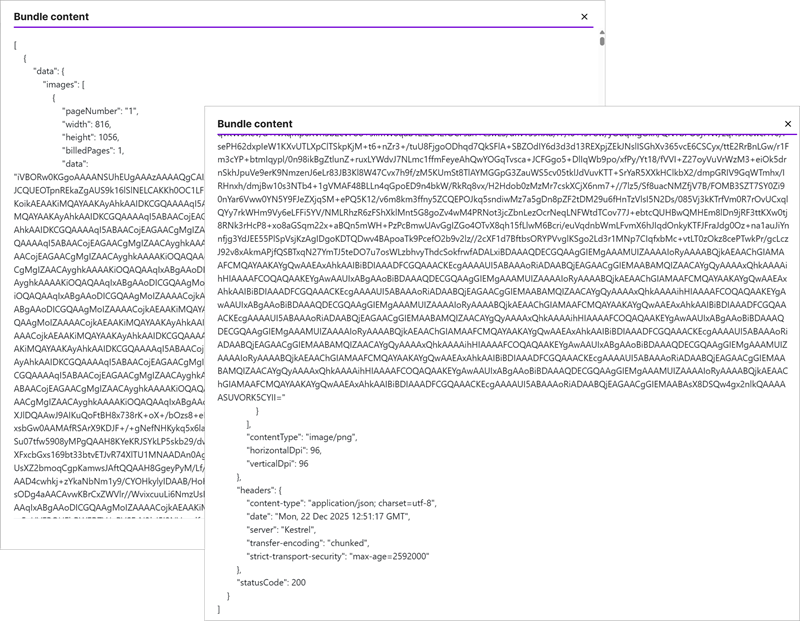
After creating the HTTP request, select Run once to run the scenario. After successfully running the scenario, open the results and select Download output bundles to review the JSON results.
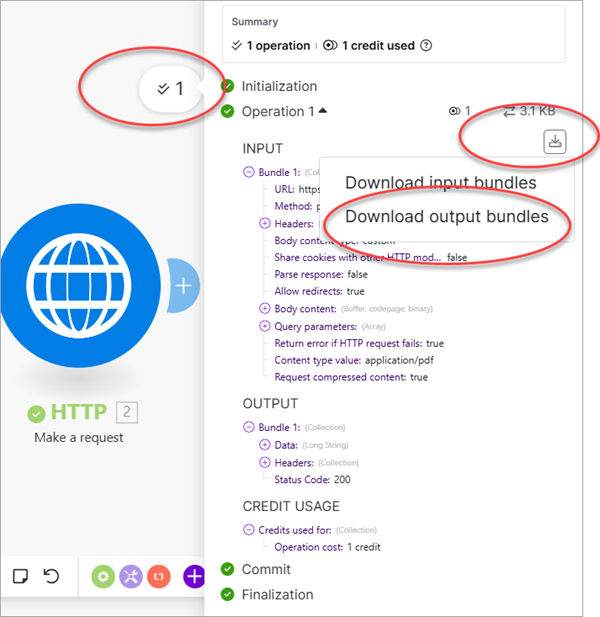
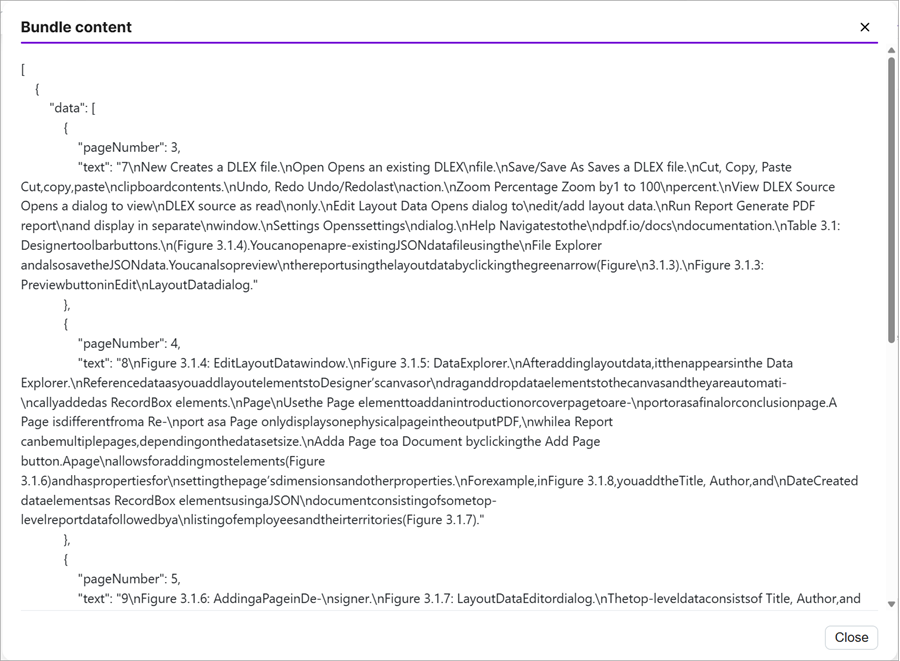
The endpoint returned the text as JSON, where each page contains its text. Because you told the module to parse the response, the JSON is formatted for easy display.
pdf-xmp
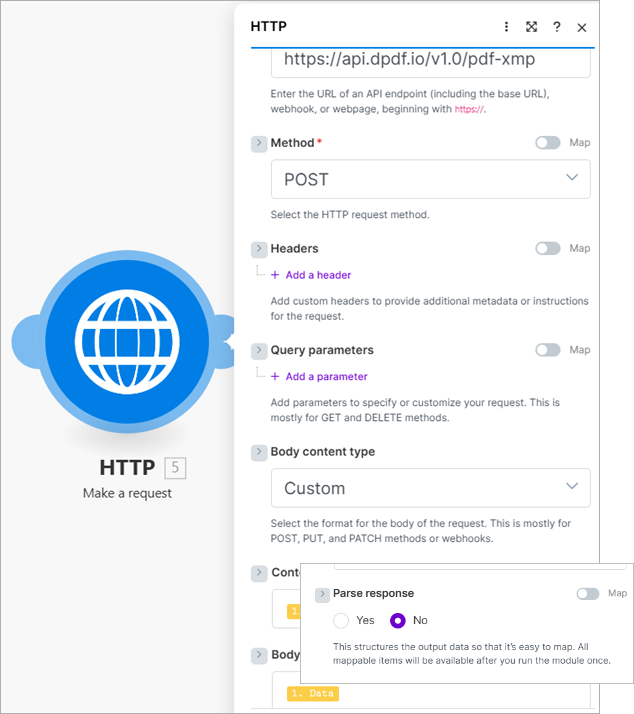
The pdf-xmp endpoint, like the pdf-text endpoint, takes a PDF as raw binary. Other than the endpoint URL, the remaining parameters are the same. The body content type is custom, the content type's value is the PDF document's mime type, and the body content is the document's data. Select No to prevent Make from parsing the XML response.
After running the application the document's XMP metadata is returned as XML.
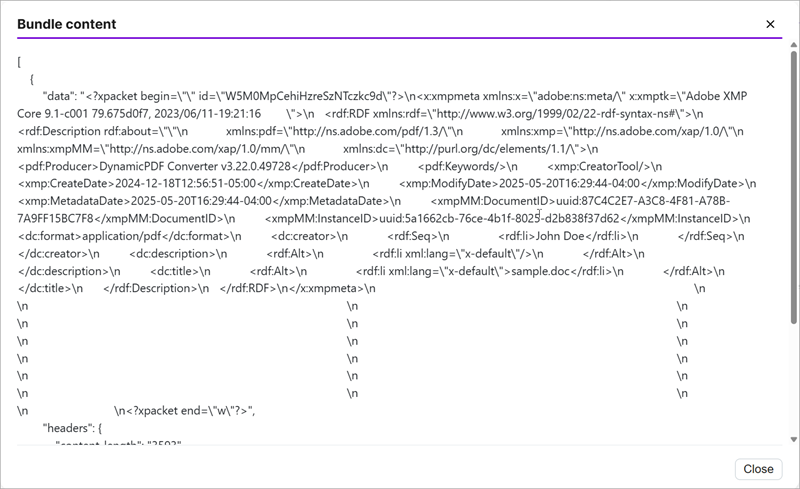
In this case, if you had opted to parse the XML response, Make would have translated the XML to RDF.
pdf-info
The pdf-info endpoint, like the previous two endpoints discussed, also takes a PDF as raw binary. Like the pdf-text endpoint, it returns JSON containing the requested information describing the examined PDF.
pdf-security-info
The pdf-security-info endpoint, like the previous three endpoints, also takes a PDF as raw binary. The endpoint returns a PDF document's security information as JSON.
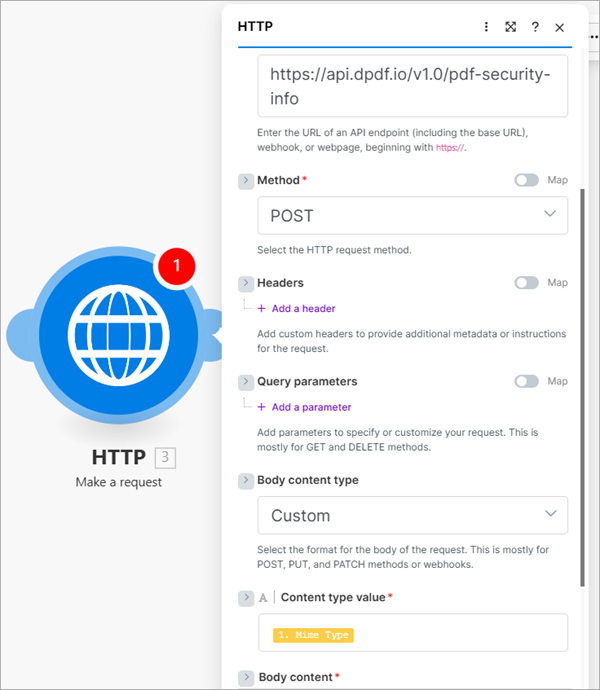

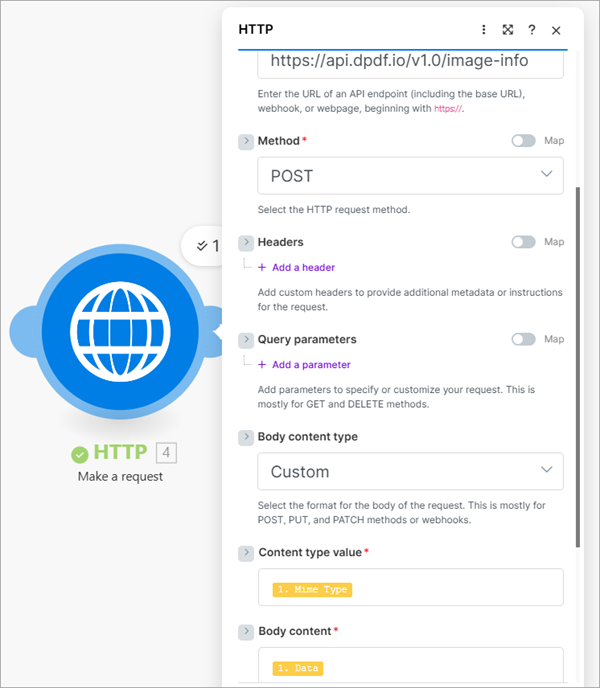
image-info
The image-info endpoint, like the previous four endpoints, takes an image as raw binary. The endpoint returns an image's information as JSON.
pdf-image
The previous five endpoints accept a binary file sent as the raw body of an HTTP POST request and return a JSON document in response. The pdf-image endpoint, in contrast, requires an HTTP POST form submission in which the PDF is sent as multipart/form-data. Its response is also JSON, but instead of simple metadata, each rasterized page image is first converted to Base64 and then embedded directly in the returned JSON payload.
In this example, once again assume you have a twelve-page PDF document named twelve-pager.pdf stored in your Google Drive. Add a Google Drive module to the scenario, select Download a File, and choose the PDF you want to send to the pdf-image endpoint.
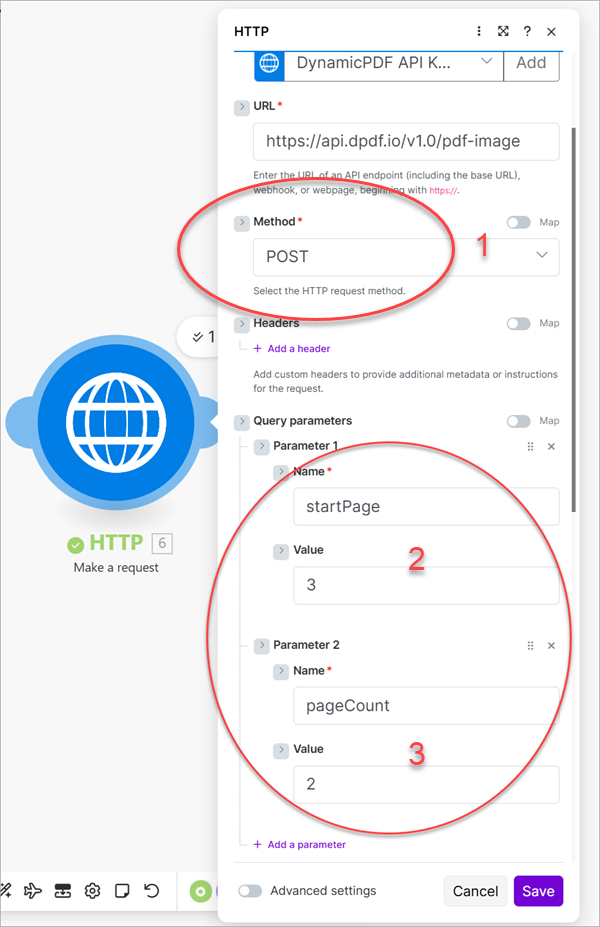
Add a new HTTP module, add the pdf-image endpoint URL and change the Method to POST (1). Add two query parameters so you only rasterize pages three and four by setting startPage to 3 (2) and pageCount to 2 (3).
Change the Body content type to multipart/form-data (1) and then assign pdf to Name (2) for Field 1. Assign File (3) as the Field type and select Google Drive - Download a File as the File (4). By selecting (4) Make automatically assigns the file's data to the Google Drive module's Data and file's name to the Google Drive module's Name.

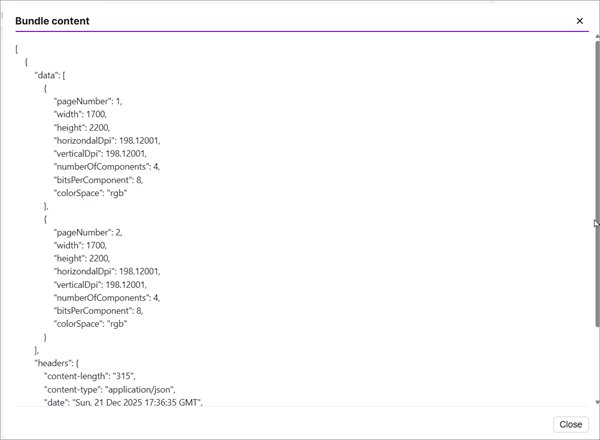
Run the application and then select Download output bundles to view the returned JSON that contains the two rasterized images as base64 data.
The dlex-layout Endpoint
The dlex-layout endpoint uses a multipart/form-data form submission that combines resources from two different locations. The DLEX template itself resides in your DynamicPDF cloud storage and is referenced by its path, which you submit as plain text using the DlexPath form field. The accompanying layout data is provided as JSON that exists locally within your scenario and is submitted as binary content using the LayoutData form field. Together, these form fields allow the endpoint to merge a stored DLEX template with externally supplied JSON data to generate the resulting PDF.
If you prefer not to store a DLEX template in DynamicPDF cloud storage, you can instead upload the template directly as part of the request by using the Resource form field rather than the DlexPath field. In this case, the DLEX file itself is sent as binary data in the multipart/form-data submission, eliminating the need to reference a stored path. This alternative approach is demonstrated later in this blog post.
Refer to the documentation on this endpoint for more information.
- dlex-layout endpoint documentation
Let's first use DlexPath and LayoutData in an HTTP module to create a PDF report.
dlex-layout (DlexPath and LayoutData)
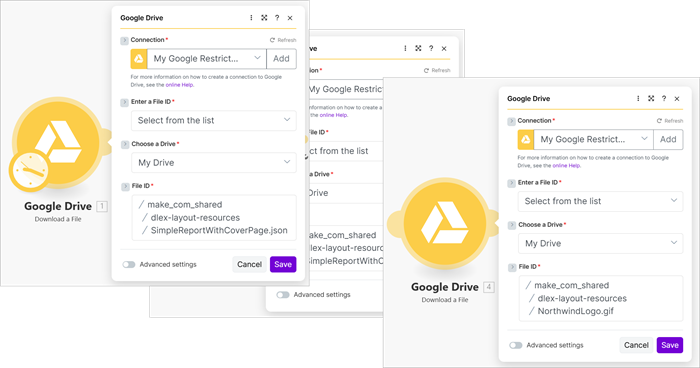
To call the dlex-layout endpoint, use the HTTP module just as you did for the previous endpoints, but configure the request body as multipart/form-data. Unlike endpoints that accept a single binary payload, dlex-layout requires multiple form fields to be submitted in one request. In this example, the DLEX template is referenced by its path in your DynamicPDF API cloud storage using the DlexPath field, while the JSON data used to populate the template is uploaded as binary using the LayoutData field. Assume the JSON data file, SimpleReportWithCoverPage.json, is stored in your Google Drive; you can retrieve it using a Google Drive module and pass its binary output directly into the HTTP module as the LayoutData form field.
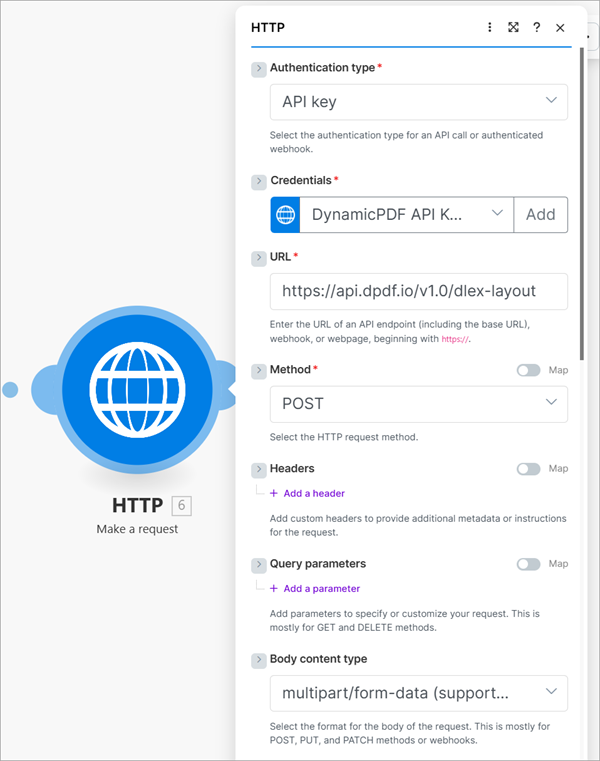
Add a new HTTP module to the scenario and after adding the API key and the URL, assign the Method as POST and the Body content type to multipart/form-data.

Assign Text as the first field's Field type (1), provide DlexPath as the value in Name (2), and assign it the path from cloud storage as the Value (3).
Add a new field and assign LayoutData as the Name (4), File as the Field type (5), and select Google Drive - Download a File as the File (6). This selection automatically links the file to the file from the previous Google Drive module you created.
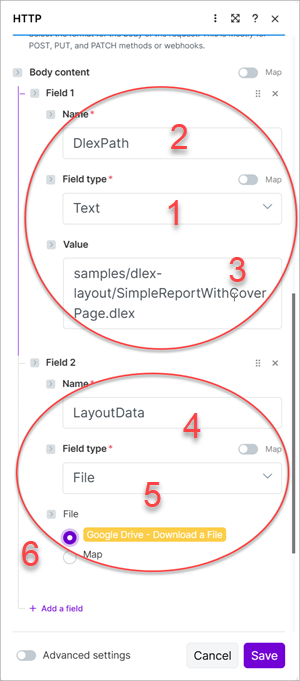
Alternatively, you could have selected Map and then manually mapped the file to the Data and Name properties from the previously created Google Drive module. You manually map to a Google Drive module's file properties later in this blog post.

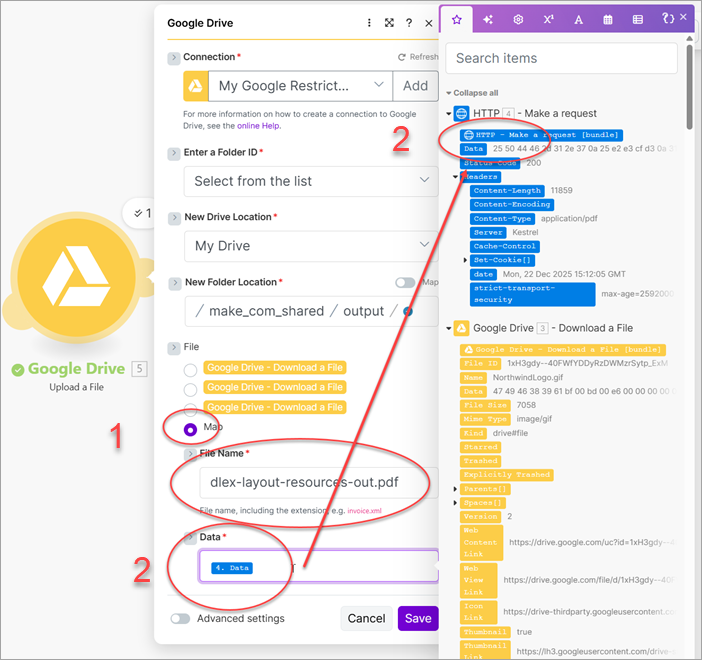
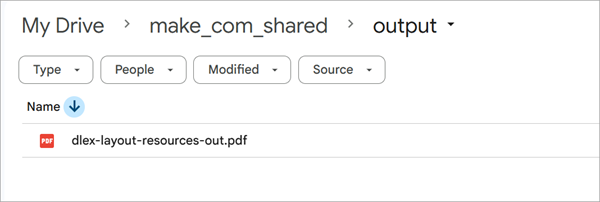
To view the PDF returned from the dlex-layout endpoint, add a new Google Drive module with the Action of Upload a File. Assume you have a folder entitled output on your Google Drive to output the created PDF. Assign the name you wish to save the PDF as to the File Name field (1) and map the Data to the Data from the HTTP module (2).
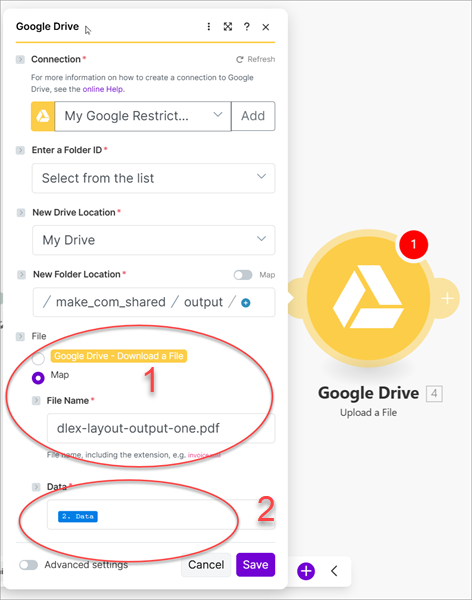
Run the scenario to call the endpoint and save the results. Navigate to the file in your Google Drive and open the created PDF in Acrobat.

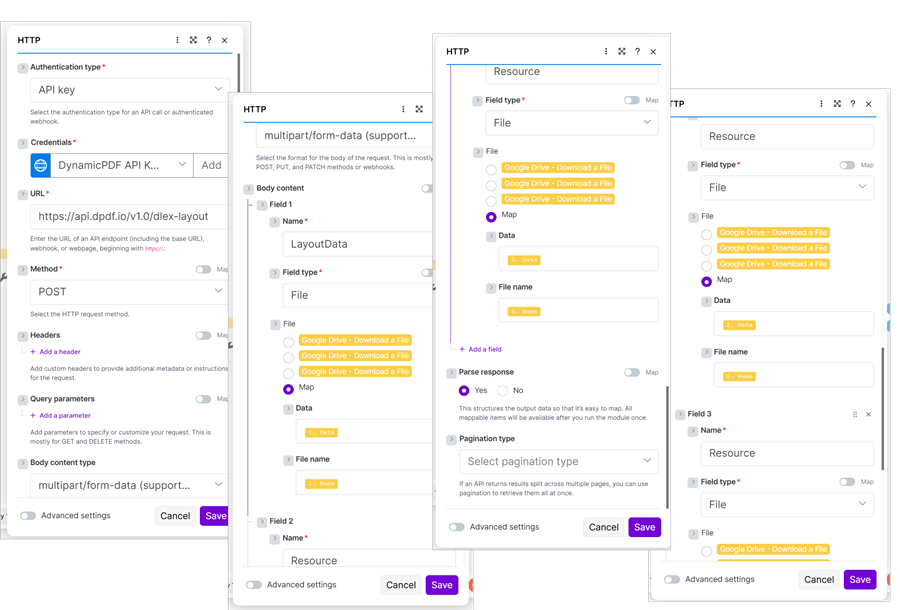
dlex-layout (LayoutData and Resource)
In the previous example, you specified the DlexPath as a text form field containing the relative path to a DLEX template stored in DynamicPDF API cloud storage. If instead you want to rely entirely on files from your own environment and avoid using DynamicPDF API storage, you can upload the DLEX template and any supporting assets directly as form files using the Resource field. In this situation, the DLEX file, embedded images, and JSON data are all sent as part of the same multipart/form-data request. For example, assume the DLEX template (SimpleReportWithCoverPage.dlex), an embedded image (NorthwindLogo.gif), and the JSON data (SimpleReportWithCoverPage.json) are all stored in your Google Drive. Add a Google Drive module that downloads each of these files so they can be included as resources in the HTTP request to the dlex-layout endpoint.
Add an HTTP module and after configuring the authentication and URL, set the Method as POST and the Body content type as multipart/form-data.
For the Body content, add a field named LayoutData (1), set the Field type to File (2) and then select Map (3) to display Data and File name. Add the Data to Data (4) and Name to the File name (5). Be careful to select the correct Google Drive module containing the file to download SimpleReportWithCoverPage.json (6).
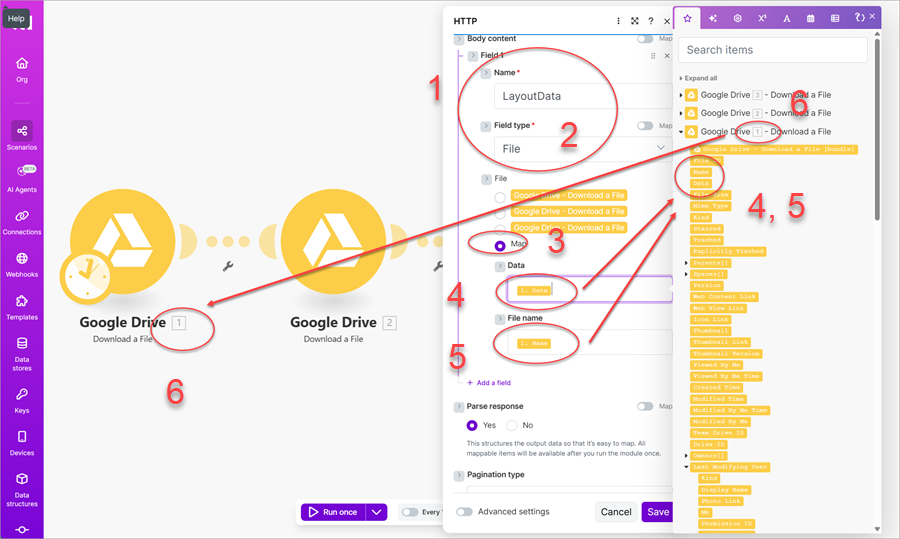
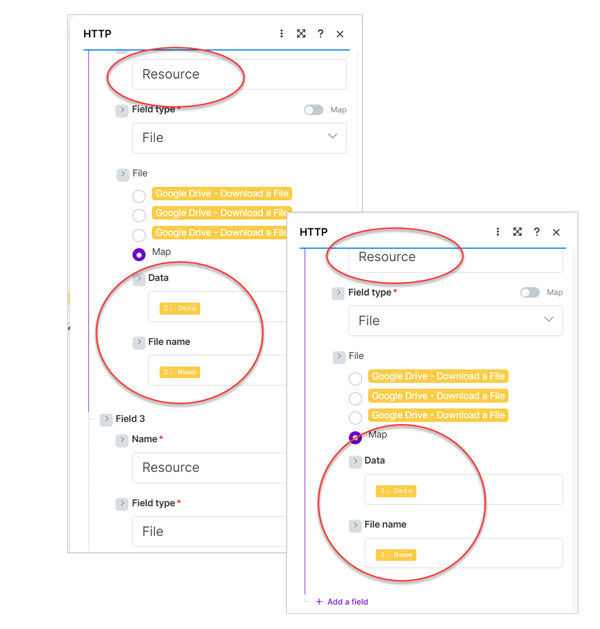
Create two more fields and assign Resource to the name and map the data and file name to the two resource files (SimpleReportWithCoverPage.dlex and NorthwindLogo.gif).
After configuring the HTTP module, run the application once.
After running the application, add a new Google Drive module and set the Action to Upload a File. Configure the output folder, select Map (1) and add the file name and map the data to the HTTP module's Data field (2).
Run the application and the endpoint is called and the file is then written to your Google Drive folder.
The pdf Endpoint
The final endpoint you use in a Make scenario is the pdf endpoint. This endpoint is the most versatile endpoint in the DynamicPDF API, as it can be used to create new PDFs as well as merge PDFs, images, documents, HTML, and other resources into a single PDF. The behavior of the endpoint is driven by a JSON file known as the Instructions document, which defines the inputs, processing steps, and output structure for the resulting PDF.
Refer to the DynamicPDF API's pdf endpoint documentation for more information.
Create an HTTP module and like the dlex-layout endpoint set it's type to multipart/form-data. Assume five resources and an associated JSON instructions on your Google drive.
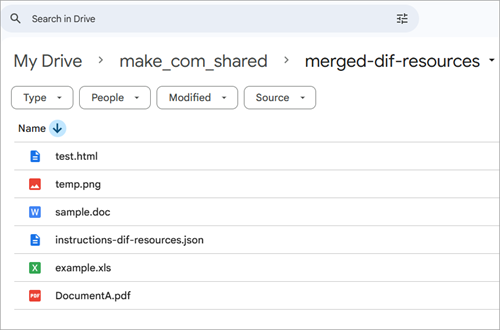
An Instructions JSON document, such as instructions-diff-resources.json, defines the set of input resources, their types, and their names, and the order in which they appear determines how they are merged in the final PDF. During execution, each resource is processed according to its type, with non-PDF inputs first converted into PDFs. All resulting PDFs are then merged sequentially into a single output document. In this example, the Instructions document converts an image and an HTML document to PDFs, includes an existing PDF as-is, and then converts a Word document and an Excel spreadsheet to PDFs before merging everything into one combined PDF.
{
  "inputs": [
    {
      "type": "image",
      "resourceName": "temp.png"
    },
    {
      "type": "html",
      "resourceName": "test.html"
    },
    {
      "type": "pdf",
      "resourceName": "DocumentA.pdf"
    },
    {
      "type": "word",
      "resourceName": "sample.doc"
    },
	{
      "type": "excel",
      "resourceName": "example.xls"
    }
  ]
}
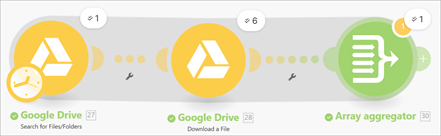
Rather than downloading each file individually as in the previous examples, you can download all required files in a single step to better demonstrate the versatility of the Google Drive module. Start by adding a Google Drive module and selecting the Search for Files/Folders action. This action returns a list of all files within a specified folder, which you can then use to retrieve multiple resources in one workflow and pass them collectively to subsequent modules in the scenario.
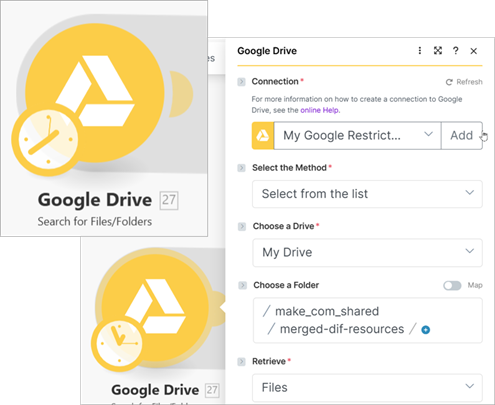
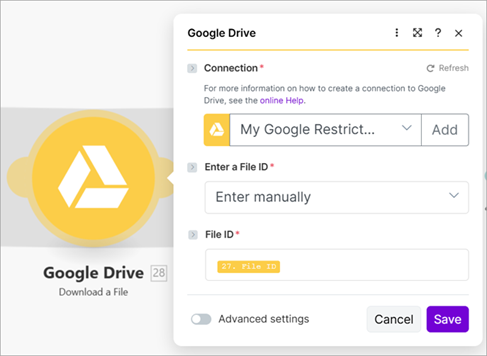
Next, connect a Google Drive module and set its action to Download a File. Connect the File ID to the File ID property from the previous module's search for files. This ensures each file is also downloaded from the drive's folder.
Add an Array Aggregator and select Google Drive - Search for Files/Folders as the Source Module.
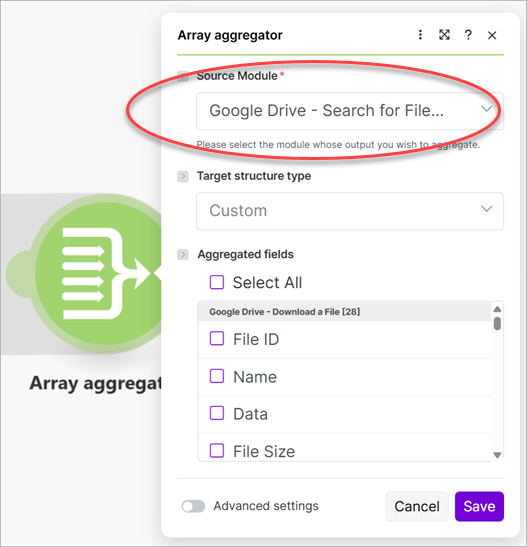
Run the scenario despite receiving a warning. Running the scenario downloads all files and creates a data structure you can use in subsequent modules.
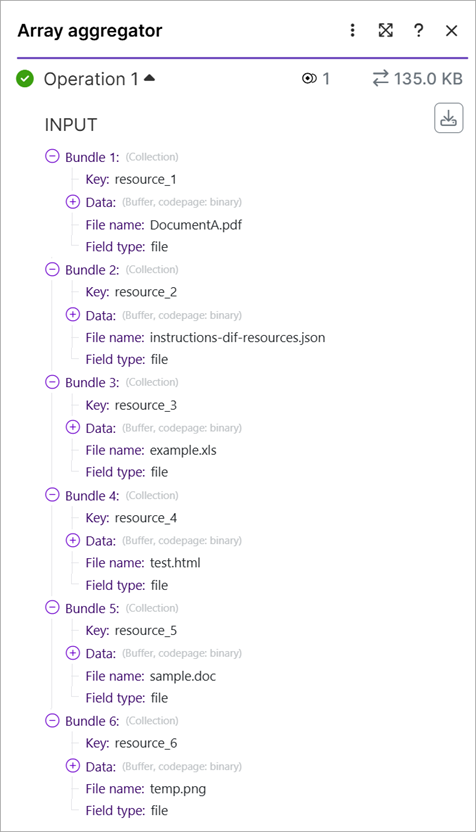
Open the aggregator's results and expand the input bundle and note each resource and its position in the array.
DocumentA.pdfinstructions-dif-resources.jsonexample.xlstest.htmlsample.doctemp.png
Add an HTTP module and assign the Method as POST and the Body content type as multipart/form-data.
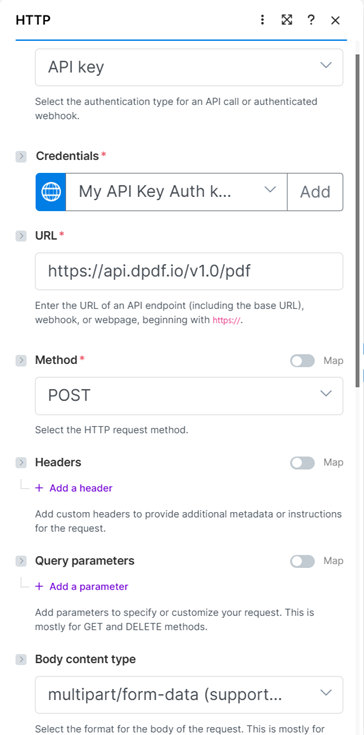
Assign Instructions as the first field's Name (1), assign File as the Field type (2), and map the Data to the data property of the second element of the aggregate's array (3) and the File Name to the array's filename (4). Create five more fields and assign Resource as the name of each and map the data to the remaining elements in the array.

Add a Google Drive, Upload a File module and assign the Data to the HTTP module's Data.

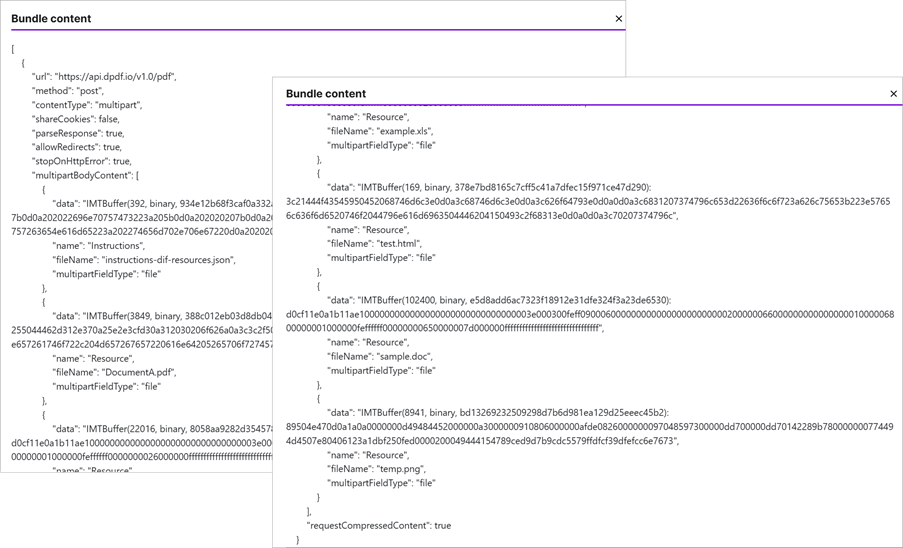
Run the application and then view the HTTP module's input to review what was sent to the pdf endpoint. As you can see from the bundle's content, it sent each file as binary to the endpoint in a multipart/form-data post.
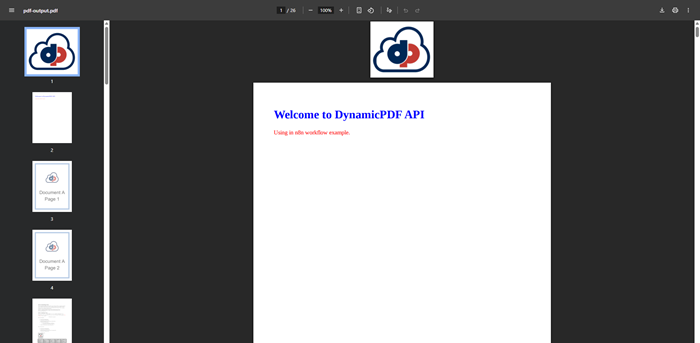
Open the PDF saved to your Google Drive to view the resultant PDF.
Conclusion
Integrating the DynamicPDF API into a Make scenario is straightforward if you understand how the HTTP module handles authentication, binary payloads, and multipart form submissions. With a single API key and Make’s built-in modules, you can work with all eight DynamicPDF API endpoints, whether you need to extract text, retrieve metadata, generate reports from DLEX templates, or combine documents using the pdf endpoint and its Instructions file.
Every endpoint fits into one of two patterns. The pdf-text, pdf-xmp, pdf-info, pdf-security-info, and image-info endpoints accept raw binary in the request body, while the dlex-layout, pdf-image, and pdf endpoints require multipart form submissions.
Although the Make interface changes frequently, the core idea remains stable. With Make’s modular workflow builder and the flexibility of the DynamicPDF API, you can create automated document solutions that are both powerful and easy to maintain.